User’s Manual
GT-650 Installation 3-1
Chapter 3
Installation
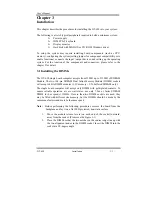
This chapter describes the procedures for installing the GT-650 into your system.
The following is a list of typical peripherals required to build a minimum system:
n
Power supply
n
IBM PC/AT keyboard
n
Display monitor
n
Hard disk with MS-DOS or CD_ROM Windows driver
To setup the system may require installing board components (such as CPU,
memory), configuring the system (setting jumper for component compatibility or to
enable functions), connects the input / output devices, and setting up the operating
system. For the location of the components and connectors, please refer to the
chapter 2 for detail.
3.1 Installing the DIMMs
The GT-650 single board computer accepts from 32 MB up to 512 MB of SDRAM
Module. The two 168-pin SDRAM Dual Inline Memory Module (DIMM) sockets
will accept 64 bits DIMM modules (3.3V memory – UN-buffered SDRAM only).
The single board computer will accept only DIMM with gold-plated contacts. To
ensure reliable operation at zero wait states, use only 7.5ns or faster SDRAM
DIMM for bus speeds 133MHz. If more then two DIMM sockets are used, they
may be filled with different size memory, but the DIMMs should be made by the
same manufacturer and must be the same speed.
Note:
Before performing the following procedures, remove the board from the
backplane and lay it on a flat ESD protected, non-static surface.
1.
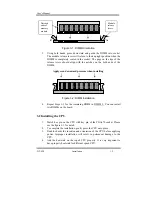
Move the module release levers (on each end of the socket) outward,
away from the socket. (Please see the Figure 3-1)
2.
Place the DIMM so that the two notches on the contact edge line up with
the two alignment nodes in the DIMM socket. Insert the DIMM into the
socket at a 90-degree angle.
Summary of Contents for GT-650
Page 1: ...GT 650 Pentium III Celeron w VGA LAN Audio w Video Capture GPIO Embedded Board User s Manual ...
Page 59: ...User s Manual GT 650 Software Setup 5 2 Click on Yes Click on Next ...
Page 60: ...User s Manual GT 650 Software Setup 5 3 Click Finish to restart computer ...
Page 61: ...User s Manual GT 650 Software Setup 5 4 For Windows NT 4 0 system Click on Yes Click on Next ...
Page 62: ...User s Manual GT 650 Software Setup 5 5 Click Finish to restart computer ...
Page 64: ...User s Manual GT 650 Software Setup 5 7 Click Finish to restart computer ...
Page 67: ...User s Manual GT 650 Software Setup 5 10 Click on Next Click on Next ...
Page 68: ...User s Manual GT 650 Software Setup 5 11 Click Finish ...
Page 74: ...User s Manual GT 650 Software Setup 5 17 Click on Finish Click on Yes to restart computer ...
Page 75: ...User s Manual GT 650 Software Setup 5 18 5 4 2 For Windows 2000 system Click on System ...
Page 78: ...User s Manual GT 650 Software Setup 5 21 Click on Next Click on Next ...
Page 79: ...User s Manual GT 650 Software Setup 5 22 Specify the PATH by Browser Locate the INF file ...
Page 80: ...User s Manual GT 650 Software Setup 5 23 Click on Next Click on Finish ...
Page 81: ...User s Manual GT 650 Software Setup 5 24 Click on Close ...
Page 83: ...User s Manual GT 650 Software Setup 5 26 Click on Add Click on Have Disk ...
Page 88: ...User s Manual GT 650 Software Setup 5 31 Click on Next Click Browse to specify PATH ...
Page 89: ...User s Manual GT 650 Software Setup 5 32 Click on Next Click OK ...
Page 93: ...User s Manual GT 650 Software Setup 5 36 Click on Next Click on Next ...
Page 94: ...User s Manual GT 650 Software Setup 5 37 Click on Next Click on Finish ...
Page 111: ...User s Manual GT 650 Mechanical drawing E 1 Appendix E Mechanical Drawing ...


