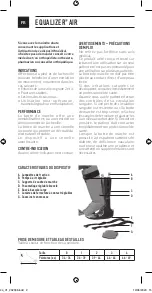
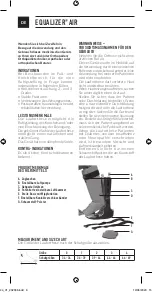
background image

EN

EQUALIZER

® 

AIR 

The  user  and/or  patient  must 

report any serious incident that has 

occurred in relation to the device to 

the manufacturer and the competent 

authority of the Member State in which 

the user and/or patient is established.

SET UP AND OPERATION

The  first  application  must  be 

carried out by a qualified healthcare 

professional to understand the correct 

fitting and how to put the device on 

properly. Subsequently, the product 

should be put on the patient in the 

same way by the user or a family 

member or a friend.

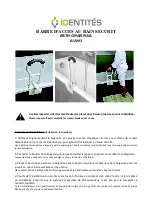
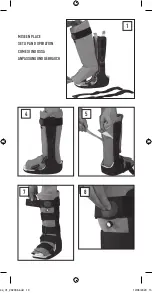
1.  Remove  softgood  by  opening 

contact closure straps and lifting out 

of brace. Do not remove pull tabs at 

this time.

2.  Place  lower  leg  and  foot  into 

softgood. Close softgood snugly over 

leg.

3. Insert foot into brace by gently 

spreading uprights. Do not remove 

pull tabs at this time.

4. Ensure struts are centered over 

the ankle bone (malleoli). The lower 

leg should be kept at a 90° angle with 

the foot.

5. Remove pull tabs located in between 

struts and softgood. This allows the 

softgood to be secured into position.

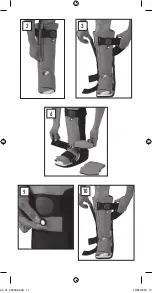
6. To accommodate for rubbing or 

spacing, additional foam pads may be 

placed inside the softgood, in between 

the softgood and plastic, or under 

straps for additional comfort.

7. Secure contact closure straps, 

starting at the toes and working 

upward. For best fit, secure straps in 

the correct order. Strap adjustments 

may be necessary as foot, ankle and 

leg swelling patterns change.

8. Inflate air chamber by turning knob 

clockwise until secure and pressing 

and releasing the air bulb repeatedly. 

Continue until softgood feels stable 

and is cushioning the lower leg. Do 

not over inflate.

9. Air can be released from air chamber 

by turning the inflation/deflation knob 

counterclockwise. To  re-inflate, repeat 

step 8.

10. When prescribed by physician, 

remove leg from product by releasing 

contact closure straps and opening 

softgood.

Pull foot and leg forward and out, 

leaving softgood inside the brace. If 

softgood is removed, follow Steps 1 

through 7 to reapply.

CARE INSTRUCTION, MAINTENANCE 

AND DISPOSAL

Remove softgood from walker plastic 

before washing.

Hand wash in warm soapy water 

(maximum 40 ° C), rinse thoroughly. 

Wring out gently; do not bleach; dry 

flat, away from a heat source (ex: 

radiator), do not tumble dry; do not 

iron; do not dry clean.

Walker plastic can be washed with a 

damp cloth and mild soap.

The  device  and  packaging  must 

be  disposed  of  in  accordance 

with respective local or national 

environmental regulations.

NR144_V1_202006.indd   5

NR144_V1_202006.indd   5

12/06/2020   15:35

12/06/2020   15:35

Summary of Contents for 6715

Page 1: ...FR Notice d utilisation EN Instructions for Use IT Istruzioni per l uso DE Gebrauchsanweisung 6715 EQUALIZER AIR 144_V1_202006 indd 1 144_V1_202006 indd 1 12 06 2020 15 12 06 2020 15 ...

Page 2: ...pas recommandé pour une utilisation sur plusieurs patients La botte de marche ne doit pas être placée au contact direct d une peau lésée Si des irritations cutanées se développent consultez immédiatement un professionnel de santé Assurez vous que le patient effectue des contrôles de sa circulation sanguine Si une perte de circulation sanguine est ressentie ou si la botte de marche est trop serrée ...

Page 3: ...ntre le tissu et le plastique ou sous les sangles pour plus de confort 7 Fixez les sangles munies de crochets auto agrippant en commençant par les orteils puis en remontant Pour une adaptation parfaite fixez les sangles dans l ordre Des réglages de sangle peuvent être nécessaires au fur et à mesure de l évolution des œdèmes du pied de la cheville et de la jambe 8 Gonflez la chambre à air en tourna...

Page 4: ...t healthcare professional immediately Be sure the patient performs circulation checks If a loss of circulation is felt or if the device feels too tight release contact closure straps and adjust to a comfortable level If discomfort continues the patient should contact their healthcare professional immediately When prescribed to patients with diabetes vascular deficiencies and neuropathies extra cau...

Page 5: ... and plastic or under straps for additional comfort 7 Secure contact closure straps starting at the toes and working upward For best fit secure straps in the correct order Strap adjustments may be necessary as foot ankle and leg swelling patterns change 8 Inflate air chamber by turning knob clockwise until secure and pressing and releasing the air bulb repeatedly Continue until softgood feels stab...

Page 6: ...re non deve essere posizionato a diretto contatto con eventuale cute lesionata Nel caso in cui si sviluppassero delle irritazioni cutanee consultare immediatamente un professionista sanitario Accertarsi che il paziente mantenga sotto controllo la sua circolazione sanguigna Nel caso in cui si rilevi una riduzione della circolazione sanguigna o qualora il tutore sia troppo stretto rilasciare le cing...

Page 7: ... possono essere posti nel tessuto tra il tessuto e la plastica o sotto alla cinghie per maggiore comfort 7 Fissare le cinghie dotate di ganci a strappo risalendo a partire dalle dita del piede Per un adattamento perfetto fissare le cinghie in modo ordinato Con l evoluzione degli edemi di piede caviglia e gamba è possibile dover regolare le cinghie 8 Gonfiare la camera ad aria ruotando il pulsante ...

Page 8: ...testet eine Anwendung bei mehreren Patienten wird nicht empfohlen Die Lauforthese darf verletzte Haut nicht unmittelbar berühren Wenn Hautreizungen auftreten suchen Sie unverzüglich einen Arzt auf Stellen Sie sicher dass der Patient seine Durchblutung kontrolliert Wenn eine unzureichende Durchblutung festgestellt wird oder die Lauforthese zu eng sitzt lockern Sie die Gurte und stellen Sie sie eine...

Page 9: ...en Riemen angebracht werden 7 Schließen Sie die Klettverschluss Riemen an den Zehen beginnend von unten nach oben Für einen perfekten Sitz schließen Sie die Riemen der Reihenfolge nach Je nach Entwicklung der Schwellung des Fußes des Knöchels und des Beins kann eine Anpassung des Riemens erforderlich werden 8 Pumpen Sie die Luftkammer auf indem Sie den Knopf im Uhrzeigersinn drehen und mehrere Pum...

Page 10: ...MISE EN PLACE SET UP AND OPERATION COME SI INDOSSA ANPASSUNG UND GEBRAUCH 1 8 4 5 7 144_V1_202006 indd 10 144_V1_202006 indd 10 12 06 2020 15 12 06 2020 15 ...

Page 11: ...2 3 10 9 6 144_V1_202006 indd 11 144_V1_202006 indd 11 12 06 2020 15 12 06 2020 15 ...

Page 12: ...NR144_V1_202006 ÖSSUR hf Grjótháls5 110 Reykjavik Iceland 144_V1_202006 indd 12 144_V1_202006 indd 12 12 06 2020 15 12 06 2020 15 ...

Reviews: