background image

RoadLED 50m


Page 15 / 20 

Created 

23.04.2021  
rasa 

Modified 

06.10.2021 
rasa 

Object-ID 

2214657 

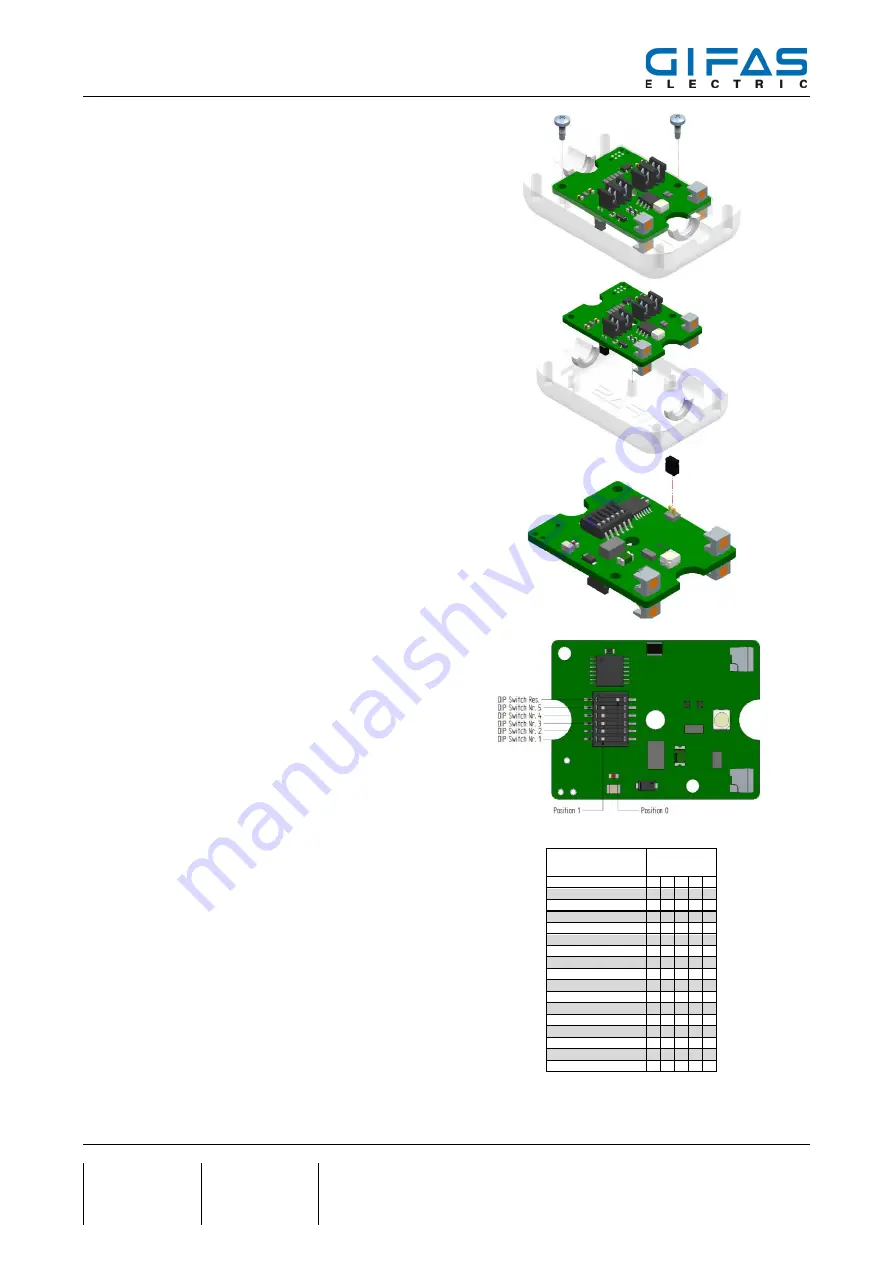
3.  Dismantle the electronics 


Loosen the screws with a Torx T6 screwdriver 

and remove the electronics.


4.  Remove the electronics 


Remove the electronics. Consider the ESD pro-

tection measures.


5.  Set the jumper 


If the light module at the end of the cable is 

replaced, the jumper must be inserted as 

shown above. The jumper serves as a 

terminating resistor and prevents reflections in 

the cable. 


6.  Transfer the DIP switch settings 


Transfer the DIP switch from the old module to 

the new module 


If a switch is moved to the right, the respective 

address is interpreted as 0. If a switch is moved 

to the left, the respective address is interpreted 

as 1. 


If a configuration is no longer recognisable, the 

setting can be taken from the following table 


The light module with address 1 is located at 

the beginning of the cable reel. The light mo-

dule with address 16 is located at the end of the 

cable. 


Example: The address of the light module 

should be set to address 16. According to the 

table in section 6. DIP switch no. 1, 2, 3 and 4 

must be in position 1 and DIP switch no. 5 in 

position 0.


Adresse RoadLED  

Position DIP-

Switch  

DIP Switch Nr.  

5  4  3  2  1 

Adresse 1 

0  0  0  0  0 

Adresse 2  

0  0  0  0  1 

Adresse 3 

0  0  0  1  0 

Adresse 4 

0  0  0  1  1 

Adresse 5 

0  0  1  0  0 

Adresse 6 

0  0  1  0  1 

Adresse 7 

0  0  1  1  0 

Adresse 8 

0  0  1  1  1 

Adresse 9 

0  1  0  0  0 

Adresse 10 

0  1  0  0  1 

Adresse 11 

0  1  0  1  0 

Adresse 12 

0  1  0  1  1 

Adresse 13 

0  1  1  0  0 

Adresse 14 

0  1  1  0  1 

Adresse 15 

0  1  1  1  0 

Adresse 16 

0  1  1  1  1 


Summary of Contents for RoadLED 50m

Page 1: ...RoadLED 50m Page 1 20 Created 23 04 2021 rasa Modified 06 10 2021 rasa Object ID 2214657 RoadLED 50m Manual VERSION MODIFICATIONS 1 0 First edition 1 1 Editorial changes ...

Page 2: ...module 6 3 2 1 Dimensions light module 6 3 3 Technical Data Accu 7 4 Set up cable reel components 8 4 1 Cable reel components 8 4 2 Light module components 9 4 2 1 Light module 1 15 10 4 2 2 Last light module 10 5 Reparation replacing light module 11 5 1 Reparation light module 1 15 11 5 2 Repair of the last light module cable end 14 5 3 Repair of a section Fehler Textmarke nicht definiert 6 Maint...

Page 3: ...e intactness of the product and or could constitute a source of danger The manufacturer rejects any liability for damage which has been caused by incorrect or non intended use of the product In countries which do not belong to the European Community the national legal reference regulations as well as the standards and regulations applicable in these countries have to be observed for warranty of a ...

Page 4: ...red for storage Ensure that the modules are protected from damage when packing them Ensure that the RoadLED is switched off and the battery is sufficiently charged min 50 max 80 of the overall capacity during storage in order to protect the battery from discharge If the RoadLED is stored for a lengthy period the charging condition must be checked at regular intervals The self discharge of 1 per mo...

Page 5: ...free hard rubber reel body safety insulated Frame material Solid tubular steel frame black powder coated Protection category IP54 Protection class II Operating temperature range 20 C to 50 C Total weight 11 4kg with LED cable harness Dimensions 350 x 299 x 487mm L x W x H Guarantee According to General Conditions of Sale and Delivery 3 1 1 Dimensions cable reel ...

Page 6: ...parent Sealing material TPV Santoprene Protection category IP67 Protection class III Over mobile load capacity 3 5t wheel pressure Operating temperature range 20 C to 50 C Weight 36g Dimensions 52 3 x 35 3 x 23mm L x W x H LED Type Osram SideLED LY A67F Osram TopLED LY E67F LED number per light module 4x Side LED 1x Top LED 1x Bottom LED LED color yellow 3 2 1 Dimensions light module ...

Page 7: ...u capacity 11000mAh 203 5Wh Charging time for full charge 230VAC 6h Charging time for full charge 12 24VDC 6h Operating time continuous light 21h Operating time flash 1 Hz ca 42h Operating time running light ca 110h Lifetime 700 1000 cycles 80 of the initial capacity at 20 C Operating temperature range 10 C to 50 C Charging temperature range 0 C to 40 C Storage temperature 10 C to 25 C storage dur...

Page 8: ...0 LED green 1 battery capacity 61 80 LED green 1 battery capacity 81 100 2 Fuse Serves as a protective device for the electric power supply in the event of default 3 Charger mains connection The connection is used to charge the integrated battery with 12 24VDC or with 230VAC mains voltage In addition an optional power supply Art No 860946 can be inserted at the connection This allows the RoadLED t...

Page 9: ...rom cable end to cable reel 6 Running light from cable reel to cable end and back 6 One press of the button corresponds to one function Pressing the button again starts a new function The battery capacity is displayed if the button is held down for more than 2 seconds 7 Rotary controller for setting the speed of the running lights blinking frequency and flash duration in 10 steps The following spe...

Page 10: ... part Item no 222633 Cable 4x1 0mm2 Item no 219289 Lower housing part Item no 222634 Light module Item no 227847 Head screw PAN 2 2x5mm Torx T10 Item no 219326 Upper housing part Item no 222633 Head screw PAN 3x10mm Torx T10 Item no 219244 Cable 4x1 0mm2 Item no 219289 Head screw PAN 2 2x5mm Torx T10 Item no 219326 Light module Item no 227847 Lower housing part Item no 222634 Jumper Item no 227847...

Page 11: ... even destroyed by an electrostatic discharge in the immediate vicinity An electrostatic discharge can come from people or be caused through handling ESD sensitive components Electrically conductive products which conform to DIN EN 61340 5 1 Protection of electronic devices from electrostatic phenomena are essential in electro nic environments to prevent an electrostatic discharge 5 1 Reparation l...

Page 12: ...e the setting can be taken from the following table The light module with address 1 is located at the beginning of the cable reel The light mo dule with address 16 is located at the end of the cable Example The address of the light module should be set to address 15 According to the table in section 6 DIP switch no 1 2 3 and 4 must be in position 1 and DIP switch no 5 in position 0 Adresse RoadLED...

Page 13: ...e max tightening torque is 0 4Nm 7 Mounting the new LED module Lay the cable over the module If necessary remove 33mm of cable insulation so that the cable cores are exposed The insulation of the cable cores are labelled No 1 4 Place the strands in the self cutting terminals as shown in the illustration Press the cable cores into the self cutting ter minals with the caps The caps must be remo ved ...

Page 14: ...s The max tightening torque is 1 5Nm 5 2 Repair of the last light module cable end 1 Open the housing of the defective module Loosen the 4 housing screws with a Torx T6 screwdriver and remove the upper part Dismantle the locking pin and set it aside 2 Remove the strands from the electronics Remove the strands from the self cutting terminals Use a tool to pull the strands upwards Remove the old lig...

Page 15: ... to the left the respective address is interpreted as 1 If a configuration is no longer recognisable the setting can be taken from the following table The light module with address 1 is located at the beginning of the cable reel The light mo dule with address 16 is located at the end of the cable Example The address of the light module should be set to address 16 According to the table in section ...

Page 16: ...e max tightening torque is 0 4Nm 8 Mounting the new LED module Lay the cable over the module If necessary remove 19mm of cable insulation so that the cable cores are exposed The insulation of the cable cores are labelled No 1 4 Place the strands in the self cutting terminals as shown in the illustration Press the cable cores into the self cutting ter minals with the caps The caps must be remo ved ...

Page 17: ...osition as shown in the illustration 10 Mount the upper housing part Use a Torx T10 screwdriver to mount the upper part of the housing with 4x 3x10mm screws The max tightening torque is 1 5Nm 5 3 Repair of a cable section If a section of a cable is damaged it can be re placed with a new cable Remove 17mm of cable insulation ...

Page 18: ...n if necessary Replace the electronics of the light mo dule Contact the manufacturer GIFAS or have it checked by a qualified electri cian on site if required send in the complete unit LED module flickers Light module connection may not be tight Cable break Contact the manufacturer GIFAS or have it checked by a qualified electri cian on site If required send in the light module Battery is not being...

Page 19: ...or a service technician appointed by the manufacturer or a comparable qualified person Subject to technical changes and errors These operating instructions are the property of GIFAS ELECTRIC GmbH and may not be copied translated transferred duplicated or passed on to third parties either in whole or in part without the prior written permis sion of GIFAS ELECTRIC GmbH ...

Page 20: ...Rheineck 49 2137 105 0 39 58 497 82 11 43 6225 7191 0 41 71 886 44 44 49 2137 105 230 39 58 493 99 24 43 6225 7191 561 41 71 886 44 49 www gifas de www gifas it www gifas at www gifas ch verkauf gifas de info gifas it verkauf gifas at info gifas ch 7 2 Imprint GIFAS ELECTRIC GmbH CH 9424 Rheineck www gifas ch Technical changes and errors reserved These installation instructions are the property of...

Reviews: