- 22 -
Hardware Installation
(Note) The USB flash drive used must be a USB 2.0 flash drive.
USB 3.1 Gen 1 Port
The USB 3.1 Gen 1 port supports the USB 3.1 Gen 1 specification and is compatible to the USB 2.0
specification. Use this port for USB devices.
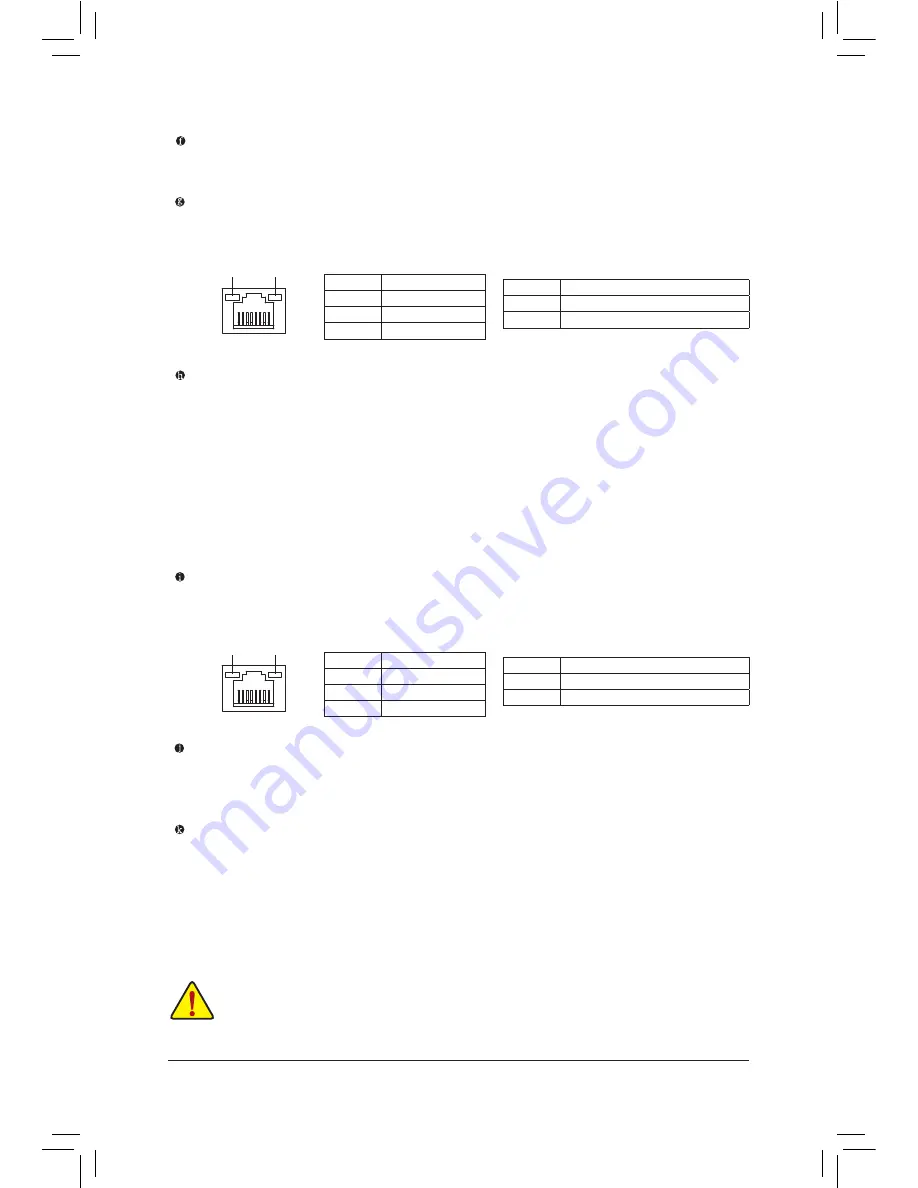
RJ-45 LAN Port (LAN2)
The Gigabit Ethernet LAN port provides Internet connection at up to 1 Gbps data rate. The following
describes the states of the LAN port LEDs.
Thunderbolt
™
3 Connector (USB Type-C
™
Port)
The connector supports standard DisplayPort and Thunderbolt
™
video outputs. You can connect a
standard DisplayPort/Thunderbolt
™
monitor to this connector with an adapter. The Thunderbolt
™
connector
can daisy chain up to six Thunderbolt
™
devices. Because of the limited I/O resources of the PC architecture,
the number of Thunderbolt
™
devices that can be used is dependent on the number of the PCI Express
devices being installed. You can adjust the Thunderbolt
™
settings under
Peripherals\Thunderbolt(TM)
Configuration
in BIOS Setup. The maximum supported resolution is 4096x2304@60 Hz when using
a DisplayPort monitor, but the actual resolutions supported are dependent on the monitor being used.
Also, the connector is reversible and supports the USB 3.1 Gen 2 specification and is compatible to the
USB 3.1 Gen 1 and USB 2.0 specification. You can use this port for USB devices, too.
RJ-45 LAN Port (LAN1)
The Gigabit Ethernet LAN port provides Internet connection at up to 1 Gbps data rate. The following
describes the states of the LAN port LEDs.
USB 3.1 Gen 1 Port (White)
The USB 3.1 Gen 1 port supports the USB 3.1 Gen 1 specification and is compatible to the USB 2.0
specification. Use this port for USB devices. Before using Q-Flash Plus, make sure to insert the USB
flash drive
(Note)
into this port first.
USB 3.1 Gen 2 Type-A Port (Red)
The USB 3.1 Gen 2 Type-A port supports the USB 3.1 Gen 2 specification and is compatible to the USB
3.1 Gen 1 and USB 2.0 specification. Use this port for USB devices.
•
When removing the cable connected to a back panel connector, first remove the cable from your
device and then remove it from the motherboard.
•
When removing the cable, pull it straight out from the connector. Do not rock it side to side to
prevent an electrical short inside the cable connector.
Activity LED
Connection/
Speed LED
LAN Port
Activity LED:
Connection/Speed LED:
State
Description
Orange
1 Gbps data rate
Green
100 Mbps data rate
Off
10 Mbps data rate
State
Description
Blinking
Data transmission or receiving is occurring
Off
No data transmission or receiving is occurring
Activity LED
Connection/
Speed LED
LAN Port
Activity LED:
Connection/Speed LED:
State
Description
Orange
1 Gbps data rate
Green
100 Mbps data rate
Off
10 Mbps data rate
State
Description
Blinking
Data transmission or receiving is occurring
On
No data transmission or receiving is occurring
Summary of Contents for GA-Z270X-Gaming 8
Page 8: ... 8 ...
Page 86: ...Configuring a RAID Set 86 ...
Page 141: ... 141 Appendix ...
Page 142: ...Appendix 142 ...


