- 63 -
Unique Features
4-2-2 Updating the BIOS with the @BIOS Utility
A. Before You Begin
1. In Windows, close all applications and TSR (Terminate and Stay Resident) programs. This helps prevent
unexpected failures when performing a BIOS update.
2. During the BIOS update process, ensure the Internet connection is stable and do NOT interrupt the
Internet connection (for example, avoid a power loss or switching off the Internet). Failure to do so may
result in a corrupted BIOS or a system that is unable to start.
3. Do not use the G.O.M. (GIGABYTE Online Management) function when using @BIOS.
4. GIGABYTE product warranty does not cover any BIOS damage or system failure resulting from an inad-
equate BIOS flashing.
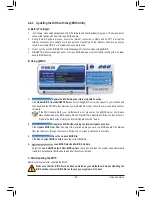
B. Using @BIOS
1.
Update the BIOS Using the Internet Update Function:
Click
Update BIOS from GIGABYTE Server
, select the @BIOS server site closest to your location and
then download the BIOS file that matches your motherboard model. Follow the on-screen instructions to
complete.
2.
Update the BIOS without Using the Internet Update Function:
Click
Update BIOS from File
, then select the location where you save the BIOS update file obtained
from the Internet or through other source. Follow the on-screen instructions to complete.
3.
Save the Current BIOS File:
Click
Save Current BIOS to File
to save the current BIOS file.
4.
Load BIOS Defaults after BIOS Update:
Select the
Load CMOS default after BIOS update
check box and then the system will automatically
load BIOS defaults after BIOS update and after the system restarts.
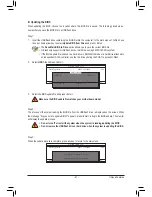
C. After Updating the BIOS
Restart your system after updating the BIOS.
If the BIOS update file for your motherboard is not present on the @BIOS server site, please
manually download the BIOS update file from GIGABYTE's website and follow the instructions in
"Update the BIOS without Using the Internet Update Function" below.
Make sure that the BIOS file to be flashed matches your motherboard model. Updating the
BIOS with an incorrect BIOS file could cause your system not to boot.

