2 1
GS-R12T4H2-RH Rack Mount Server
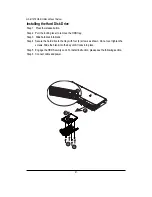
Installing the Hard Disk Drive
Step 1 Press the release button.
Step 2 Pull the locking lever to remove the HDD tray.
Step 3 Slide hard disk into blank.
Step 4 Secure the hard drive to the tray with four (4) screws as shown. Do not over tighten the
screws. Slide the blank into the bay until it locks into place.
Step 5 Engage the HDD Security Lock. For detail instruction, please see the following section.
Step 6 Connect cable and power.
1
2
3
4
4
Summary of Contents for GS-R12T102
Page 20: ...20 GS R12T4H2 RH Rack Mount Server 3 4 5 6 5 6 ...
Page 27: ...27 GS R12T4H2 RH Rack Mount Server ...
Page 48: ...48 GS R12T4H2 RH Rack Mount Server Processor Configuration ...
Page 54: ...54 BIOS Setup Memory Configuration ...
Page 56: ...56 BIOS Setup Advanced Chipset Configuration ...
Page 57: ...57 GS R12T4H2 RH Rack Mount Server Figure 2 3 1 Intel VT for Directed I O VT d ...
Page 62: ...62 GS R12T4H2 RH Rack Mount Server SATA Configuration Figure 2 5 SATA Configuration ...
Page 74: ...74 BIOS Setup Server Figure 5 Server ...
Page 75: ...75 GS R12T4H2 RH Rack Mount Server System Management ...

