background image

System Installation Guide 

3-13 

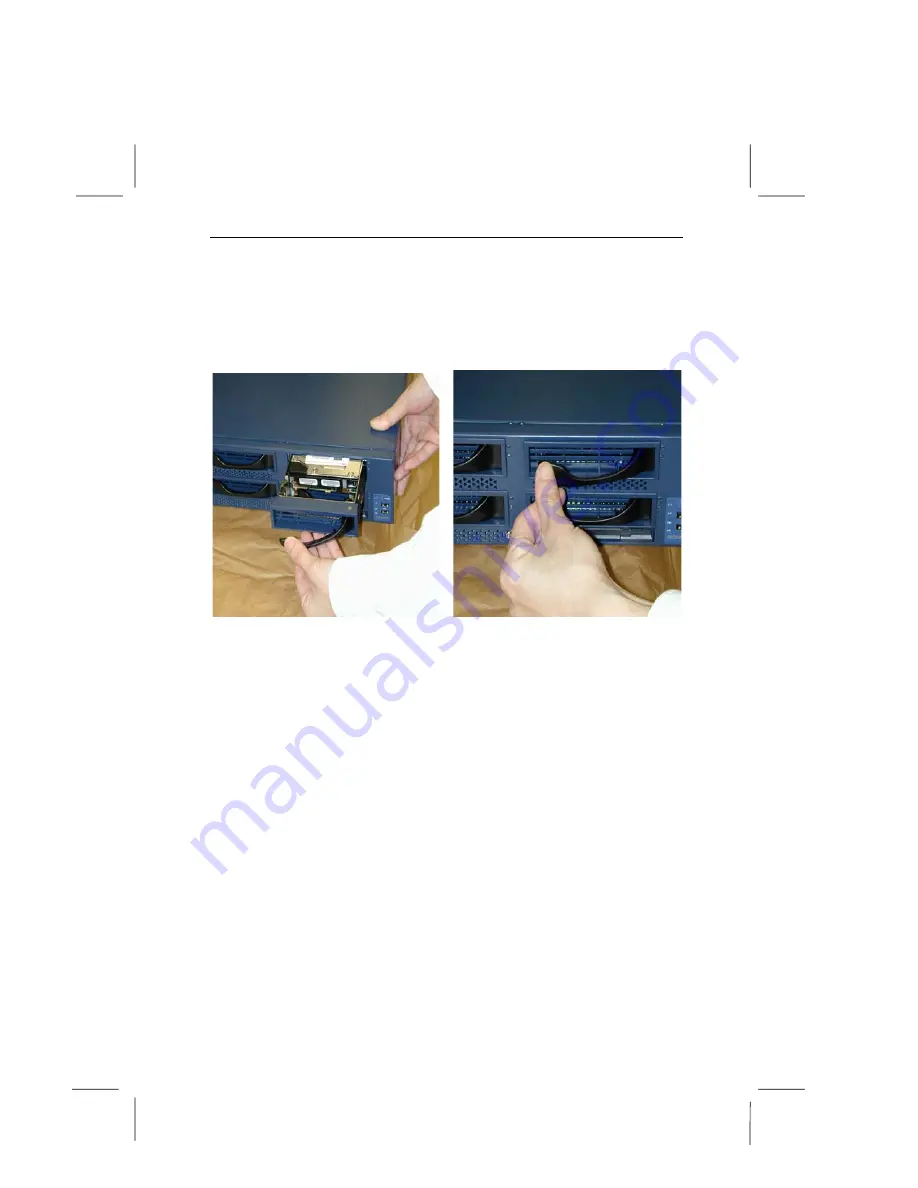
After hard disk drive is secure with the screws hold the hard 
drive handle at open position and insert the tray into chassis

Fig-27

. When the hard disk drive connector meets the SCSI 

back plane, push the hard disk drive tray handle to the closed 
position.

Fig-28


Fig-27 Fig-28 

Summary of Contents for GS-SR102T

Page 1: ...System Installation Guide 1 i GS SR102T SR202T System Installation Guide ...

Page 2: ...NSTALLATION 3 3 3 4 MEMORY INSTALLATION 3 5 3 5 PCI EXPANSION CARD INSTALLATION 3 5 3 6 AIR FLOW DUCT INSTALLATION GUIDE 3 7 3 7 REINSTALL TOP COVER 3 9 3 8 SCSI ID SETTINGS 3 10 3 9 JUMPER SETTING FOR HD1 HD2 AND HD3 3 11 3 10 DOCK HANDLES INSTALLATION 3 12 3 11 HARD DISK DRIVE INSTALLATION 3 12 3 12 FRONT PANEL 3 14 3 13 LED PANEL 3 14 3 14 REAR PANEL 3 15 3 15 DUAL LAN CARD INSTALLATION OPTIONA...

Page 3: ... not apply cleaning solutions directly to the system 1 2 Features The 1U Rackmount server contains the several features These features provide respective advantages to your system The key features of the adapter are Processor Support Dual Socket 370 for Intel FC PGA Pentium III or other compatible processor up to 1 GHz and above 100 133MHz FSB AUTO detect CPU voltage BIOS Support Dual BIOS technol...

Page 4: ...ge XL VGA Chip PROMISE PDC20265R Intel 82559 Dual LAN chip Memory Support 4 168 pin 25 degree slant DIMM sockets Supports PC 100 PC 133 SDRAM and VCM SDRAM Supports up to 4 0GB SDRAM Supports only 3 3V SDRAM DIMM Storage Controller Max 4 IDE ATA channels 2 x ATA 66 and 2 x ATA 100 for IDE RAID 0 or 1 ...

Page 5: ... contents If there is missing component or damage to the system please inform your vendor immediately Contents System Chassis Power Supply installed GA 6ETXDR Motherboard installed Slim type CD ROM drive installed Slim type Floppy drive installed Three Six Hard Disk Drive Trays for SR102 SR202 Two CPU heat sinks Two Dock Handles with tow screws Driver Application CD Installation Manual ...

Page 6: ......

Page 7: ... thumb screws from the back of the system Fig 1 b Standing at the front of the system Gently apply force to the indentures with your thumbs and push toward the rear of the chassis for about 3 4 of an inch Top cover may be lifted straight up Fig 2 Fig 1 c With the top cover removed you will see a plastic air duct over the CPU and Memory Remove the air duct to install the CPU and Memory Fig 3 Fig 2 ...

Page 8: ...Guide 3 2 3 2 CPU Installation To install Socket 370 CPU lift up bar located next to the Socket Then insert Socket370 CPU inside Socket and push the lever bar back into original position Fig 4 Fig 5 CPU 1 CPU 2 Fig 4 Fig 3 ...

Page 9: ...em Installation Guide 3 3 Heat Sink Installation Click Fan Heatsink to CPU socket 370 and plug the Fan power cable to the each single CPU cooling Fan connector on the motherboard Fig 6 and Fig 7 Fig 5 Fig 6 ...

Page 10: ...e connect to J13 CPU1 FAN connector and for CPU2 Fan power cable connect to J15 CPU2 Fan Connector Note to make sure the connector is plugged into the header in the correct and firmly seated Fig 8 J13 CPU1 Fan Connector J15 CPU2 Fan Connector Fig 7 Fig 8 ...

Page 11: ...ply push the memory modules into the DIMM sockets Fig 9 Fig 9 3 5 PCI Expansion Card Installation GS SR102 provides one expansion raiser slot for a peripheral card 64Bit 66 MHz full length To install the peripheral please follow these few steps a There are three screws holding the raiser bracket First remove the screw on the top of the bracket Fig 10 then remove the two screws located at the rear ...

Page 12: ...move the PCI raiser bracket Fig 12 c Install the card into place Secure the card with screw Fig 13 make sure it is seated properly into PCI slot d Replace the raiser bracket into the PCI slot on the motherboard Fig 14 Fig 12 Fig 13 Fig 10 Fig 11 ...

Page 13: ...istent system operation We will differentiate those two air flow duct installation guide on the following steps 1 SR 102 Please insert the Air Flow Duct following the arrow Fig 16 After smoothly insert the Air Flow Duct please pay attention to the stable clip circle on Fig 17 Stable Circle must complete insert in the Air Flow Stable Rack Fig 18 indicates Air Flow Duct should be flat and completely...

Page 14: ... b On the other side of Air Flow Duct follow the above instruction again Fig 20 c Finally completely insert the Power Cable and header inside the Air Flow Duct to ensure the heat flow out smoothly Attention There are pressure from both front and back end therefore the slight pop up at middle is nature Fig 16 Fig 17 Fig 18 ...

Page 15: ...l the essential components from section 3 1 to 3 5 replace the transparent plastic air duct This will ensure the air flow inside the chassis Failure to do so may cause CPU and Memory to over heat Replace the top cover insuring that the thumb screws are tighten Fig 22 Fig 19 Fig 20 Fig 21 ...

Page 16: ...CSI ID Settings The SCSI ID is preset as shown in Fig 23 during manufacture If there is a abnormal SCSI hard disk drive behavior e g does not find hard disk drive properly please make sure HD1 HD2 and HD3 have different IDs Fig 22 Fig 23 ...

Page 17: ...N ON ON ON 1 ON ON ON OFF 2 ON ON OFF ON 3 ON ON OFF OFF 4 ON OFF ON ON 5 ON OFF ON OFF 6 ON OFF OFF ON 7 ON OFF OFF OFF 8 OFF ON ON ON 9 OFF ON ON OFF A OFF ON OFF ON B OFF ON OFF OFF C OFF OFF ON ON D OFF OFF ON OFF E OFF OFF OFF ON F OFF OFF OFF OFF ON Jumper Close 1 2 OFF Jumper Open 2 3 ...

Page 18: ... two on each side of the chassis secure with screws provided Fig 24 3 11 Hard Disk Drive Installation Pull the hard disk drive tray handle and remove the tray from the chassis Fig 25 Insert 80 pin SCA SCSI hard disk drive into the tray Secure each hard disk drive with screws Fig 26 Fig 24 Fig 25 Fig 26 ...

Page 19: ...e is secure with the screws hold the hard drive handle at open position and insert the tray into chassis Fig 27 When the hard disk drive connector meets the SCSI back plane push the hard disk drive tray handle to the closed position Fig 28 Fig 27 Fig 28 ...

Page 20: ...3 13 LED Panel Power LED Green Online Off Offline LAN Activity Green Online Off Offline Flashing LAN Activity LAN Activity Power LED USB Connector Fan Status System Status USB LED Serial Port Floppy Drive CD ROM Drive Serial Port Floppy Drive CD ROM Drive USB LED ...

Page 21: ... LED1 Green HDD installed HDD LED2 Flashing HDD activity 3 14 Rear Panel 3 15 Dual LAN Card Installation Optional GS SR202 provides optional 32bit 33MHz dual LAN card To install dual LAN card please follow these few steps a There are three screws holding the raiser HDD LED1 HDD LED2 Power Connectors Ultra dense SCSI Expansion slots ...

Page 22: ...st remove the screw on the top of the bracket Fig 29 then remove the two screws located at the rear Fig 30 b Care fully remove the PCI raiser bracket Fig 31 c Install the dual LAN card into place Fig 32 Fig 33 Fig 34 Fig 29 Fig 30 Fig 31 Fig 32 ...

Page 23: ... Fig 34 d After that before the raiser bracket into the PCI slot motherboard remove the mother board from chassis and change IO shielding plate first And then put raiser bracket into the PCI slot on motherboard Fig 35 Fig 36 Fig 35 Fig 36 ...

Page 24: ...System Installation Guide 3 18 3 16 Connector Icons Suggested icons Description Keyboard VGA Mouse LAN ParallelPort Serial Port USB ...

Reviews: