background image

- 4 -

GV-NX72G512E1/E2 Graphics Accelerator

1. Introduction

1.1. Features

The graphics card supports NVIDIA TurboCache technology, which enhances graphics card
performance by allowing the graphics processing unit (GPU) to dynamically share the
available system memory. The total effective VGA memory differs depending on system
memory. See the following tables for details:

Powered by NVIDIA

®

 GeForce

TM

 7200 GS Graphics Processing Unit (GPU)

Integrated with 128 MB GDDR2 memory (for GV-NX72G512E1 only)

Integrated with 256 MB GDDR2 memory (for GV-NX72G512E2 only)

Supports DirectX 9.0c

Supports AV output

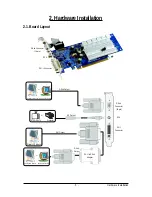
Supports 1 DVI-I connector

Supports 1 D-Sub connector

1.2. Minimum System Requirements

Hardware
-

Intel

®

 Pentium

®

 4 or AMD Athlon

TM

-

128 MB of system memory; 2 GB or more for best performance

-

Optical drive for software installation (CD-ROM or DVD-ROM drive)

-

A power supply with 300-watt is recommended

Operating System
-

Windows

®

 XP with Service Pack 2 (SP2)

-

Windows

®

 XP Professional x64 Edition

-

Windows

®

 2000

 Available Graphics Memory Calculation for the GV-NX72G512E1

 Available Graphics Memory Calculation for the GV-NX72G512E2

System Memory

256 MB

512 MB

1 GB or above

Onboard Graphics Memory (a)

256 MB

256 MB

256 MB

Allocated System Memory (b)

   0 MB

   0 MB

256 MB

Total Effective Graphics Memory (a)+(b) 256 MB

256 MB

512 MB

System Memory

256 MB

512 MB

1 GB or above

Onboard Graphics Memory (a)

128 MB

128 MB

128 MB

Allocated System Memory (b)

   0 MB

128 MB

384 MB

Total Effective Graphics Memory (a)+(b) 128 MB

256 MB

512 MB

Summary of Contents for GV-NX72G512E1

Page 1: ...d Due to rapid change in technology some of the specifications might be out of date before publication of this this manual The author assumes no responsibility for any errors or omissions that may appear in this document nor does the author make a commitment to update the information contained herein Macrovision corporation product notice This product incorporates copyright protection technology t...

Page 2: ...Nov 23 2007 VGA Card GV NX72G512E1 GV NX72G512E2 VGA Card GV NX72G512E1 GV NX72G512E2 Nov 23 2007 ...

Page 3: ...ation 9 3 1 1 Operating System Requirements 9 3 1 2 DirectX Installation 10 3 1 3 Driver Installation 11 3 1 4 Utilities on Driver CD 13 3 1 5 Taskbar Icons 16 3 1 6 Display Properties Pages 19 3 1 7 nView Properties Pages 24 3 2 Windows 2000 Driver Installation 29 4 Troubleshooting Tips 30 5 Appendix 31 5 1 How to Reflash the BIOS in MS DOS Mode 31 5 2 Resolutions and Color Depth Table In Windows...

Page 4: ...tor 1 2 Minimum System Requirements Hardware Intel Pentium 4 or AMD Athlon TM 128 MB of system memory 2 GB or more for best performance Optical drive for software installation CD ROM or DVD ROM drive A power supply with 300 watt is recommended Operating System Windows XP with Service Pack 2 SP2 Windows XP Professional x64 Edition Windows 2000 Available Graphics Memory Calculation for the GV NX72G5...

Page 5: ... I Connector Digital LCD Monitor DVI Output D Sub Connector 15 pin DVI I to D Sub Adapter AV Output NTSC PALTV Projector or D Sub Output Analog LCD Monitor Analog CRT Monitor or Analog LCD Monitor Analog CRT Monitor or D Sub Output DVI I Connector D Sub Connector 15 pin RCA ...

Page 6: ... separated from the system The card contains sensitive electric components which can be easily damaged by static electricity so the card should be left in its original packing until it is installed Unpacking and installation should be done on a grounded anti static mat The operator should be wearing an anti static wristband grounded at the same point as the anti static mat Inspect the card carton ...

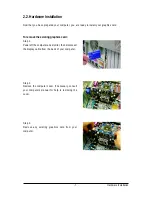
Page 7: ...raphics card To remove the existing graphics card Step 1 Power off the computer and monitor then disconnect the display cable from the back of your computer Step 2 Remove the computer cover If necessary consult your computer s manual for help in removing the cover Step 3 Remove any existing graphics card from your computer ...

Page 8: ...or of the graphics card is securely inserted Step 2 Replace the screw to fasten the card in place and replace the computer cover Step 3 Plug the display cable into your card then turn on the computer and monitor If your graphics card came with a DVI I connector you can connect a flat panel display to the appropriate connector as shown below You are now ready to proceed with the installation of the...

Page 9: ...ollow the instructions to setup your graphics card driver Please follow the subsection 3 1 3 Driver Installation to install the driver for your graphics card 3 1 Windows XP Driver and Utilities Installation 3 1 1 Operating System Requirements Notice the following guidelines before installing the drivers 1 First make sure your system has installed DirectX 9 0c or later version 2 Make sure your syst...

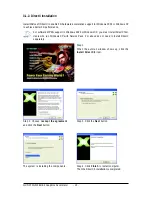
Page 10: ...ws 2000 or Windows XP you must install DirectX first Users who run Windows XP with Service Pack 2 or above do not need to install DirectX separately Step 1 When the autorun window shows up click the Install DirectX 9 item Step 2 Choose I accept the agreement and click the Next button Step 3 Click the Next button The system is installing the components Step 4 Click Finish to restart computer Then t...

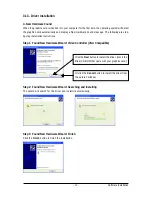
Page 11: ... installation instructions Step 1 Found New Hardware Wizard Video Controller VGA Compatible Click the Next button to install the driver Insert the driver CD ROM that came with your graphics card Or click the Cancel button to install the driver from the autorun window Step 2 Found New Hardware Wizard Searching and Installing The wizard will search for the driver and install it automatically Step 3 ...

Page 12: ...ive The autorun window will appear If it does not show up please run D setup exe Step 1 When the autorun window shows up click the Install Display Driver item Step 2 Click the Next button The system is installing the components Step 3 Click the Finish button to restart the computer Then the driver installation is completed ...

Page 13: ...r CD ROM and then you can see the AUTORUN window If it does not show up please run D setup exe Step 1 When autorun window shows up please click the GIGABYTE Utility item Step 2 Click the Next button Step 4 Click the Finish button Step 5 Click the Next button Step 3 Click the Install button ...

Page 14: ...12E1 E2 Graphics Accelerator Step 6 Click the Next button Step 7 Click the Next button Step 8 Click the Install button Step 9 Click the Finish button to restart computer Then the utilities installation is completed ...

Page 15: ...The V Tuner3 clock configuration utility will determine the recommended GPU and memory clock setting your system If the utility should hang restart your system and then enter Auto Optimized mode Fixed Clock The V Tuner3 clock configuration utility will lock the GPU and memory clock you choose whether you restart your system or not To rechange clock uncheck the Fixed Clock mode and then adjust Hard...

Page 16: ... of the graphics card s enhanced and other functions You may click the Display Properties item and then click Settings Click Advanced after clicking Settings Click the appropriate tab to change your display settings Right click the icon Click the Color Correction and VGA Information items to open the Color Adjust and VGA Info tabs You can link to GIGABYTE website for up dated information about the...

Page 17: ...Installation Color Adjust Color Adjust allows you to make color adjustments such as brightness contrast and gamma values for each or all of RGB colors VGA Info VGA Info lists the relevant information about your card ...

Page 18: ...hics Accelerator After installing the graphics card driver you will find an NVIDIA icon in your system tray Click this icon to open the control panel Right click the icon You can adjust the properties of the graphics card here ...

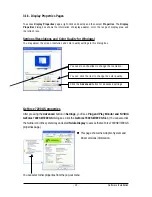
Page 19: ...log box You can move the slider to change the resolution You can click the item to change the color quality Click the Advanced button for advanced settings This page shows theAdapter System and Driver versions information You can select other properties from the pop out menu GeForce 7200 GS properties After pressing the Advanced button in Settings you ll see Plug and Play Monitor and NVIDIA GeForc...

Page 20: ... the format for your television and then click Apply followed by OK 1 Clone Mode Clone mode indicates that both displays in the display pair show images of the same desktop Select Clone from the nView Display Mode list and click Apply Clone Mode Dual Monitor Setup You can set the display to output from two monitors on the nView Display Settings page This graphics card supports the following modes ...

Page 21: ...L applications Antialiasing settings value allows to set the degree of the Global Driver Settings Color Correction properties The Color Correction Properties is used to compensate for variationsinluminancebetweenasourceimageanditsoutput on a display device Adjust the color correction settings to provide more accurate color reproduction of images such as photographs on your display device Also many...

Page 22: ...ay Properties directly from the Windows taskbar Shortcuttools The Desktop Manager provides enhanced nView multi displayfunctionalityandhelpsyouorganizeyourapplications for use with multiple displays and desktops Displayoptimization Run the Display Optimization Wizard to adjust your display s for optimal viewing and representation of colors Troubleshooting Thisoptioncanbeusedtoforcedetectionofanatt...

Page 23: ...s The TemperatureSettingsPropertiescanautodetectedthe GPU Core temperature You can select the Notify when GPU core temperature exceeds threshold check box Menu Editing properties The Menu Editing Properties can remove infrequently used screens by dragging them from the screen menu to the list below Restore screens to the menu by dragging them individually or click Restore Defaults To begin select ...

Page 24: ...plications so you won t have to crowd several open application windows on one desktop Enable the nView Desktop Manager features Right click on desktop and choose Properties Settings Advanced GeForce 7300 SE 7200 GS DesktopManagement Access nView properties page To access the nView properties page you can click the NVIDIA icon on the taskbar and select nView Properties under nView Destop Manager Me...

Page 25: ... display settings for easy softwaresetup nView Desktop Management properties ThistabcontainsinformationaboutthenViewDesktopManager The setup wizard can also be accessed from this tab nView Windows properties Thistaballowsyoutocontrol windowanddialogboxplacement when using multiple monitors ...

Page 26: ...properties This tab allows you to create up to 32 unique desktops nView Applications properties ThistaballowsyoutocontrolnViewsettingsdependingdifferent applications nView User Interface properties This tab allows for customization of the nView user interface ...

Page 27: ...n the desktop Alsoenablesfullscreenvideoplaybackviathevideomirroring controlbutton nView Effects properties This tab provides special windows effects that you can apply to your applications nView Hot Keys properties This tab lets you perform various actions with shortcut keys or key combinations ...

Page 28: ... GV NX72G512E1 E2 Graphics Accelerator nView Mouse properties Thistabcanmodifyandextendmousebehaviorwithkinematic actions nView Tools properties ThistabcanimprovenViewfunctionalityformobileanddesktop users ...

Page 29: ...ow will show up Click the Install Display Driver item and follow the wizard to install the driver If the autorun window does not show up automatically run the following steps 1 On the menu bar click the Start button 2 Select Run 3 Type the following D SETUP exe If D is not your CD ROM drive substitute D with the correct drive letter 4 Click OK 5 Click Install Display Drivers to start the Installat...

Page 30: ...al or manufacturer NOTE Some manufacturers do not allow the built in graphics to be disabled or to become the secondary display Make sure you selected the appropriate display device and graphics card when you install the graphics driver Restart your computer Press F8 on your keyboard after system starts up When the Windows Advanced Options Menu appears select Safe Mode and press Enter After gettin...

Page 31: ...dows 2000 XP you need a startup disk to restart the computer in MS DOS mode 3 Change the command prompt to A 4 To back up the current BIOS at the A prompt type BIOS flash utility name s BIOS file name example gvf18 s x72g5e1 f1 and press Enter 5 To flash BIOS at the A prompt type BIOS flash utility name p BIOS file name example gvf18 p x72g5e1 f2 and press Enter 6 Wait until it s done then restart...

Page 32: ... 3 3 640 x 400 16 10 60 75 3 3 3 640 x 480 60 240 3 3 3 720 x 480 60 3 3 3 720 x 576 50 60 3 3 3 800 x 600 60 240 3 3 3 848 x 480 60 240 3 3 3 960 x 600 16 10 60 240 3 3 3 1024 x 768 60 200 3 3 3 240 3 3 X 1088 x 612 16 9 60 200 3 3 3 240 3 3 X 1152 x 864 60 170 3 3 3 200 3 3 X 1280 x 720 16 9 60 150 3 3 3 170 3 3 X 1280 x 768 60 150 3 3 3 170 3 3 X 1280 x 800 60 150 3 3 3 170 3 3 X 1280 x 960 60 ...

Page 33: ...solution Hz Standard mode High mode True mode 1600 x 1200 60 100 3 3 3 120 3 3 X 1920 x 1080 16 9 60 85 3 3 3 100 3 3 X 1920 x 1200 16 10 60 85 3 3 3 100 3 3 X 1920 x 1440 60 85 3 3 3 2048 x 1536 60 85 3 3 3 This table is for reference only The actual resolutions supported depend on the monitor you use ...

Page 34: ... 34 GV NX72G512E1 E2 Graphics Accelerator ...

Page 35: ...GABYTE are continuing our efforts to develop products that do not use internationally banned toxic chemicals Waste Electrical Electronic Equipment WEEE Directive Statement GIGABYTE will fulfill the national laws as interpreted from the 2002 96 EC WEEE Waste Electrical and Electronic Equipment directive The WEEE Directive specifies the treatment collection recycling and disposal of electric and ele...

Page 36: ...g used batteries properly With your help we can reduce the amount of natural resources needed to produce electrical and electronic equipment minimize the use of landfills for the disposal of end of life products and generally improve our quality of life by ensuring that potentially hazardous substances are not released into the environment and are disposed of properly China Restriction of Hazardou...

Reviews: