background image

- 19 -

Software Installation

Display

A variety of display features enable you to further manipulate and configure your display settings to
optimize the use of your displays. Tasks in the Display pages allow you to do the following:
• Run display optimization wizard
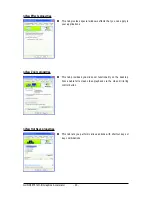
• Move CRT screen position
• Change resolution
• Adjust desktop color settings
• Rotate display
• Manage custom resolutions

 (Note 1)

• Run multiple display wizard

 (Note 2)

• Set up multiple displays

(Note 1) This item is present only in Advanced view mode.
(Note 2) This item will show up when you connect two monitors.

„

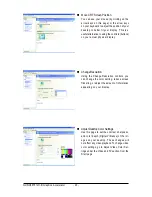
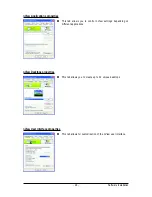
Run Display Optimization Wizard

This wizard helps you adjust your displays
for optimal viewing and repersentation of
colors.

Summary of Contents for GV-NX88T512H-B

Page 1: ...o rapid change in technology some of the specifications might be out of date before publication of this this manual The author assumes no responsibility for any errors or omissions that may appear in this document nor does the author make a commitment to update the information contained herein Macrovision corporation product notice This product incorporates copyright protection technology that is ...

Page 2: ...Oct 25 2007 VGA Card GV NX88T512H B VGA Card GV NX88T512H B Oct 25 2007 ...

Page 3: ...perating System Requirements 11 3 1 2 DirectX Installation 12 3 1 3 Driver Installation 13 3 1 4 Taskbar Icon 15 3 1 5 Display Properties Pages 16 3 1 6 nView Properties Pages Note 27 3 2 Windows 2000 Driver Installation 32 4 Troubleshooting Tips 33 5 Appendix 34 5 1 How to Reflash the BIOS in MS DOS Mode 34 5 2 Resolutions and Color Depth Table In Windows XP 35 RegulatoryStatements 37 Note This i...

Page 4: ...2 GB or more for best performance Optical drive for software installation CD ROM or DVD ROM drive A power supply with 450 watt is recommended Operating System Windows XP with Service Pack 2 SP2 Windows XP Professional x64 Edition Windows 2000 SLI TM Configuration If you are planning on using this graphics card as part of an SLI system the following arerequired An SLI certified motherboard with two...

Page 5: ...tor TV Out DVI I Connector 1 DVI I Connector 2 HDTV NTSC PAL TV Projector NTSC PAL TV Projector or or Digital LCD Monitor AnalogLCDMonitor AnalogMonitor or Y Pr Pb AV Output S Video Output DVI Output D Sub Output DVI I to D Sub Adapter TV Out DVI I Connector 1 DVI I Connector 2 ...

Page 6: ...separated from the system The card contains sensitive electric components which can be easily damaged by static electricity so the card should be left in its original packing until it is installed Unpacking and installation should be done on a grounded anti static mat The operator should be wearing an anti static wristband grounded at the same point as the anti static mat Inspect the card carton f...

Page 7: ...raphics card To remove the existing graphics card Step 1 Power off the computer and monitor then disconnect the display cable from the back of your computer Step 2 Remove the computer cover If necessary consult your computer s manual for help in removing the cover Step 3 Remove any existing graphics card from your computer ...

Page 8: ...aphics card then turn on the computer and monitor To connect a flat panel directly to your graphics card use the DVI I connector To connect a D Sub monitor to the DVI I connector plug the DVI I to D Sub adapter into the DVI I connector then plug the monitor cable into the adapter After installation remember to connect the power cable to your graphics card or the system will not boot Do not touch t...

Page 9: ...HDTV cables to the video adapter according to the corresponding color Y Green Pr Red Pb Blue 2 Connecting S Video If your TV has a S Video connection connect the S Video cable from your TV to the S Video Out port on the adapter 3 Connecting AV Output If your TV has a Composite video connection you can connect the RCA cable from your TV to the AV Out port on the adapter ...

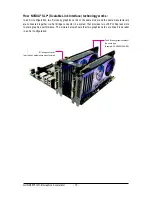
Page 10: ...the same manufacturers are connected together via SLI bridge connector in a system that provides two x16 PCI Express slots to scale graphics performance The picture below shows that two graphics cards are linked in parallel in an SLI configuration SLI bridge connector provided by motherboard manufacturer Two SLI ready graphics cards of the same type Example GV NX88X768H RH ...

Page 11: ...follow the instructions to setup your graphics card driver Please follow the subsection 3 1 3 Driver Installation to install the driver for your graphics card 3 1 Windows XP Driver and Utilities Installation 3 1 1 Operating System Requirements Notice the following guidelines before installing the drivers 1 Fist make sure your system has installed DirectX 9 0c or later version 2 Make sure your syst...

Page 12: ...s 2000 or Windows XP you must install DirectX first Users who run Windows XP with Service Pack 2 or above do not need to install DirectX separately Step 1 When the autorun window shows up click the Install DirectX 9 item Step 2 Choose I accept the agreement and click the Next button Step 3 Click the Next button The system is installing the components Step 4 Click Finish to restart computer Then th...

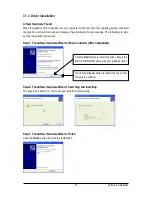
Page 13: ... installation instructions Step 1 Found New Hardware Wizard Video Controller VGA Compatible Click the Next button to install the driver Insert the driver CD ROM that came with your graphics card Or click the Cancel button to install the driver from the autorun window Step 2 Found New Hardware Wizard Searching and Installing The wizard will search for the driver and install it automatically Step 3 ...

Page 14: ...ve The autorun window will appear If it does not show up please run D setup exe Step 1 When the autorun window shows up click the Install Display Driver item Step 2 Click the Next button The system is installing the components Step 3 Click the Finish button to restart the computer Then the driver installation is completed ...

Page 15: ...3 1 4 Taskbar Icon After installing the graphics card driver you will find an NVIDIA icon in your system tray Click this icon to open the control panel Right click the icon You can adjust the properties of the graphics card here ...

Page 16: ...ange the resolution You can click the item to change the color quality Click the Advanced button for advanced settings NVIDIA Control Panel After pressing the Advanced button in Settings you ll see the Plug and Play Monitor and NVIDIA GeForce 8800 GT Properties dialog box Click the GeForce 8800 GT tab You can also click the NVIDIA icon in your system tray and select NVIDIA Control Panel Access the...

Page 17: ...gs Display Video Television In the NVIDIA Control Panel change a view if you want The supported modes are Standard Advanced Custom 3D Settings Tasks in the 3D Settings pages allow you to do the following Change the image and rendering settings of your 3D applications and games that utilize Direct3D and OpenGL technology Override the shipped clocked frequencies of your GPU and GPU memory to increas...

Page 18: ...hanges you make for improved image quality and rendering Manage 3D Settings Note The Manage 3D Settings page enables you to establish default 3D settings to use for all your Direct3D or OpenGL applications and to estab lish a unique set of 3D settings for a particular game or application MonitorTemperatureLevels To monitor the current temperature of your NVIDIA GPU using NVIDIA nTune utility pleas...

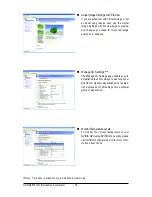
Page 19: ... optimization wizard Move CRT screen position Change resolution Adjust desktop color settings Rotate display Manage custom resolutions Note 1 Run multiple display wizard Note 2 Set up multiple displays Note 1 This item is present only in Advanced view mode Note 2 This item will show up when you connect two monitors Run Display Optimization Wizard This wizard helps you adjust your displays for opti...

Page 20: ...actual physical display ChangeResolution Using the Change Resolution controls you can change the color setting reduce screen flickering or adjust the amount of information appearing on your display Adjust Desktop Color Settings Use this page to set the contrast sharpness and color depth Digital Vibrance of the im ages on your desktop These changes will not affect any video playback To change video...

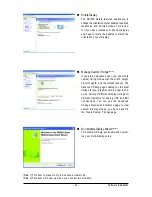
Page 21: ...ght bit color depth and the refresh rate etc The Advanced Timing page enables you to adjust timings for your graphics card in order to sup port a variety of different display timings for ultimate flexibility for analog CRT and DVI connections You can use the advanced Change Resolution Attributes page to view custom display modes you have saved in the Create Custom Timings page Run Multiple Display...

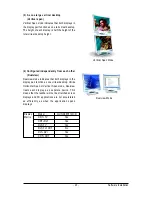
Page 22: ...here Only use one display Single The same on both display Clone As one large horizontal desktop Horizontal span As one large vertical desktop Vertical span Configured independently from each other Dualview 1 The same on both display Clone Clone mode indicates that both displays in the display pair show images of the same desktop 2 As one large horizontal desktop Horizontal span Horizontal Span mod...

Page 23: ...r Dualview Dualview mode indicates that both displays in the display pair function as one virtual desktop Unlike Horizontal Span or Vertical Span mode Dualview treats each display as a separate device This means that the taskbar will not be stretched across displays and 3D applications are not accelerated as efficiently as when the application spans displays Vertical Span Mode Dualview Mode Displa...

Page 24: ...t fit your television or HDTV high definition television screen Change the signal format to use for your standard television or HDTV as well as change country specific signal or the HDTV format Enable full screen video mirroring Adjust Video Color Settings Use the controls on this page to fine tune the color settings for video content on your display Select one of the test images to monitor your c...

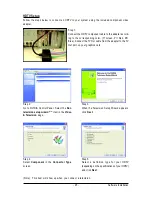
Page 25: ...the TV Out cable from the adapter to the TV Out port on your graphics card Step 2 Go to NVIDIA Control Panel Select the Run television setup wizard Note item in the Video Television page Step 3 When the Television Setup Wizard appears click Next Step 4 Select Component in the Connector Type screen Step 5 Select a definition type for your HDTV depending on the specifications of your HDTV and click ...

Page 26: ... 26 GV NX88T512H B Graphics Accelerator Step 6 Click the Preview button to preview the selected settings Then click Next Step 7 Click Finish to apply the new television settings ...

Page 27: ...dows on one desktop Enabling the nView Desktop Manager Features Click the NVIDIA icon in your system tray and select nView Properties under nView Destop Manager Click the Enable button to turn on all the nView Desktop Manager features Note This item will show up when you connect two monitors Step 1 Click nView Properties Step 2 Click Enable Accessing the nView Properties Pages To access the nView ...

Page 28: ...about the nView Desktop Manager The Setup Wizard can also be accessed from this tab nView Profiles properties This tab contains a record of all nView display settings for easy software setup nView Windows properties This tab allows you to control window and dialog box placement when using multiple monitors ...

Page 29: ... This tab allows you to control nView settings depending on different applications nView Desktops properties This tab allows you to create up to 32 unique desktops nView User Interface properties This tab allows for customization of the nView user interface ...

Page 30: ... that you can apply to your applications nView Zoom properties This tab provides dynamic zoom functionality on the desktop Also enable full screen video playback via the video mirroring control button nView Hot Keys properties This tab lets you perform various actions with shortcut keys or key combinations ...

Page 31: ...Software Installation nView Mouse properties This tab can modify and extend mouse behavior with kinematic actions nView Tools properties This tab can improve nView functionality for mobile and desktop users ...

Page 32: ...un window will show up Click the Install Display Driver item and follow the wizard to install the driver If the autorun window does not show up automatically run the following steps 1 On the menu bar click the Start button 2 Select Run 3 Type the following D SETUP exe If D is not your CD ROM drive substitute D with the correct drive letter 4 Click OK 5 Click Install Display Drivers to start the In...

Page 33: ...nufacturer NOTE Some manufacturers do not allow the built in graphics to be disabled or to become the secondary display Make sure you selected the appropriate display device and graphics card when you install the graphics driver Restart your computer Press F8 on your keyboard after system starts up When the Windows Advanced Options Menu appears select Safe Mode and press Enter After getting into S...

Page 34: ...S mode For Windows 2000 XP you need a startup disk to restart the computer in MS DOS mode 3 Change the command prompt to A 4 To back up the current BIOS at the A prompt type BIOS flash utility name s BIOS file name example gvf18 s x88t5b f1 and press Enter 5 To flash BIOS at the A prompt type BIOS flash utility name p BIOS file name example gvf18 p x88t5b f2 and press Enter 6 Wait until it s done ...

Page 35: ...16 10 60 75 3 3 3 640 x 480 60 240 3 3 3 720 x 480 60 3 3 3 720 x 576 50 60 3 3 3 800 x 600 60 240 3 3 3 848 x 480 60 240 3 3 3 960 x 600 16 10 60 240 3 3 3 1024 x 768 60 200 3 3 3 240 3 3 X 1088 x 612 16 9 60 200 3 3 3 240 3 3 X 1152 x 864 60 170 3 3 3 200 3 3 X 1280 x 720 16 9 60 150 3 3 3 170 3 3 X 1280 x 768 60 150 3 3 3 170 3 3 X 1280 x 800 60 150 3 3 3 170 3 3 X 1280 x 960 60 150 3 3 3 170 3...

Page 36: ...lution Hz Standard mode High mode True mode 1600 x 1200 60 100 3 3 3 120 3 3 X 1920 x 1080 16 9 60 85 3 3 3 100 3 3 X 1920 x 1200 16 10 60 85 3 3 3 100 3 3 X 1920 x 1440 60 85 3 3 3 2048 x 1536 60 85 3 3 3 2560 x 1600 60 3 3 3 Dual Link This table is for reference only The actual resolutions supported depend on the monitor you use ...

Page 37: ...GABYTE are continuing our efforts to develop products that do not use internationally banned toxic chemicals Waste Electrical Electronic Equipment WEEE Directive Statement GIGABYTE will fulfill the national laws as interpreted from the 2002 96 EC WEEE Waste Electrical and Electronic Equipment directive The WEEE Directive specifies the treatment collection recycling and disposal of electric and ele...

Page 38: ... used batteries properly With your help we can reduce the amount of natural resources needed to produce electrical and electronic equipment minimize the use of landfills for the disposal of end of life products and generally improve our quality of life by ensuring that potentially hazardous substances are not released into the environment and are disposed of properly China Restriction of Hazardous...

Reviews: