background image

English

T1000 SERIES USER’S MANUAL

3

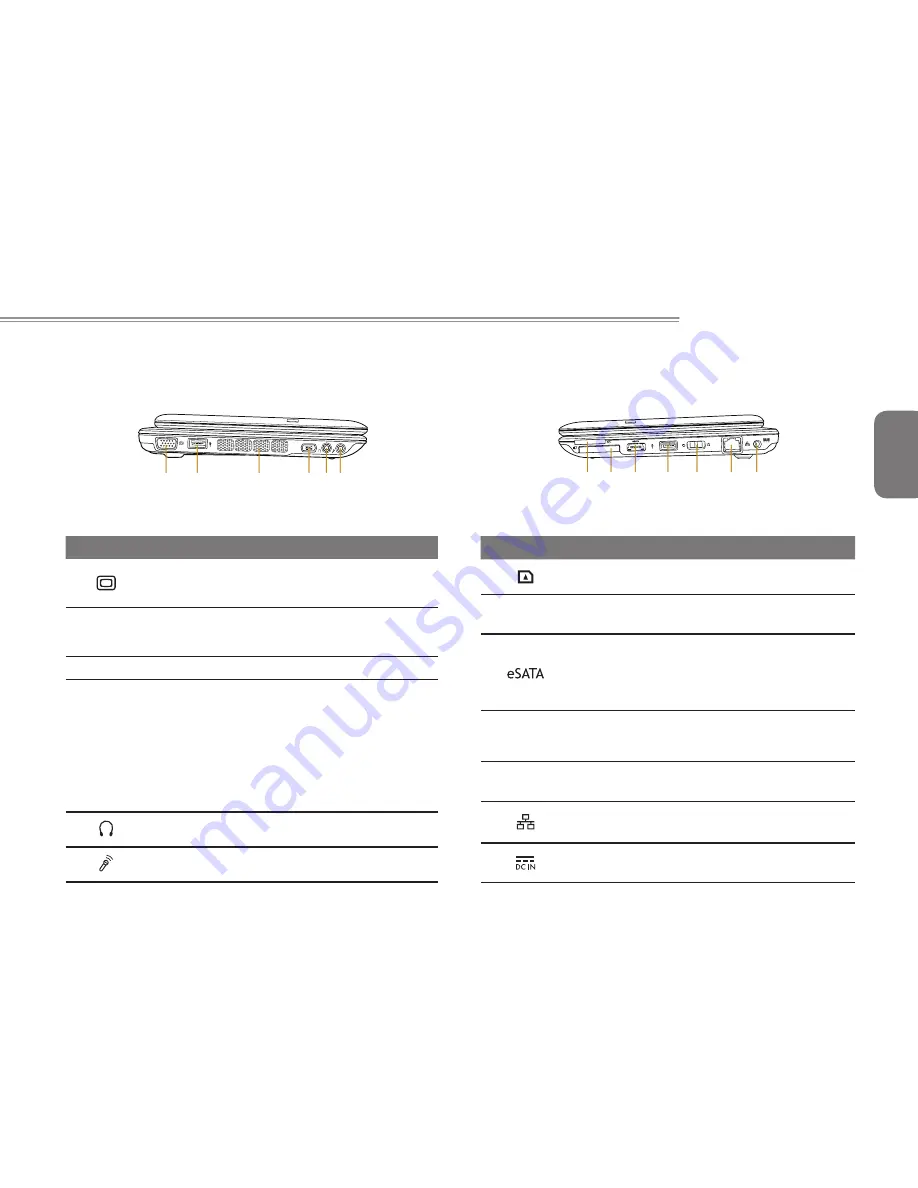
1.2  Left View


# Icon

Item

Description 

1

External  

Display 

(VGA) Port

Connects to a display device such as 

external monitor or LCD projector.

2

USB Port

Connects to USB devices such as a 

USB mouse, USB printers and USB 

external Hard drives

3

Air Vent

To vent excess heat from the Netbook.

4

Function Key

To activate the function key

a). The battery capacity can be dis-

played when the battery is loaded 

and the function button is pressed 

in shutdown/standby/hibernate 

mode.

b). In the Windows

®

 7 Starter system: 

Open / Close  the Smart Manager 

system utility.

5

Headphone 

Jack

Connects to audio line-out devices 

such as speakers and headphones.

6

Microphone 

Jack

Accepts inputs from external micro-

phones.

1.3  Right View


#

Icon

Item

Description 

1

Multi Card 

Reader

Accepts SD/MMC/MS/MS Pro 

memory cards.

2

Express Card 

Slot

Accepts PC Card Express 34 

Cards. (Optional)

3

eSATA/ USB 

Combo Port

The combo port doubles as an 

eSATA and a USB port allowing 

USB devices and external Hard 

Drives to be connected using just 

one port.

4

USB Port

Connects to USB devices such 

as USB mouse, USB printers and 

USB external Hard drives..

5

Power Button

Turns the computer on and off

6

Ethernet Port

Connects to an Ethernet 

10/100/1000 based network.

7

DC-in Jack

Connects the an AC adapter.

1 2 3 4 5 6 7

1 2

3

4 6

5

Summary of Contents for T1000 Series

Page 1: ...d in any form or by any means electronic mechanical by photocopy recording or otherwise without prior written consent Trademarks Product names used herein are for identification purposes only and may be the trademarks of their respective companies Microsoft MS DOS Windows and Windows Sound System are trademarks of the Microsoft Corporation Intel Atom are registered trademarks of Intel Corporation ...

Page 2: ...that are supplied by your netbook manufacturer Using other types of battery or AC adapter may heighten the risk of fire or explosion Incorrectly inserted batteries may result in an explosion Replace only with the same or compatible battery recommended by the manufacturer Please discard used batteries according to the manufacturer s instructions Before you connect your netbook to a power source ens...

Page 3: ...or on its strain relief loop and not on the power cord itself As you pull out the connector please ensure that it is pulled out evenly in order not to bend its connecting pins Also be fore you connect the power cord make sure that both connectors are correctly oriented and aligned Before you clean your netbook turn it off first unplug it from its power source and remove the battery Handle interior...

Page 4: ...evision re ception which can be determined by turning the equipment off and on the user is encouraged to try to correct the interference by one or more of the following measures Reorient or relocate the receiving antenna Increase the separation between the equipment and receiv er Connect the equipment into an outlet on a circuit different from that to which the receiver is connected Consult the de...

Page 5: ...powered on Don not continue to use a battery that has been dropped or that appears damaged e g bent or twisted in any way Even if the computer continues to work with a damaged battery in place it may cause circuit damage which may possibly result in fire Recharge the batteries using the notebook s system Incorrect re charging may make the battery explode Do not try to repair a battery pack Refer a...

Page 6: ...st netbook computers are classified by the Bureau of Standards Meteorology and Inspection BSMI as Class B information technol ogy equipment ITE The symbol above must be attached to the product indicating compliance with the BSMI standard ...

Page 7: ...English T1000 SERIES USER S MANUAL VI ...

Page 8: ... architecture providing you with a personal computer that is compact powerful and easy to use Designed for a wide range of general business and personal productivity applications this netbook is an ideal choice for use in the office at home and on the road This Manual contains all the information you need to set up and use your netbook computer It describes all of its features in a thorough yet ea...

Page 9: ...ing the Battery Pack 10 1 14 Connecting the AC Adapter 11 1 15 Installing T1000 Device Drivers 11 1 16 Touch Screen Calibration 12 1 17 Use your T1000 as a Tablet PC 12 1 18 Operating Temperature 12 Chapter 2 Battery 2 1 Battery Pack 14 2 2 Recharging the Battery Pack 14 2 3 Questions and Answers 14 2 4 Battery Maintenance 15 2 5 Power Consumption 15 2 6 Removing the Battery Pack 15 2 7 Battery Ca...

Page 10: ...English IX ...

Page 11: ...ou how to operate your T1000 series netbook including connecting the AC adapter turning the computer on off using touch pad keyboard hot keys battery and so on If you are new to computers and to the operating system this chapter will guide you through some of the new exciting features that are available ...

Page 12: ... components and their active state 5 Touchpad Touch sensitive pointing device which functions like a computer mouse 6 Num Lock Caps Lock 3 5G LEDs Num Lock Caps Lock 3 5G LED lights Please refer to the detailed descrip tions of the LED indicators on Page 5 of the User s Manual 7 Microphone Internal microphone for sound recording 8 Stylus Pen Slot The slot stores the Stylus Pen Both Stylus Pen Slot...

Page 13: ...rt Manager system utility 5 Headphone Jack Connects to audio line out devices such as speakers and headphones 6 Microphone Jack Accepts inputs from external micro phones 1 3 Right View Icon Item Description 1 Multi Card Reader Accepts SD MMC MS MS Pro memory cards 2 Express Card Slot Accepts PC Card Express 34 Cards Optional 3 eSATA USB Combo Port The combo port doubles as an eSATA and a USB port ...

Page 14: ...To rotate the LCD Panel 1 5 Bottom View Item Description 1 Battery Computer battery pack 2 Speaker Delivers stereo audio 3 Kensington Lock Connects to a Kensington compatible computer security lock 4 SIM Card Slot To insert of a mobile SIM card for the 3 5G function Optional 2 1 4 3 1 2 ...

Page 15: ... when the WiFi LAN device is active HDD Status LED Indicates when the hard disk drive is active Battery Status LED Flash when charging and is off when the battery is full Power Status LED Indicates the computer s power status 1 Number locked Indicator The keyboard is in Number lock mode Caps locked Indicator The keyboard is in Caps lock mode 3 5G Indicator WWAN 3 5G on off status ...

Page 16: ... the interior of your T1000 netbook to cool off Closing the panel will force the heat up against the LCD screen and doing so can cause lasting damage to the screen More importantly never close the LCD panel for a long period of time when the computer is on or when the power saving function is disabled 1 8 Keyboard Functions T1000 netbook is equipped with a standard typewriter layout keyboard and h...

Page 17: ...AN Enables disables the Wireless LAN function Fn F3 Brightness Down Decrease the screen brightness Fn F4 Brightness Up Increases the screen brightness Fn F5 Display Toggle Switches display output between the display screen external monitor if connected and both Fn F6 Touchpad Toggle Turns the internal touchpad on and off Fn F7 Speaker Toggle Turns the speaker on and off Fn F8 Volume Down Decreases...

Page 18: ...ping on the touch pad produces similar results Tips For using the multi touch function of touchpad see the explanation on the touchpad software 1 10 Using the Built in Camera The Web Camera is an embedded camera that is used to capture video take still images and to do video conference calls or person to person video chat Programs like Windows Live Messenger take advantage of web cameras otherwise...

Page 19: ... 12 Using the Wireless LAN You can use the Smart Manager 3 1 GIGABYTE Smart Manager Functions or Fn combination keys 1 8 Keyboard Function to turn on Wireless LAN Right click the Wireless network icon on the Taskbar and select View available wireless network Select AP Access Point you want to connect to and type necessary information Click Connect And If you place the mouse pointer on the Wireless...

Page 20: ...han 95 Li Ion Battery is vulnerable do not charge it with other power adapter otherwise fire or explosion may occur Replacing the Battery The battery will gradually weaken over time We recommend that you replace your battery when you notice a significant decrease of battery capacity To change the battery pack follow the steps below 1 Turn off the computer 2 Close the lid and flip the computer over...

Page 21: ...nnect the power cord to the AC adapter 2 Connect the AC adapter to the DC power port of your computer 3 Connect the AC adapter power cord to an AC outlet 1 15 Installing T1000 Device Drivers If your T1000 netbook already has an operating system installed it is best to install all necessary device drivers in order for the hardware to properly function Before installing drivers check with your vendo...

Page 22: ...g Temperature 10ºC to 40ºC 1 16 Touch Screen Calibration Below are the two conditions that you need to calibrate your touch screen The first time Windows is installed and boot up The active cursor is shifted not exactly the same position where is tapped Periodically when you find the active cursor is shifted away from the screen position where is tapped To calibrate the touch screen please select ...

Page 23: ...English T1000 SERIES USER S MANUAL 13 Chapter 2 Battery ...

Page 24: ... will generate heat during recharging and discharging There is a protection circuit inside the T1000 to prevent overheating User needs not to worry My battery operation time is not as long as it should be Why The battery is heat sensitive and can only be charged to its maximum if the battery and its environmental temperature remain within 15 25 C 59 77 F The more the temperature deviates from this...

Page 25: ...HDD as much as possible When the battery is empty wait for the T1000 to cool down especially the battery The temperature should be within 15 25 C 59 77 F Then insert the AC adapter to recharge the battery 2 5 Power Consumption Select Power Options in the Control Panel or Power Mode in Smart Manager 3 1 GIGABYTE Smart Manager Functions to adjust Power Consumption 2 6 Removing the Battery Pack This ...

Page 26: ...e LED indicators will show the battery capacity status as following 5 LED indicators on Battery capacity 100 4 LED indicators on Battery capacity 80 3 LED indicators on Battery capacity 60 2 LED indicators on Battery capacity 40 1 LED indicator on Battery capacity 20 1 LED indicator flashing Low battery capacity No LED indicator on A Please check the battery is inserted properly B No battery capac...

Page 27: ...English T1000 SERIES USER S MANUAL 17 Chapter 3 GIGABYTE Smart Manager ...

Page 28: ...n will be shown on the screen when using battery as the main power source Volume control Press the volume control icon to adjust the volume level Mute Press the mute icon to enable disable the mute mode Brightness Press the brightness icon to adjust the level of the display backlight brightness Power mode Press the power mode icon to select different power management mode Wireless LAN Press the Wi...

Page 29: ...duction of GIGABYTE Smart Charge function The GIGABYTE Smart Charge allows you to charge your digital devices through USB ports while the computer is in the sleep mode When your computer is powered through an AC adapter by direct AC power supply you will be able to use Smart Charge when the computer is in Off Sleep Hibernation mode However if the battery pack is the sole power supply for your comp...

Page 30: ... Chapter 4 Troubleshooting Q A This chapter contains advice and solutions to a few basic troubles you might encounter when you use T1000 Please refer to this chapter and follow the instructions to solve troubles ...

Page 31: ...your dealer to buy another one Battery life is not as long as it should be Battery life depends on using condition of T1000 You can change the settings in Power Manager of OS to save power Battery pack can t exert its full capacity if it works when not fully recharged frequently Power T1000 by battery pack until its power drops to a critically low level and the machine emits a high pitched beep or...

Page 32: ...agment Use disk defrag tools to rearrange the programs on the hard disk WARNING Please pay attention to the following information about Hard Drive maintenance 1 The hard disk is a high speed data storage device Avoid using the T1000 in unstable locations as far as possible to prevent hard disk damage and data loss 2 Please use the computer in accordance with normal startup shutdown procedures impr...

Page 33: ...ith GIGABYTE T1000 place it in a special case in a tidy manner as far as possible Excess objects may squeeze the machine and therefore damage the LCD screen 6 Do not touch the screen with sharp objects directly 7 It is recommended that the LCD screen be wiped with a special screen cleaning cloth Wipe the screen gently to avoid breakage of the screen 8 Prevent any liquid from entering the LCD scree...

Page 34: ...gment file blocks For more information about these utilities please refer to your Windows documentation What kind of external microphone can I use with my notebook computer You will need to use a self amplifying microphone There are echoes coming from my speakers What can I do Double click on the Speaker icon on the task bar Then under Microphone Balance check the Mute box Because of a software pr...

Page 35: ...e list of devices select the device that you want to unplug or eject and then click Stop This tells the system that you will be unplugging or ejecting the device 3 In Stop a Hardware device click OK A notification appears stating that it is now safe to unplug or eject the device Caution Unplugging or ejecting a device that supports safe removal without first using the Safe Removal application to w...

Page 36: ...rnal liners pads on the edges of the outer shell to displace therefore squeezing the edges of the touch control screen and causing the screen to fail What is the capacity of SDHC card that T1000 can support The specification of SDHC that T1000 SD card reader supports shall be in accordance with that of the SD Association Currently the maximum capacity announced by SD Association is 32GB http www s...

Page 37: ...English T1000 SERIES USER S MANUAL 27 Appendix I Specifications ...

Page 38: ...ress Card Slot Optional DC in Jack Audio 1 5Watt Speaker 2 Internal Microphone Communications LAN Wireless LAN Bluetooth 10 100 1000Mbps Ethernet 802 11b g n Wireless Bluetooth V2 1 EDR HSDPA 3 5G HSDPA Antenna build in HSDPA Module supported Optional Webcam 1 3 Mega Pixel Webcam Security Kensington Lock Battery Li ion 4 cell 32 4Wh 4500mAh Li ion 6 cell 56 61Wh 7650mAh Dimensions 265 W x 195 D x ...

Page 39: ...English T1000 SERIES USER S MANUAL 29 Appendix II Smart Recovery Smart Recovery ...

Page 40: ...s part of the notebook installation and it ships preset from the factory The Options menu allows you to launch the Windows Recovery tool to reinstall the operating system to factory defaults Below will briefly describe how to launch the Recovery Tool and to get the recovery started 1 Turn off or restart the notebook 2 Turn the notebook on and press and hold the F9 key to launch the tool 3 The reco...

Page 41: ...English T1000 SERIES USER S MANUAL 31 Appendix III GIGABYTE Service Information More service information please link to GIGABYTE official website http www gigabyte com tw ...

Reviews: