background image

English

1

1

Congratulations on your purchase of the GIGABYTE Notebook.

This manual will help you to get started with setting up your notebook. The final product 

configuration depends on the model at the point of your purchase. GIGABYTE reserves 

the right to amend without prior notice. For more detailed information, please visit our 

website at www.gigabyte.com

Using GIGABYTE Notebook for the First Time

1

2

3

1

Connect the power cord to the AC adapter.

2

Connect the AC adapter to the DC-in jack on the left side of the notebook. 

3

Connect the power cord to the power outlet.

Switching on the Power

After you turn on the X11 for the very first time, do not turn it off until the 

operating system has been configured. Please note that the volume for the 

audio will not function until Windows

®

 Setup has completed.

Booting Up the X11 for the First Time

Depending on your configuration, the Microsoft

®

 Windows

®

 Boot Screen will be 

the first screen that you will see as the notebook starts up. Follow the on-screen 

prompts and instructions and enter your personal information to complete the 

setup of the Windows

®

 Operating System.

Summary of Contents for X11

Page 1: ......

Page 2: ...ect the AC adapter to the DC in jack on the left side of the notebook 3 Connect the power cord to the power outlet Switching on the Power After you turn on the X11 for the very first time do not turn it off until the operating system has been configured Please note that the volume for the audio will not function until Windows Setup has completed Booting Up the X11 for the First Time Depending on y...

Page 3: ...Tour 2 Top View Left View 2 1 4 3 5 7 6 1 Webcam Indicator 2 Microphone 3 Webcam 4 Light Sensor 5 Power Key 6 Speakers 7 TouchPad 1 DC in Jack 2 USB 3 0 3 Mini Display Right View 1 Micro SD Slot 2 Combo Audio Jack 3 USB 2 0 1 2 3 1 2 3 ...

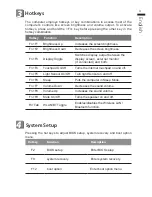
Page 4: ...external monitor if connected and both Fn F4 Touchpad On Off Turns the internal touchpad on and off Fn F5 Light Sensor On Off Turn light Sensor on and off Fn F6 Sleep Puts the computer in Sleep Mode Fn F7 Volume Down Decreases the sound volume Fn F8 Volume Up Increases the sound volume Fn F9 Mute On Off Turns the speaker on and off Fn Tab WLAN BT Toggle Enables disables the Wireless LAN Bluetooth ...

Page 5: ...or bar will show on the window when the recovery process is running Please make sure the AC adapter is plugged in and do not turn off the laptop 4 Note If the storage has been switched or the partition deleted the recovery option will no longer be available and a recovery service will be needed The recovery function is only available on devices with O S preinstalled Devices with DOS do not have th...

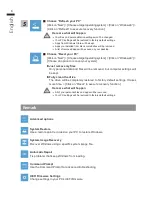
Page 6: ...aptop to improve the system stability without losing your files Reset your PC If you want to remove all of your files you can reset your PC completely Caution All personal data and files will be lost 5 During the laptop turn on process press and hold F9 key to launch the tool 2 1 3 4 Turn off and restart the laptop Choose Troubleshoot to enter the recovery settings Also you can choose Continue to ...

Page 7: ...recovery function Advanced options System Restore Use a restore point recorded on your PC to restore Windows System Image Recovery Recover Windows using a specific system image file Automatic Repair Fix problems that keep Windows from loading Command Prompt Use the Command Prompt for advanced trobleshooting UEFI Firmware Settings Change settings in your PC s UEFI firmware Remark 5 Choose Reset you...

Page 8: ...ed information please refer to the warranty card or GIGABYTE service website as the below link http www gigabyte com support downloads technical support aspx FAQ FAQ Frequent Asked Questions please refer to the below link http www gigabyte com support downloads faq aspx ...

Page 9: ......

Reviews: