background image

Gigaset CL390HX / LHSG IE-UK-International en / A31008-M2962-R101-1-4N19 / settings_HX.fm / 9/9/19

Te

mplat

e

 M

odu

le

, V

e

rs

ion 1.

3,

 1

1

.04.

20

19

Phone settings

Availability and operation of the functions 

  may differ on your telephone.

29


Phone settings

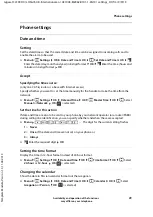
Date and time

Setting

Set the date/time so that the correct date and time can be assigned to incoming calls and to 
enable the alarm to be used.

¤

Menu


Settings


OK


Date and Time


OK


Set Date and Time


OK


Enter the date (day, month and year) in 8-digit format     

OK


 Enter the time (hours and 

minutes) in 4-digit format     

OK


Accept

Specifying the time source

(only on a CAT-iq router or a base with Internet access)

Specify whether you want to set the time manually for the handset or take the time from the 
network. 

Set the time for this action

If date and time are also to be sent to your phone by your network operator (or a router/PABX) 
during calling line identification, you can specify whether and when these are accepted:

¤

Menu


 . . . The digit for the current setting flashes:

¤

 Enter the required digit


OK

¤

Menu


Settings


OK


Date and Time


OK


Master Time


OK


 Select 

Manual

 or 

Network


OK 

(


=  selected)

1

 =

Never

2

 =

Once

, if the date and time are not set on your phone or

3

 =

Always

Setting the time format

Display the time in 12-hour format instead of 24-hour format.

¤

Menu


Settings


OK


Date and Time


OK


Time Format


OK


 Select 

24-hour

 or 

12-hour


OK 

(


=  selected)

Changing the calendar

Show the date in Persian calendar format not the Gregorian. 

¤

Menu


Settings


OK


Date and Time


OK


Calendar


OK


 Select 

Gregorian

 or 

Persian


OK 

(


=  selected)

Summary of Contents for CL390HX

Page 1: ...onal en A31008 M2962 R101 1 4N19 CL390HX You can find the most up to date user guide at www gigaset com manuals You will also find here the user guide for your Gigaset phone Other phone system or router Documentation for your base router ...

Page 2: ...a DECT GAP telephone or router from another manufacturer The handset also functions with DECT GAP telephones from other manufacturers of course as well as DECT routers Additional information can be found at www gigaset com compatibility On DECT routers with CAT iq 2 0 Your GigasetHX handsetiscertifiedin accordance with the DECT CAT iq 2 0 standard As a result operation with a DECT router with CAT ...

Page 3: ...k unlock the keypad 11 Control key 11 Display 12 Menu navigation 13 Making calls 14 Making a call 14 Accepting a call 15 Handsfree mode 15 Muting 16 Call with three subscribers 16 Calling Line Identification 17 Network services 17 Call message lists 18 Call list 18 Message list 19 Directory 19 Local directory 19 Base directory 21 Changing the assignment of the control key to a directory 21 Transfe...

Page 4: ...guage if available 30 Display 30 Tones and signals 31 System 33 Firmware update 34 Connections 35 Service Customer Care 36 Customer Service Assistance 37 Guarantee Certificate United Kingdom and Ireland 38 Manufacturer s advice 39 Authorisation 39 Data protection 39 Environment 39 Care 40 Contact with liquid 40 Technical data 41 Index 44 Not all functions described in the user guide are available ...

Page 5: ...n menus and entry fields 6 Key 1 Call answering machine network mailbox Press and hold 7 Star key Enable disable ringtone Press and hold Switch from pulse dialling to tone dialling Press briefly 8 Microphone 9 Message key Access to the call and message lists flashes new message or new call New messages in the call list network mailbox list are shown on the display by message New messages 10 End ca...

Page 6: ...s that could generate costs Prerequisite for carrying out the following action Additional helpful information Talk Handsfree key Hash key End call key Star key Control key Recall key to Digit letter keys Menu OK Display keys Menu Settings OK Telephony OK Auto Answer OK enabled Step Actions required Menu Press the Menu display key Settings OK Use the control key to navigate to entry Settings Press ...

Page 7: ...install them in a damp environment such as bathrooms or shower rooms Use only the power adapter indicated on the device Whilst charging the power socket must be easily accessible Remove faulty devices from use or have them repaired by our Service team as these could inter fere with other wireless services Do not use the device if the display is cracked or broken Broken glass or plastic can cause i...

Page 8: ... adapter into the socket Toremove theplugfromthechargingcradle again Press the release button Pull out the plug The charging cradle is designed for use in closed dry rooms within a temperature range of 5 C to 45 C Never expose the telephone to heat sources direct sunlight or other electrical devices Protect your telephone from moisture dust corrosive liquids and vapours The device s feet do not us...

Page 9: ... the language Select the required language OK The language selected is set as the display language Selecting the country if available Select the country where you use the phone OK Country specific settings are configured Only use rechargeable batteries as this could otherwise result in significant health risks and personal injury For example the outer casing of the batteries could be damaged beyon...

Page 10: ...egacy GAP Registration Menu Settings OK Registration Legacy GAP Registration This registering guarantees correct displays on the handset but can entail restrictions for some functions De registering a handset Menu Settings OK Registration Deregister Handset Gigaset base Press and hold the Register Paging key on the base for about 3 seconds Other base router Information on the registration procedur...

Page 11: ...ssed in the different operating situations e g for press right on the control key Switching on When the handset is switched off press and hold the End call key Switching off When the handset is in idle mode press and hold the End call key If a call is indicated on the handset the keypad automatically unlocks and you can accept the call It then locks again when the call is finished It is also not p...

Page 12: ...s the display key Function shown in display above Changing the assignment of the right display key in idle mode Press and hold the right display key Select the function OK Display functions accessed from the control key Open the main menu submenu Confirm menu function save entry Back one menu level Delete character by character to the left Access the call list message list Use to scroll up down an...

Page 13: ...ral levels When the phone is in idle press the Display key Menu or the control key right the menu opens Use the control key to scroll to the function required Confirm with OK The display automatically returns to idle mode after two minutes of inactivity Keypad lock activated Ringtone deactivated Good to poor No reception ECO DECT mode No Radiation enabled Local answer machine switched on if availa...

Page 14: ...k key Or Open the directory with Enter the first letter of the name The first entry matching the input is displayed Scroll as needed to the entry required Press theTalk key When a directory is also provided by the base Press and hold the button The base directory is opened Scroll to the required entry Press the talk key or Dialling from the redial list The list contains the 10 numbers last dialled...

Page 15: ...on the loudspeaker so that you can hear the caller without holding the handset to your ear Enabling disabling handsfree mode during a call and when listening to the answer machine Press the handsfree key Entries from the directory are assigned to keys 2 to 9 One touch call A predefined number is dialled by pressing any key This allows children whoare unable to enter a number to call a certain numb...

Page 16: ...usic on hold is enabled on the base the other person hears the melody Query calls Call swapping During a call or in state Call on hold call a second subscriber Menu External Call Accept Enter the phone number Dial The call is initiated End an active call Menu End Active Call The active call is ended the call held becomes active again Switch between two callers call swapping Press up down on the co...

Page 17: ...External Call No number is transferred Withheld Caller has withheld Calling Line Identification Unavailable Caller has not authorised Calling Line Identification Network services dependent on base and must be supported by provider Next call is anonymous When the function is enabled sending of the call number is suppressed for outgoing calls Menu Select Services OK Select the connection as required...

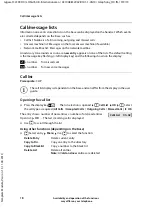
Page 18: ...y Call list Prerequisite CLIP Opening the call list The entry shows number of new entries number of old read entries Open list OK The last incoming call is displayed Use to scroll through the list Using other functions depending on the base Select entry Menu Use to select the function Answer machine list Messages on the local answer machine if available number for missed calls number for new voice...

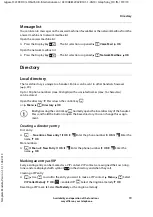
Page 19: ...ectory OK Creating a directory entry First entry No entries New entry OK Enter the phone number OK Enter the name OK More numbers Menu New Entry OK Enter the phone number OK Enter the name OK Marking an entry as VIP Every existing entry can be marked as a VIP contact VIP contacts are assigned their own ring tones and are displayed with symbol in the directory and when they call Creating a VIP entr...

Page 20: ...ansferring a directory entry to another handset Transferring a directory entry to another handset Transferring a directory to another handset Display number Menu Show Number OK Change entry Menu Edit Entry OK Delete characters with change entry with OK Select entry Menu Shortcut OK Select key OK selected Select entry Menu Shortcut OK No Shortcut OK selected Select entry Menu Delete Entry OK Menu D...

Page 21: ...red directory The default directory is the local one Changing the preferred directory Menu Directory OK Preferred Directory OK Select Local Handset Directory or Basestation Directory OK The preferred directory is the one opened with the control key into which a number is transferred using when it is dialled in which a search is performed for the right name for a phone number such as for an incomin...

Page 22: ...he Display key The list selection is opened Network Mailbox OK Menu Answering Machine OK Answ Mach OK enabled Press the Display key The list selection is opened Voice Mail OK Menu Answering Machine OK Announcements OK Rec announce OK Startrecording OK You hear the ready tone short tone Record the announcement min 3 seconds Confirm with OK The network mailbox is registered with the network provider...

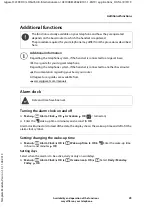
Page 23: ... your telephone and how they are operated depends on the base router to which the handset is registered The procedure required for your telephone may differ from the procedures described here Additional information Regarding the telephone system if the handset is connected to a Gigaset base User guide for your Gigaset telephone Regarding the telephone system if the handset is connected to another ...

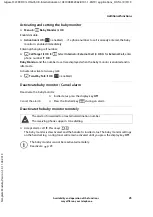
Page 24: ... function This function is used to switch the loudspeaker of the handset located in the baby s room on or off In baby monitor mode incoming calls are only indicated on the display without ringtone The display backlight is reduced to 50 Advisory tones are deactivated Advisory tones are disabled All keys with the exception of the display keys are disabled If you accept an incoming call the baby moni...

Page 25: ...OK Baby Monitor and the number to call are displayed when the baby monitor is enabled and in idle mode Activate deactivate two way talk Two Way Talk OK enabled Deactivate baby monitor Cancel alarm Deactivate the baby monitor remotely Accept alarm call Press keys The baby monitor is deactivated and the handset is in idle status The baby monitor settings on the handset e g no ringtone will remain ac...

Page 26: ...the lower the radiation Reducing radiation by up to 80 Enabling disabling the maximum range Disabling radiation in idle mode The wireless signals of the base are also disabled with the No Radiation setting Menu Settings OK ECO DECT OK Max Range OK range and radiation reduced It is not possible to use a repeater to increase the range Menu Settings OK ECO DECT OK No Radiation OK Radiation disabled A...

Page 27: ...played with the phone number If the list is empty No entries New entry is displayed p 27 Creating an entry Enter the number OK Enter the name OK Creating an entry for an incoming call or during an active conversation Press the display key Copy to Blacklist The number of the incoming or active call is trans ferred to the black list The incoming call number is sent CLIP Visual Only An incoming call ...

Page 28: ...ist Specify what happens when the maximum number of entries in the black list is reached and a new entry is created Menu Call Manager OK Blacklist OK Rule for Full List OK Select the option required selected Showing of blocked calls on the display Menu Call Manager OK Blacklist OK Visual Only Full Suppression OK enabled Save calls from blocked numbers not in the call list Menu Call Manager OK Blac...

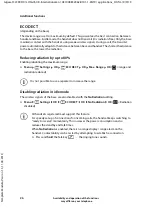
Page 29: ... to set the time manually for the handset or take the time from the network Set the time for this action If date and time are also to be sent to your phone by your network operator or a router PABX during calling line identification you can specify whether and when these are accepted Menu The digit for the current setting flashes Enter the required digit OK Menu Settings OK Date and Time OK Master...

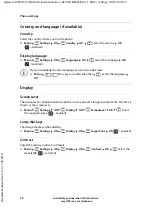
Page 30: ...ot used over a longer period of time The time is shown as the screensaver Menu Settings OK Display OK Screensaver OK Select the required option enabled Large dial keys Show large dial keys when dialling Menu Settings OK Display OK Larger Font OK enabled Contrast Adjust the display contrast on 9 levels Menu Settings OK Display OK Contrast OK Select the level OK selected Country Select the country w...

Page 31: ...Display OK Backlight Control OK Display Off During Calls OK enabled The display flashes for new messages Menu Settings OK Display OK Backlight Control OK Flash Display for Notifications OK enabled Tones and signals Call volume Adjust the receiver volume or handsfree function on 5 levels Menu Audio Settings OK Call Volume OK Earpiece Handsfree OK The current setting is displayed Select the volume O...

Page 32: ...ect ringtone required OK selected Disabling re enabling the ringtone permanently When the phone is idle press and hold the Star key When the ringtone is disabled symbol is shown on the display Deactivating the ring tone for the current call Menu Silent OK Enabling disabling advisory and warning tones The handset provides acoustic notification of different activities and statuses You can enable and...

Page 33: ...ystem PIN OK Enter the current 4 digit system PIN default 0000 OK Enter the new 4 digit system PIN OK Resetting the system PIN depending on the base Resetting the base to the original PIN code 0000 Remove the power cable from the base Keep pressed the Registration paging key on the base At the same time reconnect the power cable to the base press and hold the key for at least 5 seconds the base is...

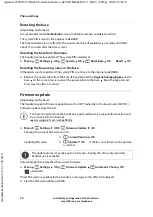
Page 34: ...00 Remove the power cable from the base Keep pressed the Registration paging key on the base At the same time reconnect the power cable to the base Keep the key pressed for at least another 5 seconds Firmware update depending on the base The handset supports firmware updating via the DECT radio link to the base router SUOTA Software Update Over The Air Automatically check whether there is new firm...

Page 35: ... When the function is enabled multiple calls can be made in parallel Permit prevent internal listening in When the function is enabled an internal party can listen in to an external call and take part in the conversation conference On a Gigaset base with Internet access you can also set up different connections and assign them to handsets User guide for your Gigaset base Menu Settings OK Telephony...

Page 36: ...Service Hotline 0818 200 033 6 6561 Ct Call Please have your proof of purchase ready when calling Please note that if the Gigaset product is not sold by authorised dealers in the national territory the product may not be fully compatible with the national telephone network It is clearly specified on the box near the CE mark for which country countries the equipment has been developed If the equipm...

Page 37: ...China 0 21 400 670 6007 RMB 0 11 Croatia 01 2456 555 Czech Republic 233 032 727 Denmark 45 43682003 Finland 358 0 9725 19734 France 0 1 57 32 45 22 Germany 02871 912 912 Greece 30 2111 98 1778 Hong Kong 2763 0203 2389 7285 Hungary 06 1 267 2109 India Please refer to your local warranty card Indonesia 62 21 5673813 62 21 888856000 Ireland 0818 200 033 Italy 02 600 630 45 Il numero è di tipo urbano ...

Page 38: ...cal chemical radio interference or thermal factors e g micro wave sauna etc Devices fitted with accessories not authorised by Gigaset Communications This Guarantee shall not apply to or extend to services performed by the authorised dealer or the customer themselves e g installation configuration software downloads User manuals and any soft ware supplied on a separate data medium shall be excluded...

Page 39: ...l our products feature Privacy by Design as standard All information we collect is used to make our products as good as possible In the process we ensure your details are protected and only used for the purposes of making available to you a product or service We know which path your data takes through the company and ensure this happens in line with data protection specifications in a secure and p...

Page 40: ...ronic equipment For more detailed information about disposal of your old appliance please contact your local council refuse centre or the original supplier of the product Care Wipe the device with a damp cloth or an antistatic cloth Do not use solvents or microfibre cloths Never use a dry cloth this can cause static In rare cases contact with chemical substances can cause changes to the device s e...

Page 41: ...Micro HR03 Voltage 1 2 V Capacity 400 1000 mAh Standby time hours 180 110 Talktime hours 12 Operating time for 1 5 h of calls per day hours 90 70 Charging time in charging cradle hours 4 5 No Radiation switched on off without display backlight in idle mode When charging approx 2 10 W To maintain the charge status approx 1 30 W DECT standard supported GAP standard supported CAT iq Certified in acco...

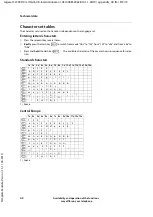
Page 42: ...ey to switch from mode Abc to 123 from 123 to abc and from abc to Abc Press and hold the Hash key The available characters of the key are shown in sequence for selec tion Standard characters Central Europe 1 Space 1x 2x 3x 4x 5x 6x 7x 8x 9x 10x 11x 12x 13x 14x 15x 1 a b c 2 ä á à â ã ç d e f 3 ë é è ê g h i 4 ğ ï í ì î ı j k l 5 m n o 6 ö ñ ó ò ô õ p q r s 7 ß ş t u v 8 ü ú ù û w x y z 9 ÿ ý æ ø å...

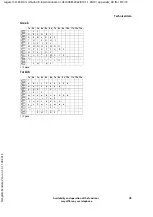
Page 43: ... on your telephone 43 Greek Turkish 1 Space 1x 2x 3x 4x 5x 6x 7x 8x 9x 10x 11x 12x 13x 1 Α Β 2 A B C Δ Ε Φ 3 D E F Γ Η Ι 4 G H I Κ Λ 5 J K L Μ Ν Ο Ω 6 M N O Π Ρ Σ Ψ 7 P Q R S Θ Τ 8 T U V Ζ Ξ Υ Χ 9 W X Y Z 0 _ 1 1 Space 1x 2x 3x 4x 5x 6x 7x 8x 9x 10x 11x 12x 13x 1 a b c ç 2 ä á à â ã d e f 3 ë é è ê g ğ h ı i 4 ï í ì î j k l 5 m n o ö 6 ñ ó ò ô õ p r s ş 7 q ß t u ü v 8 ú ù û y z 9 w x ÿ æ ø å 0 _ ...

Page 44: ...a call 14 31 permanently 31 Changing the display language 30 Character set handset 42 Charging time of handset 41 CLI Calling Line Identification 17 CLIP CLI Presentation 17 CLIR CLI Restriction 17 Conference call 16 Connecting the charger cradle 8 Connection assigning handset 35 change name 35 Connection settings 35 Contact with liquid 40 Control key 5 11 accessing display functions 12 Country 30...

Page 45: ... 5 star key 5 talk key 5 L LAN connection Outage 7 Language set with assistant 9 Last number redial 14 Line 35 Liquid 40 List answer machine 19 calls 18 network mailbox 19 Listening to a message network mailbox 22 Lock unlock the keypad 5 11 M Making calls accepting a call 15 Manufacturer s advice 39 Medical equipment 7 Menu opening 11 Menu navigation 13 Messages key 5 18 Messages list 19 Micropho...

Page 46: ...rching in the directory 19 20 Send base directory to handset 21 Sending directory entry to base 21 Sending a directory entry to a handset 20 Service 36 Setting the time format 29 Setting the wake up time 23 Setting up handset 9 Settings for connections 35 Set up assistant 9 Specifying the time source 29 Speed dial key 15 Star key 5 Status bar 5 13 SUOTA 34 Switching off handset 11 Switching on han...

Page 47: ... 1 4N19 Cover_back_c fm 9 9 19 Template Module Version 1 3 11 04 2019 Issued by Gigaset Communications GmbH Frankenstr 2a D 46395 Bocholt Gigaset Communications GmbH 2019 Subject to availability All rights reserved Rights of modification reserved www gigaset com ...

Reviews: