18
First steps
Gigaset N720 DECT IP Multicell System / engbt / A31008-M2314-L101-2-7619 / starting.fm / 06.02.2012
V
e
rsion 2, 06.0
8
.2010
Registering base stations
¤
Open the Web configurator and log in (
¤
Open the
¢
Network and connectors
¢
Base station registration
page (
The window shows a list of all DECT base stations connected to the local network
which have not yet been registered. The base stations are identified by their MAC
address and by the date and time of their initial contact with the system.
¤
Register all the base stations that are to belong to your telephone system, as described
in section "
".
Synchronising base stations and forming clusters
¤
Open the
Preferences
¢
Network and connectors
¢
Base station synchronisation
page (
The registered base stations are displayed.
¤
Assign each base station to a cluster.
If you only want to manage one cluster, assign all the base stations to the same cluster
number.
¤
Assign the planned synchronisation level to each base station.
Be aware that synchronisation level one can only be assigned once.
¤
Save your settings.
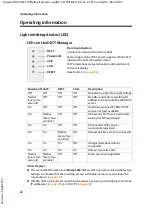
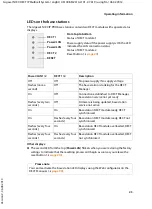
Synchronisation starts automatically. If synchronisation is successful, this is indicated by
the
DECT 1
/
DECT 2
LEDs on the Gigaset N720 IP PRO base stations (
Registering handsets and assigning VoIP accounts
All the handsets to be used for making calls on the Gigaset N720 DECT IP Multicell System
must be registered on the DECT Manager. When registering, the handset is permanently
assigned a VoIP connection as the receive and send connection.
Up to 100 handsets can be connected.
The following handsets are recommended: Gigaset SL610H PRO, SL400H, S810H, E49H.
Further information relating to the functions of the handsets in connection with the
Gigaset base stations can be found in the
) and on the
Service
page at www.gigaset.com/pro/gigasetn720 on the Internet.

