64
Cleaning
Model: GGF-400, GGF-720
6.1.
Boil-Out Procedure - continued
Continued on Next Page
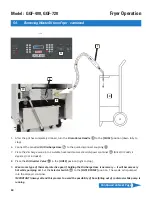
9. Disconnect and remove
Filter Pan
from fryer.
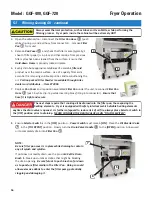
10. Position a suitable
heat resistant catch container
⑥
(not
provided)
beneath the fryer drain.
11. Slowly turn the
Drain Valve Handle
⑦
to the
[OPEN]
position,
allowing boil-out solution to drain from pot. If using catch container, carefully monitor and empty as needed.
As solution drains, clean heating elements and pot surfaces, by scrubbing with the provided brushes.
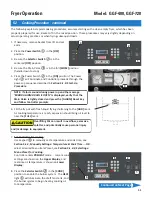
5. Place the
Power Switch
③
in the
[ON]
position.
6. Place the
Selector Switch
④
in
[COOK]
position.
7. After controller powers-up and the alarm sounds,
press
[START]
key to enter
PREHEAT
; amber
HEAT
light on control panel turns
ON
, solution begins
heating
.
Note
Upper Display
reads
“PRESS [BOIL] -
GO TO BOIL-OUT”
. Press the
[BOIL]
key
⑤
to place
fryer into
BOIL OUT mode.
Temp setting changes to
200°F (93°C)
and time begins countdown from
30
mins
. Allow the boil out cycle to run completely.
These values can be changed in User Settings, Section 5.1.7
.
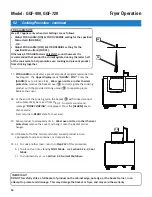
8. When boil out cycle time expires, a
“
DONE COOKING”
alarm
sounds; place both
Selector Switch
④
and
Power Switch
③
in the
[OFF]
position.
6
4
3
5
NOTE:
As a safeguard, when the boil out cycle
ends, the controller temperature
setpoint automatically changes to 50F.
Before cooking activities can resume, a
menu item preset
must be re-selected,
or temperature setpoint must be re-
entered manually.
IMPORTANT!!
DO NOT drain boil-out solution into the filter pan or run through
filter pump!
It is corrosive and can cause damage to
components. Equipment failures and/or malfunctions caused in
this manner, are not be covered by the factory warranty
The container used for this step should be
heat resistant up to 300°F (148°C). Plastic is
generally not safe, as it may soften and break open. A leak-
proof metal container should be used. Failure to comply with
this caution may result in personal injury.
If a floor drain is available in a suitable nearby location, slowly
draining solution onto floor and squeegeeing the liquid into the
drain is an acceptable alternative
(may require a helper)
.
7
Summary of Contents for GGF Series
Page 13: ...4 Model GGF 400 GGF 720 Introduction ...
Page 26: ...Model GGF 400 GGF 720 Overview 18 3 1 Control Panel 5 6 4 3 2 1 7 ...
Page 28: ...20 Model GGF 400 GGF 720 Overview 3 2 Lower Cabinet 5 6 4 3 2 1 7 ...
Page 32: ...24 Model GGF 400 GGF 720 Overview 3 4 Basket and Elevator Assembly 3 1 2 4 ...
Page 38: ...30 Model GGF 400 GGF 720 Overview Notes ...
Page 42: ...34 Fryer Preparation Model GGF 400 GGF 720 ...
Page 80: ...72 Troubleshooting Model GGF 400 GGF 720 ...
Page 88: ...80 Parts List 8 5 Plumbing Model GGF 400 GGF 720 1 2 2 3 3 4 5 6 7 7 7 7 8 10 11 9 12 ...
Page 90: ...82 Parts List 8 6 Basket Basket Cover Model GGF 400 GGF 720 1 2 3 ...
Page 94: ...86 Parts List Notes Model GGF 400 GGF 720 ...
Page 95: ......


