background image

 Condor 2 user manual 

 _____________________________________________________________________________________________________________________________________ 

 inspection according to the strictest GIN Inspection Instruction guidelines. Finally the overall condition 
 of the paraglider should be assessed and recorded. 

 Additional inspections should be performed following a crash or violent landing on the leading 

 edge, or if you note a deterioration of performance or behaviour. 

 The condition of all components and materials must be checked with the utmost accuracy during 

 testing in accordance with the GIN inspection instructions. These results, and an overall assessment 
 of the condition, are part of the check log. 

 Service and repair shops authorized by Gin gliders are in possession of the Gin Gliders inspection 

 instruction, which contains all the necessary procedures, equipment and additional technical 
 information about the Condor 2, such as single line lengths, sewing and further material and 
 processing guidelines. 

 It is very important that your glider is serviced at the required intervals throughout its entire life. In 
 order to bene

fi

t from Gin Gliders warranty: 


 You must have your paraglider inspected by Gin Gliders or an inspection agent authorised by 
 Gin Gliders. 


 The documentation and the result of the inspection must be clearly identi

fi

able (date and 

 place / name of the inspector) and be entered near the glider information/certi

fi

cation sticker. 

 Pilots are able to carry out the inspections themselves or appoint a third party to do so (e.g. 

 manufacturer/importer), provided that the requirements are all ful

fi

lled. However, if this is done, the 

 liability and warranty of Gin Gliders will lapse. 

 GIN and the commissioned test laboratory recommends that inspection is carried out by the 

 manufacturer/importer or by an authorised inspection agent. 

 Repairs 

 All repairs and servicing should be carried out by a Gin Gliders authorised workshop or directly by Gin 
 Gliders. Gin Gliders workshops have trained staff, original Gin Gliders parts and the necessary 
 know-how, all of which will ensure top quality. 

 Major repairs at the Condor 2, such as replacing panels, should only be carried out by the distributor 

 or manufacturer. 

 Very small holes in the sail can be repaired with the sticky back tape provided with your glider. 
 Damaged lines should be replaced by your GIN dealer. Before 

fi

tting a replacement line, check it for 

 length against its counterpart on the other side of the wing. When a line has been replaced, always 
 in

fl

ate the glider on 

fl

at ground to check that everything is in order before 

fl

ying. 

 Page  34 

Summary of Contents for Condor2

Page 1: ...v1 0 March 2022...

Page 2: ...version number of this manual are given on the front page Gin Gliders Inc The reproduction of this manual including the partial reprint with the exception of short quotations in technical articles re...

Page 3: ...re no special flying procedures and or configurations apart from those detailed in this manual Your GIN paraglider has been designed to meet all safety and regulatory requirements These requirements a...

Page 4: ...ion 9 Operating limitations 10 Before the first flight 10 Trike 10 Harnesses 10 Reserve 11 Weight range 11 First flight 11 Preparation for launch 13 General warnings and advice 13 Material check 13 Pr...

Page 5: ...es of stall 25 Deep stall parachuting stable stall 26 Full stall dynamic stall 26 Spin 27 Other tips for dangerous situations 27 Cascade 27 Emergency steering rear riser steering 27 Flying in the rain...

Page 6: ...cription of pilot skills required 37 Target group and recommended flying experience 37 Normal flight requirements 37 Requirements for incidents and quick descents 37 Manufacturing and delivery 37 Over...

Page 7: ...also to ISO 9001 2008 We believe that the product should speak for itself Only by flying can the pilot understand the wing and develop trust and confidence in it From this feeling comes safety comfort...

Page 8: ...site Paragliding is of course an outdoor sport protect and preserve our planet s resources Gin Gliders gives consideration to the entire lifecycle of its paragliders the last stage of which is recycl...

Page 9: ...manual Safety notices Safety notices are issued when defects arise during use of a paraglider which could possibly also affect other gliders of the same model The notices contain instructions on how t...

Page 10: ...are different for each motor unit It is the pilot s responsibility to ensure that the required accessories are approved by the manufacturer and that they have the necessary strength for the maximum t...

Page 11: ...e reserve installation the pilot or person installing the rescue system is obliged to ensure that the conditions in this document are met Additional technical conditions for ULM with rescue device Thi...

Page 12: ...________________________________________________________ Carry out your first flights only during stable weather and in a familiar area or on a training slope You should steer gently and carefully to...

Page 13: ...day Is your equipment and choice of site suitable for your level of experience Do you have a suitable helmet gloves boots eyewear and adequate clothing Are you carrying some form of identification in...

Page 14: ...es open 3 Are all the lines untangled and are any lines under the canopy 4 Are the trimmer positions correct and symmerical 5 Does the weather in particular wind direction and strength allow a safe fl...

Page 15: ...der and follow the take off direction If both risers have a steady tension and the glider is above the pilot the control view is carried out Check that the canopy is completely inflated and that no li...

Page 16: ...f and pick up speed before converting speed to height with a brief application of the brakes An additional reason not to climb too fast is related to the risk of low level engine failure Although the...

Page 17: ...Condor 2 will leave you all the comfort to adjust everything properly Trim speed brakes fully released is the best glide speed in still air The brake lines are used to adjust the speed according to th...

Page 18: ...e flying to eliminate collapses in all but the most turbulent conditions Keep tension on the brakes approximately equal to the weight of your arms This allows you to stay relaxed and sensitively feel...

Page 19: ...in your paraglider and should be avoided if you want to preserve your paraglider We recommend that you practice the rapid descent techniques under professional guidance during a safety training course...

Page 20: ...The advantage of big ears is that the glider continues to fly straight meaning that a danger area can be avoided It is even possible to land using big ears for example on a top landing to compensate...

Page 21: ...er the headwind the more energetic and deeper the final braking must be In the case of stronger headwinds the final braking must not be too abrupt In very strong winds the brakes are not pulled down c...

Page 22: ...s recommended to use the trimmers to half or completely closed maximum lift Your performance in sink rate will be better This choice is even more crucial at a high wing loading Make a flat approach wi...

Page 23: ...ut the right safety altitude or without training Always keep within the recommended limits Avoid aerobatics and extreme loading such as spirals and big ears This will prevent accidents and avoid overl...

Page 24: ...ogressive pumping action Be sure not to apply too much brake too slowly as this may risk a stall Remember that a partly collapsed wing has a reduced surface area and thus a higher stall speed If you g...

Page 25: ...rakes Take care not to apply too much brake for too long as this may stall the wing In the case of extreme front stalls across the entire wing chord the wing tips may move forward making the glider fo...

Page 26: ...mushy and the airflow around your ears decreasing The glider may also compress spanwise Flying in strong turbulence or exiting a deflation with too much brake applied can cause this situation A wet gl...

Page 27: ...dle has come undone or a brake line is defective the Condor 2 can also be steered and landed using the rear risers In this case stall happens more quickly and the pilot must compensate for the changed...

Page 28: ...methods spiral dives or prohibited aerobatic manoeuvres They considerably accelerate the aging process of the structure and should therefore be avoided The glider must be inspected earlier than is usu...

Page 29: ...so perform an important function on launch Therefore the less they have been bent the more easily the glider will inflate and launch Packing the Condor 2 1 Spread out the paraglider completely on a sm...

Page 30: ...xtra for pilots that require it Packing the rucksack Even if your paraglider was completely dry when it was packed up after the final flight of the season for long term storage you should if possible...

Page 31: ...after landing Modern paraglider fabrics have better protection against the sun but UV rays in particular are still one of the decisive factors in how the fabric ages The colours will fade first and t...

Page 32: ...The plastic rods on the Condor 2 can all be replaced through small pockets If you notice that a plastic rod has been damaged or misshapen because of incorrect use this can be replaced by Gin Gliders...

Page 33: ...ear are slight bumps or changes in flying characteristics The lines must then be replaced immediately Use only inspected and approved lines which can be obtained through Gin Gliders Failure to observe...

Page 34: ...ed by Gin Gliders or an inspection agent authorised by Gin Gliders The documentation and the result of the inspection must be clearly identifiable date and place name of the inspector and be entered n...

Page 35: ...quality of our products and are committed to putting right any problems affecting the safety or function of your equipment and which are attributable to manufacturing faults Your GIN dealer is your fi...

Page 36: ...is markedly modified and different from the description given The Condor 2 was developed and tested for use solely as a paramotor wing Any use other than as intended is prohibited The Condor 2 receive...

Page 37: ...ol the most common disturbances especially side and front collapses Flight maneuvers such as a steep spiral or a B stall make higher demands on the pilot due to the overall more demanding handling beh...

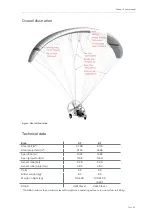
Page 38: ...Technical data Area flat m2 37 00 41 15 Area projected m2 31 34 34 86 Span flat m 14 07 14 84 Span projected m 11 08 11 69 Aspect ratio flat 5 35 5 35 Aspect ratio projected 3 92 3 92 Cells 49 49 Glid...

Page 39: ...hey do not have to be held for a long period during flying The lines can be tightened and re attached to the clamp The advantage of fixation is that the paraglider can be controlled normally via the b...

Page 40: ...he trimmer Line system and brakes The Condor 2 has A B C and D line levels which fork three or four times from the bottom riser to the top canopy and which are divided into Main Middle Higher Middle a...

Page 41: ...handle attachment as shown in the diagram Brake line knot If the brake lines are too long the paraglider reacts slowly and is di cult to land The brake lines can be adjusted during flight by wrapping...

Page 42: ...Condor 2 user manual _____________________________________________________________________________________________________________________________________ Page 42...

Page 43: ...Condor 2 user manual _____________________________________________________________________________________________________________________________________ Line layout Page 43...

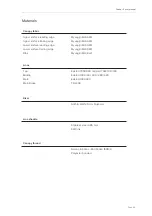
Page 44: ...urface trailing edge Lower surface leading edge Lower surface trailing edge Ribs Myungjin MJ40 MF Myungjin MJ40 MF Myungjin MJ40 MF Myungjin MJ40 MF Myungjin MJ38 HF Top Middle Main Main Brake Edelrid...

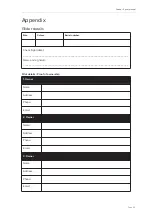
Page 45: ..._______________________________ Appendix Glider details Check flight date _________________________________________________________________________ Name and signature _________________________________...

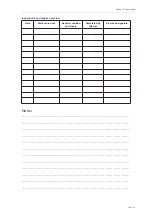
Page 46: ..._________________________________________________________________________________ ______________________________________________________________________________________________ _______________________...

Page 47: ...Fon 49 0 8022 9675 0 Fax 49 0 8022 9675 99 Email dhv dhv de www dhv de Route du Pr au Comte 8 1844 Villeneuve Switzerland Fon 41 219 65 65 65 Fax 41 219 65 65 68 www para test com B timent 1602 9 rue...

Page 48: ...www gingliders com...

Reviews: