background image

Introduction

Thank you for choosing the GIO Electric Peak electric bicycle, this manual
contains information regarding safety, assembly and maintenance of your
new e-bike. The pictures included in this manual are for reference and may

di er from your bike/show similar components of a di erent model.

Please read the

entire

manual before riding your new bicycle and

familiarize yourself with its operation. Refrain from allowing anyone else to
ride your e-bike if they are not familiar with its use.

∙ N E V E R modify your e-bike with unapproved accessories.
∙ N E V E R ride through deep water.
∙ N E V E R perform wheelies, jumps, or trick stunts.
∙ N E V E R operate your e-bike after consuming any alcohol or drugs.
∙ A V O I D riding in the rain for long periods of time.
∙ A V O I D water contact to the motor and electric lines.
∙ A V O I D running your battery extremely low or completely dead.
∙ A L W A Y S keep both hands on handlebars.
∙ A L W A Y S apply brakes lightly when riding on rocks or loose surfaces.
∙ A L W A Y S inspect your e-bike before each ride to ensure a safe ride.
∙ A L W A Y S turn your e-bike o  when stopped and when not in use.
∙ A L W A Y S charge your e-bike after riding and prior to first use.

This e-bike is not designed for two riders. Please ensure only one person at
a time is riding the e-bike. Max weight 264lbs (120kg)

Young children, pregnant women, and any person with vision, balance, or

other condition that would prevent them from riding a standard bicycle
should not use this e-bike.

This e-bike is for on-road, or maintained trail use only and should not be

used for riding rough terrain. Damage to the bike may occur if used in
such o -road conditions.

Under standard road conditions (paved asphalt, concrete, cement without

wind resistance, with a temperature of 77°F (25°C), and with battery

capacity attenuation ≤5%), the running distance per charge is approx.
18.6miles (30km).

When riding in slippery conditions, such as rain or snow, allow extra

distance for braking. When the e-bike runs at the speed of 12.4mph
(20km/h), the wet braking distance should be no longer than 50’ (15m).

For your safety and that of other people, turn o your e-bike when it is not

in use or if there is a problem with any electric component. Your battery will
also drain while the e-bike is turned on even if not in use.

For saving energy and extending the life of the battery, please use the

pedals for assistance on the e-bike when climbing a slope or heading into

the wind.

02

Summary of Contents for Peak

Page 1: ......

Page 2: ...omplex object however it is recommended that you consult an e bike repair specialist if you have concerns as to your ability to assemble repair or maintain this product It is important for you to understand your new e bike By reading this manual completely before the first ride you will get better performance and enjoyment from this product also it s helpful to extend the life of your e bike Table...

Page 3: ... in use A L W A Y S charge your e bike after riding and prior to first use This e bike is not designed for two riders Please ensure only one person at a time is riding the e bike Max weight 264lbs 120kg Young children pregnant women and any person with vision balance or other condition that would prevent them from riding a standard bicycle should not use this e bike This e bike is for on road or m...

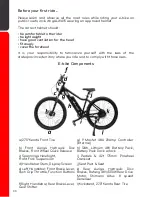
Page 4: ...ply with those laws E bike Components a 27 5 Kenda Front Tire g 9 Mosfet 48A 20Amp Controller internal b Front Auriga Hydraulic Disc Brakes Front Wheel Quick Release h 12Ah Lithium 48V Battery Pack Battery Pack Dock w lock c Spanninga Headlight Front Fork Suspension i Pedals 42t 175mm Prowheel Crankset d Handlebar Stem Display Screen j Seat Post Seat e Left Handlebar Front Brake Lever Push Grip Th...

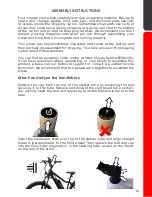
Page 5: ...s in the shipping carton about 90 assembled You can find an assembly video online at https youtu be AHz0PDdsUQc If you have questions about assembling or your ability to assemble this product please call our technical support or consult a qualified bicycle technician We recommend that two people work together to assemble the e bike Attach and adjust the handlebars Remove the cap from the top of th...

Page 6: ... release front axle The front axle quick release consists of the axle with a lever a on one end a fitting b 2 springs c and a capped nut d Begin the wheel installation by installing the axle into the front wheel Carefully remove the plastic guard shielding the front brake disc avoiding touching the disc Unscrew and remove the capped nut and one of the 2 springs from the axle then insert the axle t...

Page 7: ...adying the wheel vertically carefully lift the front forks over the axle slot the brake disc a in between the brake pads of the brake caliper b and lower the forks squarely onto the axle Once in place snug the capped nut until the lever on the brake side requires enough pressure to close that it leaves an imprint on your hand when closing 06 ...

Page 8: ...he left side arm and is turned counter clockwise The right pedal attaches to the chain side crank arm by turning clockwise Check your pedals before each ride to ensure that they are tight If you ride your bike with loose pedals you may strip the threads that hold the pedal to the crank Adjust Seat Seat Post The installation and adjustment of your seat is the easy yet very important step Open the q...

Page 9: ...erall performance To begin checking the brakes use a stand second person some other object to hold the e bike so you are able to freely spin the wheel Visually inspect the clearance between the brake disc a and the brake pads b A light can be used to backlight the caliper making it easier to see If with the brakes not engaged there is no rubbing between the pads and the spinning rotor your brakes ...

Page 10: ... using the pedals PAS or the throttle Power Assist PAS In the power assist mode the motor is engaged when you pedal forward Even lightly pushing the pedals will activate the motor and maintain desired assistance level Power assist will automatically shut off when the e bike has reached the maximum speed if the brakes are applied or if you stop pedaling You should use the SHIMANO gear shifter on th...

Page 11: ...d it may not re charge The Lithium battery is built with circuitry that prohibits over charging and excessive discharging Your battery pack switch has 2 positions Turning the key counter clockwise will set it to the locked ON position and turning the key clockwise will turn it to unlocked OFF position It is a good idea to turn the key to the OFF position after any ride so that your e bike will not...

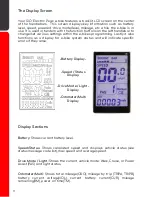
Page 12: ... display for e bike system status and will indicate specific errors if they arise Battery Display Speed Status Display Drive Mode Light Display Odometer Multi Display Display Sections Battery Shows current battery level Speed Status Shows calculated speed and displays vehicle status see status message code list max speed and average speed Drive Mode Light Shows the current vehicle mode Walk Cruise...

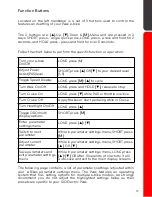
Page 13: ...Turn Cruise Off Apply brakes or start pedaling while in Cruise Turn Headlight On Off LONG press Toggle ODO multi display options SHORT press M Enter parameter settings menu LONG press Switch to next parameter While in parameter settings menu SHORT press M Adjust current parameter While in parameter settings menu SHORT press OR Save parameters and exit parameter settings menu While in parameter set...

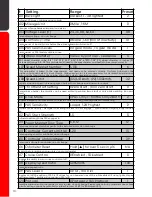
Page 14: ...ther the throttle can be used without pedaling zero start or only while pedaling non zero start p10 Drive Mode 0 PAS Only 1 Throttle Only 2 Both 2 Toggles method to activate motor GIO Electric Peak runs using both regardless of this setting p11 PAS Sensitivity Lowest 1 24 Highest 2 Adjusts PAS sensitivity The higher the setting the less PAS will engage This will result in slightly longer battery l...

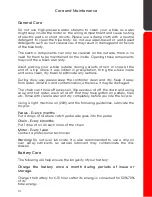
Page 15: ...se keep the controller clean and dry Keep it away from water vibration and contamination otherwise it may be damaged The chain can throw off excess oil Wipe excess oil off the chain and using soap and hot water wash all oil off that may have gotten on pedals tires etc Rinse with clean water and dry completely before you ride the bicycle Using a light machine oil 20W and the following guidelines lu...

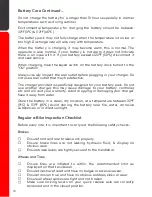
Page 16: ... battery pack Do not use another charger this may cause damage to your battery controller etc and will void your warranty Avoid dropping or damaging your charger Keep it away from water Store the battery in a clean dry location at a temperature between 32 F 0 C 113 F 45 C Avoid storing the battery near fire water corrosive substances or in direct sunlight Regular e Bike Inspection Checklist Before...

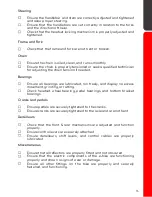
Page 17: ...ed run freely and display no excess movement grinding or ratting Check headset wheel bearing pedal bearings and bottom bracket bearings Cranks and pedals Ensure pedals are securely tightened to the cranks Ensure cranks are securely tightened to the axle and are not bent Derailleurs Check that the front rear mechanisms are adjusted and function properly Ensure control levers are securely attached E...

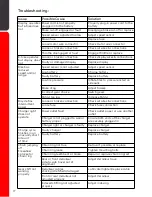
Page 18: ...ar choice Switch gears PAS lvl too low Increase PAS lvl Bicycle has intermittent power Loose or broken connection Check all wires connections Loose fuse Check fuse connection Charger light does not operate Power outlet fault Check outlet power or use another outlet Charger is not plugged to wall or battery proper Ensure both ends of the charger are securely plugged in Charger light or charger is f...

Page 19: ...ll anomaly 8 Turning malfunction 36 Brake anomaly 9 Controller failure 37 Communication anomaly Warranty The limited warranty as contained herein is exclusive and in lieu of all other warranties expressed or implied There are no warranties that extend beyond the description in this limited warranty GIO Electric guarantees this product including charger motor controller to be free of manufacturing ...

Page 20: ......

Reviews: