13
12
•
Assicurarsi che gli utilizzatori del pas-
seggino siano a conoscenza dell’esatto
funzionamento dello stesso.
•
Nelle operazioni di regolazione assicu-
rarsi che le parti mobili del passeggino
non vengano a contatto con il corpo del
bambino.
•
L’uso di spartigambe e cinture di sicu-
rezza è indispensabile per garantire la
sicurezza del bambino. Utilizzare sem-
pre le cinture di sicurezza contempora-
neamente allo spartigambe.
•
Non lasciare mai il passeggino su un
piano inclinato, con dentro il bambino,
anche se con i freni azionati.
•
Non usare il passeggino sulle scale o
sulle scale mobili: si potrebbe perdere
improvvisamente il controllo.
•
Prestare attenzione quando si sale e
scende un gradino o il marciapiede.
•
Utilizzare il dispositivo frenante ogni
qualvolta si sosti.
•
Per evitare rischi di strangolamento,
non dare al bambino e non riporre vicino
al bambino oggetti muniti di corde.
•
Se lasciate il passeggino esposto al
sole per molto tempo, aspettate che si
raffreddi prima di mettervi il bambino.
L’esposizione prolungata al sole può
causare cambiamenti di colore nei ma-
teriali e tessuti.
•
Evitare il contatto del passeggino con
acqua salina per prevenire la formazio-
ne di ruggine.
•
Non utilizzare il passeggino in spiaggia.
•
Quando non in uso, il passeggino va te-
nuto lontano dalla portata dei bambini.
PER RAGIONI DI NATURA TECNICA O COM-
MERCIALE, GIORDANI POTRÀ APPORTARE
IN QUALUNQUE MOMENTO, ANCHE SOLO
IN UN DETERMINATO PAESE, MODIFICHE
AI MODELLI DESCRITTI IN QUESTA PUB-
BLICAZIONE CHE POSSONO INTERESSA-
RE CARATTERISTICHE TECNICHE DEGLI
STESSI E/O FORMA, TIPO E NUMERO DE-
GLI ACCESSORI FORNITI.
UK
G
IORdANI
S
EATTLE
STROLLER
(FROM 6 MONTHS TO 3 YEARS)
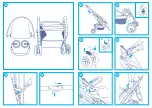
HOW TO OPEN THE STROLLER
1. WARNING:
To avoid risk, ensure that
your child or other children are at a safe
distance when opening this product.
When opening, make sure the mobile
components of the stroller do not come
in contact with your child.
2.
Release the lock as shown in the box.
3.
Pull the button on the left side (step
A) and press the button at the bottom
(step B).
4.
Grasp the handle and pull it upwards
until it clicks into place when opening
is complete.
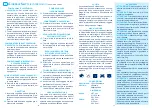
HOW TO MOUNT
THE FRONT WHEELS
5. WARNING:
Before use, make sure that
the wheel units are locked into place.
Mount the front wheel on the stroller
until it is fully engaged into place. Re-
peat this step for the other wheel unit.
HOW TO OPERATE
THE FRONT SWIVEL LOCK
6.
Lift both swivel lock levers to lock the
rotation. To unlock it, push them in the
opposite direction.
HOW TO USE THE BUMPER BAR
7.
Insert the bumper bar into the joint un-
til completely engaged as shown in the
box.
8.
Press the plastic clip to remove the
bumper bar as shown in the box.
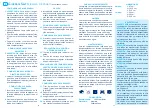
HOOd
9.
Insert the hood into the plastic compo-
nent until completely engaged. Repeat
this step on the other side also.
10.
Operate in the opposite direction to re-
move the hood.
AdJUSTING THE LEG REST
11.
Press the button located next to the
seat to adjust the leg rest in the desired
position.
HOW TO APPLY THE BRAKES
12.
Press the brake levers on the left side
downwards to apply the brakes. Push
the brake levers upwards to release the
wheels.
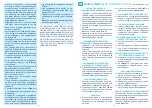
AdJUSTING THE RECLINEd/VERTICAL
POSITION
13.
Pull the buckle to recline the backrest.
14.
Pull the straps forward from both sides
to adjust the backrest in a vertical po-
sition.
AdJUSTMENT OF THE FIVE-POINT
HARNESS SYSTEM
15.
Press the left button of the buckle to
release the lap belt on the left side.
16.
Repeat the same step to release the
lap belt on the right side.
HOW TO CLOSE
THE STROLLER
17.
Pull the button on the left side (step
A) and press the button at the bottom
(step B).
18.
Grasp the handle and push it forward
to close it.
19.
Ensure that the stroller is completely
closed with the lock.
20.
The stroller can remain in an upright
position after being closed.
MAINTENANCE ANd CARE
The user must perform cleaning and main-
tenance of this product regularly. Only
adults must perform cleaning and mainte-
nance of this stroller.
CLEANING
The cover is not removable.
Clean the fabric parts with a damp sponge
and a mild detergent. Please refer to the
label of the product.
Clean metal parts regularly with a soft and
damp cloth. Always dry the metal parts to
prevent the formation of rust in case of con-
tact with water.

