ENGLISH
9
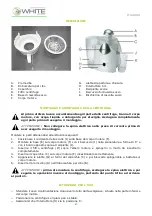
DESCRIPTION
A.
Presser
B.
Feeder tube
C.
Lid
D.
Centrifugal filter
E.
Juice collecting base
F.
Motor body
G.
Holding tabs
H.
On/Off switch
I.
Pulp container
J.
Spout for juice outlet
K.
Juice glass
MOUNTING AND DISMOUNTING OF THE APPLIANCE
Before using the appliance for the first time, all parts except the motor body must
be cleaned with warm soapy water. Finally all parts must be thoroughly dried
before their reassembly.
WARNING
: Do not plug the appliance before mounting each part properly.
Follow the mounting instructions below:
1.
Place the pulp container (I) in its housing on the motor body (F).
2.
Insert the juice collecting base (E) on the motor body (F) by positioning the juice spout (J)
into its ‘V’ housing.
3.
Fit the centrifugal filter (D) onto the drive shaft coupling and push it downwards to lock it.
4.
Place the lid (C) on the motor body (F).
5.
Hook the holding tabs (G) to the lid (C) by pushing them towards the motor body (F).
6.
Fit the presser (A) into the feeder tube (B).
WARNING
: Before disassembling the appliance, unplug it and then follow the
instructions in the opposite way of the mounting process starting from point 6 to
point 1.
INSTRUCTION FOR USE
−
Unroll the power cord from its location in the lower part of the motor body.
−
Place the juice extractor on a stable and a flat surface.
−
Make sure the ON/OFF switch (H) is positioned at ‘0’.
−
Pull out the presser (A) from the feeder tube (B).
−
Place the juice glass (K) under the spout for the juice outlet.

