background image

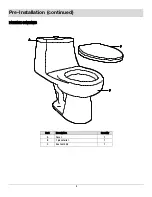
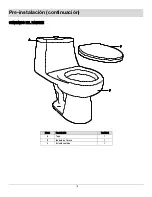
Pre-Installation (continued) 

PACKAGE CONTENTS 

Part 

Description 

Quantity 

Cover 

1 piece toilet 

Seat with lid 

Summary of Contents for 1000633237

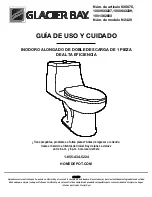
Page 1: ...eate quality products designed to enhance your home Visit us online to see our full line of products available for your home improvement needs Thank you for choosing Glacier Bay USE AND CARE GUIDE HIGH EFFICIENCY ELONGAGED 1 PIECE DUAL FLUSH TOILET Questions problems missing parts Before returning to the store call Glacier Bay Customer Service 8 a m 6 p m EST Monday Friday 1 855 434 5224 HOMEDEPOT...

Page 2: ... will replace FREE OF CHARGE any product or parts that proves defective Simply return the product part to any of The Home Depot retail locations or call 1 855 HD Glacier 1 855 434 5224 to receive the replacement item Proof of purchase original sales receipt from the original consumer purchaser must be made available for all Glacier Bay warranty claims This warranty excludes incidental inconsequent...

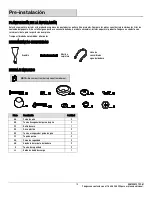
Page 3: ...maged do not attempt to assemble install or operate the product Contact customer service for replacement parts Estimated Assembly Time 60 minutes TOOLS REQUIRED Putty knife Carpenters level Toilet water supply line HARDWARE INCLUDED NOTE Hardware not shown to actual size Part Description Quantity AA Floor bolt 2 BB Floor bolt hex nut 2 CC Wax ring 1 DD Plastic disc 2 EE Floor bolt wing nut 2 FF Bo...

Page 4: ...4 Pre Installation continued PACKAGE CONTENTS Part Description Quantity A Cover 1 B 1 piece toilet 1 C Seat with lid 1 ...

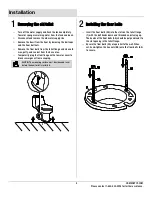
Page 5: ...bolts from the toilet flange and clean old wax putty and sealant from the base area Temporarily plug the floor flange with a towel or cover to block sewer gases from escaping NOTE The mounting surface must be clean and level before the new toilet is installed Insert the floor bolts AA into the slots on the toilet flange 1 with the bolt heads down and threaded ends facing up The heads of the floor ...

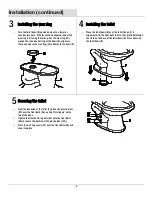
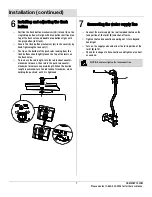
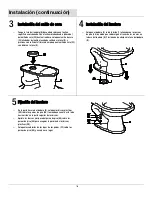
Page 6: ...o the bowl B Place the toilet bowl B over the toilet flange 1 in alignment with the floor bolts AA so they protrude through the slots on the base of the toilet bowl B Press down on the toilet bowl B 5 Securing the toilet From the backside of the toilet B place the plastic discs DD over the floor bolts AA noting this side up on the top of the discs Tighten the floor bolt wing nuts EE onto the floor...

Page 7: ...ng from the flush buttons should lightly touch the top of the levers on the flush valve To increase the rod length turn the rod locknut counter clockwise to loosen then rotate the push rod counter clockwise to increase exposed length When the desired length is achieved turn the rod locknut clockwise while holding the push rod until it is tightened Connect the water supply line not included between...

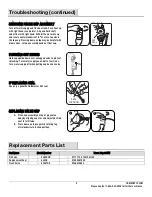
Page 8: ...use damage to the seat s finish so test your cleaning solution on an inconspicuous area before applying to the entire surface WARNING DO NOT USE IN TANK CLEANERS Products containing chlorine calcium hypochlorite can seriously damage tank fittings potentially causing leaks excessive water use and property damage Troubleshooting Problem Solution If fill valve does not turn on will not turn off or wi...

Page 9: ...t cup FLUSHING OUT DEBRIS Hold cup upside down over uncapped valve to prevent splashing Turn water supply on and off a few times Turn water supply off when putting cap back on valve IF REPLACING SEAL Use only a genuine Fluidmaster 242 seal REPLACING VALVE CAP A Place cap assembly on top of grey valve body by aligning cap arm and adjustment rod next to refill tube B Press down on top cap while rota...

Page 10: ...Questions problems missing parts Before returning to the store call Glacier Bay Customer Service 8 a m 6 p m EST Monday Friday 1 855 434 5224 HOMEDEPOT COM Retain this manual for future use ...

Page 11: ...rar su hogar Visítenos en internet para ver nuestra línea completa de productos disponibles para sus necesidades de mejorar su hogar Gracias por elegir a Glacier Bay GUÍA DE USO Y CUIDADO INODORO ALONGADO DE DOBLE DESCARGA DE 1 PIEZA DE ALTA EFICIENCIA Tiene preguntas problemas o faltan piezas Antes de regresar a la tienda llame al Servicio a Clientes de Glacier Bay de lunes a viernes entre 8 a m ...

Page 12: ...eemplazaremos LIBRE DE CARGOS cualquier producto o pieza que se demuestre está defectuosa Símplemente devuelva el producto a cualquiera de las ubicaciones de venta al detalle de The Home Depot o llame al 1 855 HD Glacier 1 855 434 5224 para recibir el artículo de reemplazo La prueba de compra recibo de venta original del comprador consumidor original debe estar disponible para todos los reclamos d...

Page 13: ...perar el producto Póngase en contacto con servicio al cliente para las partes de reemplazo Tiempo estimado de ensamblado 60 minutos HERRAMIENTAS REQUERIDAS Espátula Nivel de carpintero Línea de suministro de agua del inodoro HERRAJE INCLUIDO NOTA No se muestra el herraje con el tamaño real Pieza Descripción Cantidad AA Perno de piso 2 BB Tuerca hexagonal del perno de piso 2 CC Anillo de cera 1 DD ...

Page 14: ...14 Pre instalación continuación CONTENIDO DEL PAQUETE Pieza Descripción Cantidad A Tapa 1 B Inodoro de 1 pieza 1 C Asiento con tapa 1 ...

Page 15: ...pie la cera masilla y sellador viejos del área de la base Tape temporalmente la brida del piso con una toalla o cobertor para evitar que escapen los gases de la cloaca NOTA La superficie de montaje debe estar liimpia y a nivel antes de instalar el nuevo inodoro Inserte los pernos de piso AA en las ranuras de la brida del inodoro 1 con las cabezas de los pernos hacia abajo y los extremos roscados h...

Page 16: ...oloque el inodoro B sobre la brida 1 alineado con los pernos de piso AA de modo que sobresalgan a través de las ranuras en la base del inodoro B Presione hacia abajo en la taza del inodoro B 5 Fijación del inodoro De la parte trasera del inodoro B coloque los discos plásticos DD sobre los pernos de piso AA tomando en cuenta este lado hacia arriba en la parte superior de los discos Apriete las tuer...

Page 17: ...amente la parte superior de las palancas en la válvula de descarga Para aumentar la longitud de la vailla gire la tuerca de seguridad de la varilla hacia la izquierda luego gire la varilla de empuje hacia la izquierda para aumentar la longitud expuesta Cuando se logre la longitud deseada gire la tuerca de seguridad de la varilla hacia la derecha mientras sostiene la varilla de empuje hasta que est...

Page 18: ...abado del asiento de modo que pruebe su solución de limpieza en un área no visible antes de aplicarlos a toda la superficie ADVERTENCIA NO USE LIMPIADORES DENTRO DEL TANQUE Los productos que contienen cloro hipoclorito de calcio pueden dañar seriamente los accesorios del tanque ocasionando posibles fugas uso excesivo de agua y daños a la propiedad Resolución de fallas Problema Solución Si la válvu...

Page 19: ...pada para que no salpique agua Abra y cierre completamente el suministro de agua unas cuantas veces Cierre la llave de suministro de agua cuando regrese la tapa de la válvula a su lugar SELLO DE SUSTITUCIÓN Use solamente un verdadero sello de Fluidmaster 242 LA SUSTITUCIÓN DE TAPA DE LA VÁLVULA A Coloque el ensamblado de la tapa sobre el cuerpo de la válvula gris alineando el brazo de la tapa y la...

Page 20: ...blemas o faltan piezas Antes de regresar a la tienda llame al Servicio a Clientes de Glacier Bay de lunes a viernes entre 8 a m y 6 p m hora local del Este 1 855 434 5224 HOMEDEPOT COM Conserve este manual para uso futuro ...

Reviews: