background image

5

Installation

Removing the old toilet

Installing the floor bolts


HOMEDEPOT.COM/GLACIERBAY


Please contact 1-855-HD-GLACIER for further assistance.

1

2


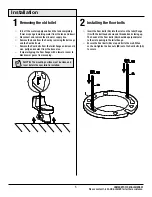
Turn off the water supply and flush the tank completely. 
Towel or sponge remaining water from the tank and bowl.


Disconnect and remove the old water supply line.


Remove the bowl from the floor by removing the bolt caps 
and the floor bolt nuts.


Remove the floor bolts from the toilet flange and clean old 
wax, putty, and sealant from the base area.


Temporarily plug the floor flange with a towel or cover to 
block sewer gases from escaping.


Insert the floor bolts (AA) into the slots on the toilet flange 
(1) with the bolt heads down and threaded ends facing up. 
The heads of the floor bolts (AA) should be perpendicular 
to the slot opening in the toilet flange.


Ensure the floor bolts (AA) are parallel to the wall. When 
set, hand-tighten the hex nuts (BB) onto the floor bolts (AA) 
to secure.

NOTE: 

The mounting surface must be clean and 

level before the new toilet is installed.

Summary of Contents for 1000633241

Page 1: ...hase of this toilet We strive to continually create quality products designed to enhance your home Visit us online to see our full line of products available for your home improvement needs Thank you...

Page 2: ...lace FREE OF CHARGE any product or parts that proves UU defective Simply return the product part to any of The Home Depot retail locations or call 1 855 HD GLACIER 1 855 434 5224 to receive the replac...

Page 3: ...ed in wax ring box 2 BB Floor bolt hex nut Located in wax ring box 2 CC Wax ring 1 DD Plastic disc 2 EE Floor bolt wing nut Located in wax ring box 2 FF Bolt cap 2 GG Brass washer Preassembled to Tank...

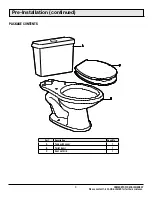
Page 4: ...re Installation continued PACKAGE CONTENTS HOMEDEPOT COM GLACIERBAY Please contact 1 855 HD GLACIER for further assistance Part Description Quantity A Tank with cover 1 B Toilet bowl 1 C Seat with lid...

Page 5: ...loor bolts from the toilet flange and clean old wax putty and sealant from the base area Temporarily plug the floor flange with a towel or cover to block sewer gases from escaping Insert the floor bol...

Page 6: ...ng gasket KK to the center drain hole under the tank A Gently place the tank A on the toilet bowl B with bolts II protruding out underneath Place an oval metal washer LL followed by a wing nut MM onto...

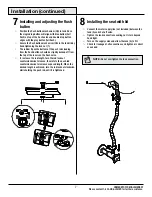
Page 7: ...from the top of the levers on the flush valve To increase the rod length turn the rod locknut counterclockwise to loosen then rotate the push rod counterclockwise to increase exposed length When the d...

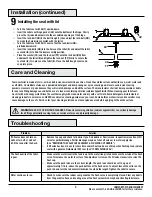
Page 8: ...not drop when flushing tank replace seal with a genuine Fluidmaster 242 seal See IF REPLACING SEAL The flush quality of the toilet is poor Make sure the water level in the tank is up to the water line...

Page 9: ...upside down over uncapped valve to prevent splashing Turn water supply on and off a few times Turn water supply off when putting cap back on valve IF REPLACING SEAL Use only a genuine Fluidmaster 242...

Page 10: ...nual for future use Questions problems missing parts Before returning to the store call Glacier Bay Customer Service 1 855 HD GLACIER 8 a m 7 p m EST Monday Friday 9 a m 6 p m EST Saturday HOMEDEPOT C...

Page 11: ...a m 7 00 p m hora del Este lunes a viernes 9 00 a m 6 00 p m hora del Este s bado 1 855 HD GLACIER HOMEDEPOT COM GLACIERBAY GRACIAS Agradecemos la confianza que ha puesto en Glacier Bay a trav s de la...

Page 12: ...ducto o pieza que se demuestre est defectuosa S mplemente devuelva el producto a cualquiera de las ubicaciones de venta al detalle de The Home Depot o llame al 1 855 HD GLACIER 1 855 434 5224 para rec...

Page 13: ...iso Ubicado en la caja del anillo de cera 2 BB Tuerca hexagonal de perno para piso Ubicada en la caja del anillo de cera 2 CC Anillo de cera 1 DD Disco pl stico 2 EE Tuerca mariposa de perno para piso...

Page 14: ...laci n continuaci n CONTENIDO DEL PAQUETE HOMEDEPOT COM GLACIERBAY Para asistencia adicional llama al 1 855 HD GLACIER Pieza Descripci n Cantidad A Tanque con cubierta 1 B Taza del inodoro 1 C Asiento...

Page 15: ...la cera masilla y sellador viejos del rea de la base Tape temporalmente la brida del piso con una toalla o cobertor para evitar que escapen los gases de la cloaca Inserte los pernos de piso AA en las...

Page 16: ...de sellado de goma KK en el agujero del desag e central abajo del tanque A Suavemente coloque el tanque A en la taza del inodoro B con pernos II que sobresalen desde abajo Coloque una arandela met lic...

Page 17: ...ra aumentar la longitud de la varilla gira la contratuerca de las misma en sentido contrario a las manecillas del reloj para aflojarla luego rota la varilla de presi n en sentido contrario a las manec...

Page 18: ...oro hipoclorito de calcio pueden da ar gravemente las conexiones del tanque y ser causa potencial de filtraciones consumo excesivo de agua y da os a la propiedad Problema Soluci n Si la v lvula de lle...

Page 19: ...ra desbloquear la tapa superior Presionar hacia abajo en la parte superior puede ser til con v lvulas m s antiguas Deja que el ensamblaje de la tapa extienda el tap n del flotante DESCARGA LOS RESIDUO...

Page 20: ...ntes de regresar a la tienda llama al Servicio al Cliente de Glacier Bay 8 00 a m 7 00 p m hora del Este lunes a viernes 9 00 a m 6 00 p m hora del Este s bado 1 855 HD GLACIER HOMEDEPOT COM GLACIERBA...

Reviews: