background image

5

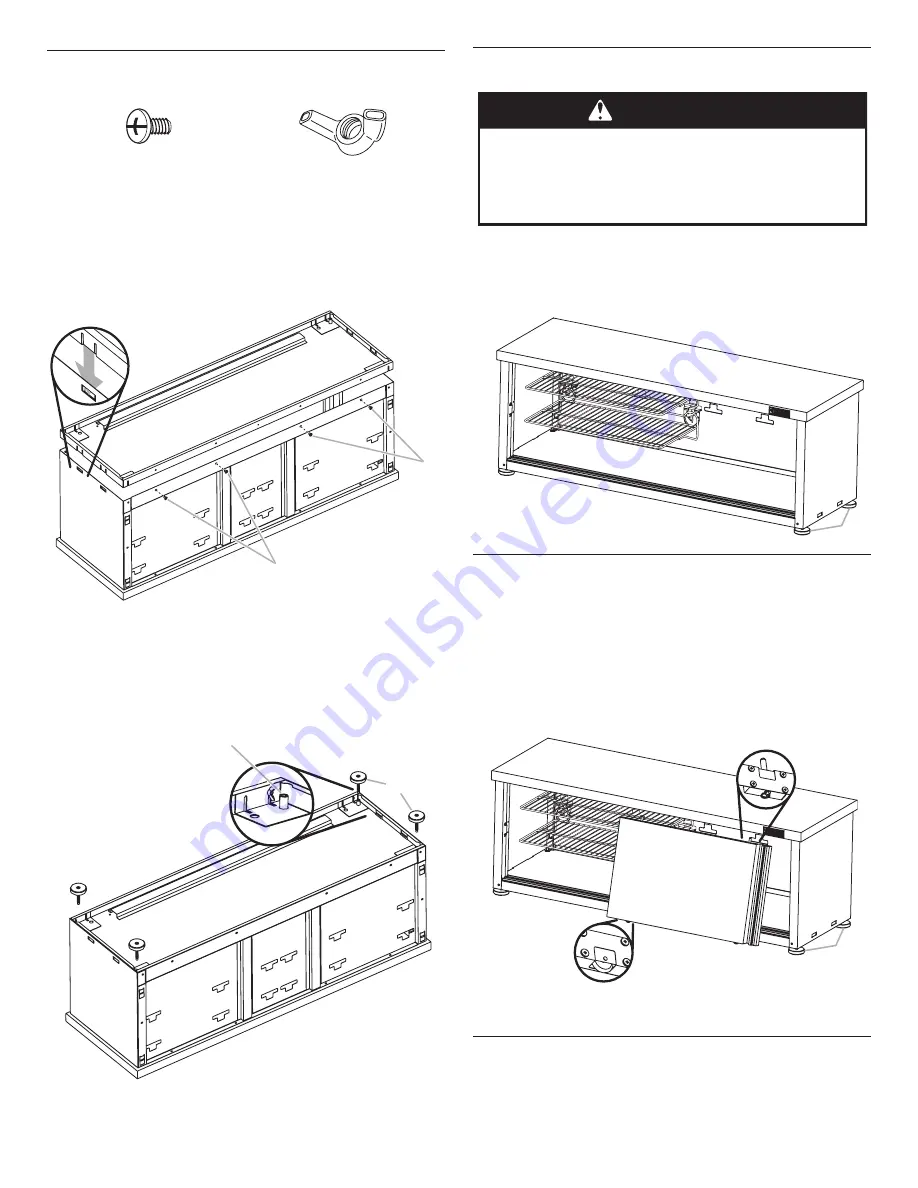
Attach the Bottom Panel

1. 

Place the bottom panel (upside down so the mating edges are 

pointing up), and make sure that the four tabs and slots are 

fully engaged.

2. 

Attach the #10-24 x 1/4" long Phillips-head screws (F1) 

between the back panel (P5) and the bottom panel (P4). Do 

not fully tighten the Phillips-head screws.

3. 

Install and tighten the four #10-24 wing nuts (F2) (hand tight) 

onto the protruding screw threads (included on the bottom 

panel) at each of the four corners.

4. 

Install the leveler feet (P6) to the bottom panel (P4).

5. 

Tighten all #10-24 x 1/4" long Phillips-head screws (F1) and 

all remaining loose screws from the previous steps.

P1

P2

P5

P4

F1

F1

F1 

#10-24 x 1/4"  

long Phillips-head Screw (4)

F2 

#10-24 wing nut (4)

P2

P5

P1

P4

P6

P6

P6

F2

Assemble Shelves (Optional)

Use two or more people to turn the storage/shoe bench over to 

an upright position. Install the shelf (P7) at the desired location. 

Insert both tabs fully into the slots at an angle, and then straighten 

shelf to fully engage the slots in the tabs. 

Install Doors (Optional)

1. 

Assemble the right-hand door (P9) first, as you face the front 

of the storage/shoe bench.

2. 

Engage the door top with the rail by placing the two top pins 

into the guides, and then push the pins in (collapse) against 

the rail.

3. 

Swing the door bottom down and push in to make the rollers 

engage into the bottom rail. Slide the door back and forth 

several times to ensure the door is engaged completely.

P1

P4

P2

P3

P7

P7

P6

P6

P9

4. 

Repeat steps 2 and 3 to assemble the left hand door (P8).

Registering Your Product

There are many benefits to registering your product. Find out 

more and register your product online at


www.gladiatorgarageworks.com.


Consumers in Canada can call 

1-800-807-6777.

P1

P4

P2

P3

P5

P7

P7

P6

P6

WARNING

Excessive Weight Hazard

Use two or more people to move, assemble or install 

cabinet.
Failure to do so can result in back or other injury.


Summary of Contents for GAGB54SBJG

Page 1: ...SURES 8 INSTRUCTIONS D ASSEMBLAGE 9 Exigences pour l utilisation du banc de rangement pour chaussures 9 Pièces du banc de rangement pour chaussures 9 Outils et pièces 9 Fixer les panneaux arrière 9 Fixer le panneau inférieur 10 Assemblage des étagères facultatif 10 Installation des portes facultatif 10 Enregistrement de votre produit 10 GARANTIE 11 SEGURIDAD DEL BANCO PARA ALMACENAMIENTO CALZADO 1...

Page 2: ...f the instructions are not followed Your safety and the safety of others are very important We have provided many important safety messages in this manual and on your appliance Always read and obey all safety messages This is the safety alert symbol This symbol alerts you to potential hazards that can kill or hurt you and others All safety messages will follow the safety alert symbol and either th...

Page 3: ...hillips head screw Label Nomenclature Qty P1 Left Side Panel 1 P2 Hardwood Top 1 P3 Right Side Panel 1 P4 Bottom Panel 1 P5 Back Panel 1 P6 Leveler Feet 4 P7 24 Shelf Optional 2 P8 Left Hand Door Optional 1 P9 Right Hand Door Optional 1 F1 10 24 x 1 4 long Phillips head Screw 6 F2 10 24 Wing Nut 4 F3 8 x 1 2 long Phillips head Screw 4 ...

Page 4: ...river Level IMPORTANT Two people may be required to complete the assembly The hardwood top P2 is intentionally designed so that the heads of the lag bolts which were pre assembled on the hardwood top P2 will match with the key holes on the side panel P3 and P1 only when it is positioned correctly If the bolt heads on the hardwood top P2 do not match with the key holes on the side panel P3 and P1 t...

Page 5: ...tion Install the shelf P7 at the desired location Insert both tabs fully into the slots at an angle and then straighten shelf to fully engage the slots in the tabs Install Doors Optional 1 Assemble the right hand door P9 first as you face the front of the storage shoe bench 2 Engage the door top with the rail by placing the two top pins into the guides and then push the pins in collapse against th...

Page 6: ...capability of the product 6 Replacement parts or product for Gladiator products operated outside the United States and Canada 7 In Canada travel or transportation expenses for customers who reside in remote areas 8 Any labor costs during the limited warranty period 9 Damage resulting from improper loading beyond the specified maximum weight capacity outlined in the assembly instructions provided w...

Page 7: ... en cas de non respect des instructions Votre sécurité et celle des autres est très importante Nous donnons de nombreux messages de sécurité importants dans ce manuel et sur votre appareil ménager Assurez vous de toujours lire tous les messages de sécurité et de vous y conformer AVERTISSEMENT DANGER Voici le symbole d alerte de sécurité Ce symbole d alerte de sécurité vous signale les dangers pote...

Page 8: ... 1 2 po de long Étiquette Nomenclature Qté P1 Panneau de gauche 1 P2 Dessus en bois dur 1 P3 Panneau de droite 1 P4 Panneau inférieur 1 P5 Panneau arrière 1 P6 Pieds de nivellement 4 P7 Tablette de 24 po facultative 2 P8 Porte de gauche facultative 1 P9 Porte de droite facultative 1 F1 Vis à tête cruciforme no 10 24 x 1 4 po 6 F2 Écrou à oreilles no 10 24 4 F3 Vis cruciforme no 8 x 1 2 po 4 ...

Page 9: ...Tournevis cruciforme Niveau IMPORTANT Il pourrait être nécessaire d être deux personnes pour effectuer l assemblage La partie supérieure en bois dur P2 est spécifiquement conçue pour que les têtes des tire fond préassemblés sur le dessus en bois dur P2 n arrivent avec les trous en forme de serrure sur les panneaux latéraux P3 et P1 que si le tout est bien positionné Si les têtes d écrous sur le de...

Page 10: ...souhaité Bien insérer les deux onglets dans les fentes en angle puis redresser la tablette pour bien engager les fentes dans les onglets Installation des portes facultatif 1 Assembler d abord la porte de droite P9 quand vous faites face au banc de rangement pour chaussures 2 Placez le haut de la porte avec le rail en insérant les deux broches du haut dans les guides puis poussez les broches vers l...

Page 11: ...structurale du produit 6 Les pièces ou le produit de rechange pour les produits Gladiator qui sont utilisés en dehors des États Unis et du Canada 7 Au Canada les frais de déplacement ou de transport pour les clients qui résidents dans des régions éloignées 8 Tous les frais de main d œuvre encourus au cours de la période de garantie limitée 9 Les dommages causés par un chargement incorrect au delà ...

Page 12: ...n las instrucciones Su seguridad y la seguridad de los demás es muy importante Hemos incluido muchos mensajes importantes de seguridad en este manual y en su electrodoméstico Lea y obedezca siempre todos los mensajes de seguridad ADVERTENCIA PELIGRO Este es el símbolo de alerta de seguridad Este símbolo le llama la atención sobre peligros potenciales que pueden ocasionar la muerte o una lesión a u...

Page 13: ...x 1 2 Rótulo Nomenclatura Cant P1 Panel lateral izquierdo 1 P2 Parte superior de madera dura 1 P3 Panel lateral derecho 1 P4 Panel inferior 1 P5 Panel trasero 1 P6 Patas niveladoras 4 P7 Estante de 24 opcional 2 P8 Puerta izquierda opcional 1 P9 Puerta derecha opcional 1 F1 Tornillo de cabeza Phillips largo 10 24 x 1 4 6 F2 Tuerca mariposa 10 24 4 F3 Tornillo de cabeza Phillips largo 8 x 1 2 4 ...

Page 14: ...necesarias Llave de 1 2 Destornillador Phillips Nivel IMPORTANTE Se necesitan dos personas para completar el ensamblaje La parte superior de madera dura P2 está diseñada intencionalmente para que las cabezas de los tirafondos que han sido ensamblados previamente en la parte superior de madera dura P2 coincidan con los orificios del panel lateral P3 y P1 solo cuando se lo coloca de manera correcta ...

Page 15: ...lengüetas completamente en las ranuras en un ángulo y luego enderece el estante para que las ranuras se enganchen en las lengüetas Instale las puertas opcional 1 Colóquese delante de la parte frontal del banco para almacenamiento calzado y ensamble primero la puerta derecha P9 2 Enganche la parte superior de la puerta al riel ubicando los dos pasadores superiores en las guías y luego presione los ...

Page 16: ...anadá gastos de viaje o de transporte para clientes que residen en áreas remotas 8 Cualquier gasto de mano de obra durante el período de la garantía limitada 9 Los daños resultantes de una carga inadecuada superior a la capacidad del peso máximo especificado indicado en las instrucciones de ensamblaje proporcionadas con el producto 10 Superficies dañadas debido a la interacción química lo que da c...

Reviews: