GLD Products
787 Dartboard
Item 42-0001
www.gldproducts.com
6
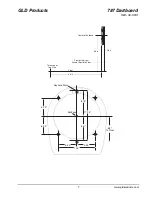
7. If using wall anchors, follow the instructions under
Wall Anchors
on page 5.
8. Insert screws into anchors until a 1/4" (6.5 mm) gap is left between the wall and the
screw head.
9. Hold the dartboard so the two screw heads fit into the lower part of the keyholes. The
dartboard should slide down 1/2 inch and the screw heads will hold it on the wall.
10. Screws can be tightened or loosened to provide a secure mounting.
Mounting Using the Four Holes From the Front
1. Choose a location that is near an electrical outlet and has at least 10 feet of open floor
space in front of the board. Locate and use a wall stud for mounting whenever possible.
2. Two people are needed for this step. Hold board on the wall. Position center of bullseye
68" from the floor. Level the board. Hold in place.
3. Locate the four mounting holes on the front of the board. Use a marker or nail to mark the
position of the board through the four mounting holes onto the wall. Remove the board.
4. Drill four pilot holes on the marks created in Step 3.
5. If using plastic anchors: drill the holes so the anchors fit snugly. Push anchors into place.
6. Line up dartboard over anchors. Screw board into place. The screws will expand the
anchors.
7. After the board is mounted, the bullseye should be 68" (173 cm) above the floor.
Create the Toe Line
Place a toe line 96" from the face of the board for the throwing distance. Adhesive tape or
masking tape, 2' long by 2-1/2" wide, may be used.


