GLD Products
Vancouver Air Powered Hockey Table
Item 64-3008
13
1-800-225-7593
www.gldproducts.com
STEP 5 - INSTALL ELECTRIC COMPONENTS
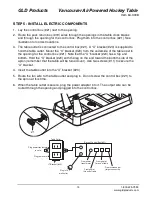
1. Lay the control box (#21) next to the opening.
2. Route the puck return box (#19) wires through the openings in the table cross braces
and through the opening for the control box. Plug them into the control box (#21). See
illustration for correct locations.
3. The table outlet is connected to the control box (#21). A “U” bracket (#20) is supplied to
hold the table outlet. Mount the “U” bracket (#20) from the underside of the table next to
the opening for the control box (#21). Note that the “U” bracket (#20) has a top and
bottom. Hold the “U” bracket (#20) with the leg on the end toward the bottom side of the
apron (remember that the table will be turned over). Use two screws (#11) to secure the
“U” bracket.
4. Insert the table outlet into the “U” bracket (#20).
5. Route the fan wire to the table outlet and plug in. Do not screw the control box (#21) to
the apron at this time.
6. When the table outlet is secure, plug the power adapter into it. The output wire can be
routed through the opening and plugged into the control box.
21
Table Outlet
Plug power transformer
in here.
Plug fan in here.
Plug in to
wall outlet.
Back of Control Box (#21)
From power
transformer
From goal at
this end of table
From goal at
far end of table
From scorekeeper
(larger connector)
“U” Bracket (#20)

