Page 33
COMMISSIONING
INSTALLATION
These Instructions should be placed along with the component manufacturers
instructions in the pocket provided on the rear of the front panel. The front panel
should then be refitted.
Important Do’s and Don’ts
1. DO check the incoming mains water pressure and flow rate are adequate. (The
preferred range of mains pressure is 2-3bar).
2. DO check that all connections are in accordance with the labelling on the thermal
store.
3. DO adjust the ballvalve so that the water level in the F & E cistern when the
system is cold is correct and does not overflow when the whole of the system is
at maximum temperature.
4. DO make sure that there is adequate clearance above the F & E cistern to service
the ballvalve.
5. DO ensure that the range rated appliances are set at the highest output and the
boiler thermostat is set to maximum for all boilers.
6. DO ensure that the water level in the F & E cistern is at least 250mm above the
highest point on the radiator circuit or the highest point of the system.
7. DO check that the F & E cistern is not more than 6m above the base of the
BoilerMate appliance.
8. DO insulate any exposed pipework in the BoilerMate cupboard.
9. DO plumb the overflow/warning pipe in a 20mm internal diameter pipe material
which is suitable for use with a heating F & E cistern, in accordance with BS
5449 (such as copper) and ensure it has a continuous fall and discharges in a
conspicuous external position.
10. DO check the pump settings:
a. The boiler pump should be set to give a temperature difference across the
boiler of 8°C or less.
b. The heating pump should be set to give a temperature difference across the
flow and return of not more than 11°C.
c. Please note - the pumps are preset on maximum speed (3). If you wish to alter
the settings of either the primary or the space heating pumps, please refer to
the information provided by the pump manufacturer opposite.
11. DO ensure that the bypass valve for the heating system (if fitted) is set correctly.
12. DON’T use a combined feed and vent on BoilerMate installations.
13. DON’T use a BoilerMate on a sealed primary i.e. closed system.
14. DON’T use pipe smaller than 28mm between the boiler and the BoilerMate when
the boiler rating exceeds 20kW (about 68,000 Btu/h).
15. DON’T use dipped flow and return between the boiler and the BoilerMate unless
the boiler is fitted with an overheat thermostat. If necessary check with the
suppliers of the boiler.
16. DON’T place any clothing or other combustible materials against or on top of
this appliance.
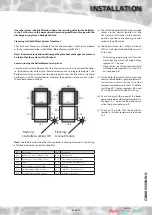
Toggling the settings of UPM3
When you switch on the pump, it runs with
the factory pre-setting. The display shows the
current operation status.
1. Press the button to switch to the setting
view. The LEDs show the current setting
for 2 seconds.
2. Release the button for more than 2
seconds. The user interface shows the
current performance in “operation status”.
3. Press the button for more than 2 seconds
and the pump switches to “setting
selection.” The LEDs flash and show the
current setting mode. Please note that if
the key lock is disabled, the pump will not
switch to “setting selection”. In this case,
unlock the key lock by pressing the button
for more than 10 seconds.
4. During a period of 10 seconds, press
shortly on the button and the pump
switches to the next setting.
5. To select between the settings, instantly
press the button until you find the setting
you want. If you pass a setting, you need to
continue until the setting appears again as
it is not possible to go back in the settings
menu.
6. Release the button for more than 10
seconds and the user interface switches
back to the performance view and the last
setting is stored.
7. Press the button and the display switches
to the setting view and the LEDs show the
current setting for 2 seconds.
8. Release the button for more than 2
seconds and the user interface switches
back to the performance view.
Summary of Contents for BMAS 150 OVR
Page 38: ...Page 38 APPENDIX APPENDIX B ...
Page 40: ...Page 40 APPENDIX D NOTES ...
Page 41: ...Page 41 NOTES ...


