Page 9
Appliance Control Board
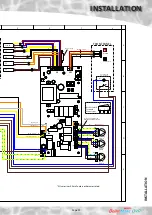
The appliance control board (shown opposite)
has a 2 digit display and 2 push buttons which
are used to check the status of the appliance,
check and set its identity and interrogate it for
the current faults and the fault history.
The 2 digit display is controlled by 2 buttons S1
and S2 The flow chart of display modes is shown
below. Generally, each press of button S2 cycles
the display from top to bottom and each press
of button S1 cycles the display functions from
left to right.
The button S2 is also used to reset the appliance
i.e. clear the lockout errors and reset the
appliance. (Note: Appliance resetting can also
be carried out using the push button on the
front panel)
Display in Normal (Standby) Mode
In the standard/normal mode the 2 digit display
indicates the status of the appliance inputs
and outputs by switching on the appropriate
segments of the display - see page 29 for details.
Appliance Type Selection
The BoilerMate is fitted with an identity (ID)
resistor which is read by the controller for
comparison with the appliance type (code)
set on the controller. The two must match for
the controller/appliance to function. Therefore
if either the appliance code setting or the ID
resistor is wrong, the appliance will shut down
safely and flag the error code until the fault
is rectified. The controller codes and the ID
resistor values for the BoilerMate are 01 and 1K5
respectively. The procedure for checking and
setting the appliance code on the controller is
described below.
• The appliance selection menu (A0 ... A9) on the
controller is hidden. It is only possible to get to
the appliance selection using the reset button
(Left hand, S2) on the main board.
• When going from the show ‘ locking error’ to
show ‘blocking error’ menu (see opposite), do
not release the button but hold it for 10 seconds.
The display will change from ‘c’ to ‘A’. At this stage
the push button (S2) can be released.
• The appliance type can now be selected by
using right hand push button, S1, e.g. for this
appliance A01.
Press the reset button, S2, to accept the setting.
If the selected appliance code does not match
with the ID resistor fitted to the appliance, then,
an error ‘33’ will be displayed.
TECHNIC
AL
D
AT
A
DESIGN
Tank_middle
16
8
9
1
T_overh_2
T_dhw_in
ID_resistor
T_overh_1
Tank_bot
T_dhw_out
Push button
Ext_led_k
Ext_se_1
PC Connector
Reset
button
Enter
button
Main processor
FLIP jumper
J9
J31
J30
SEND_TO_GAS
VSS
GASV_IN
220_0
WD_RECEIVE
VSS
SAFETY
220_1
J29
DIV_OUT_2
220-0
DIV_OUT_1
220_0
EL_HEAT_OUT
BOIL_HEAT_DEM
OVERHEAT
220_0
BOIL_HEAT_DEM
CH_P_MOD
CH_P_L
CH_P_L
CH_P_PE
BOIL_P_PE
BOILER_P_MOD
BOIL_P_L
BOIL_P_N
DHW_P_PE
DHW_P_MOD
DHW_P_L
DHW_P_N
220_1
220_PE
220_0
220_PE
220_1
220_0
CH_ON_IN
220_0
220_1
SWL_IN
DHW_ON_IN
220_INPUT
J3
J33
J32
J34
J28
J5
S2 S1
APPLIANCE CONTROL BOARD
Figure 5
2 DIGIT ACB BOARD DISPLAY FLOW CHART
Press S2
Press S2
Press S2
Press S2
Press S2
Press
S1
Press
S1
Press
S1
Press
S1
Appliance
type
Press
S1
Press
S1
Press
S1
Press
S1
Fault code indicator
block outs
Press
S1
Press
S1
Press
S1
Press
S1
Fault code indicator
lock outs
Press
S1
Press
S1
Press
S1
Press
S1
Control set-point
reading
Press
S1
Press
S1
Press
S1
Press
S1
Sensor temperature
reading
Normal - standby state
Indicate system status
S2
S1
Figure 6
Summary of Contents for BMAS 150 OVR
Page 38: ...Page 38 APPENDIX APPENDIX B ...
Page 40: ...Page 40 APPENDIX D NOTES ...
Page 41: ...Page 41 NOTES ...


