background image


2.6.


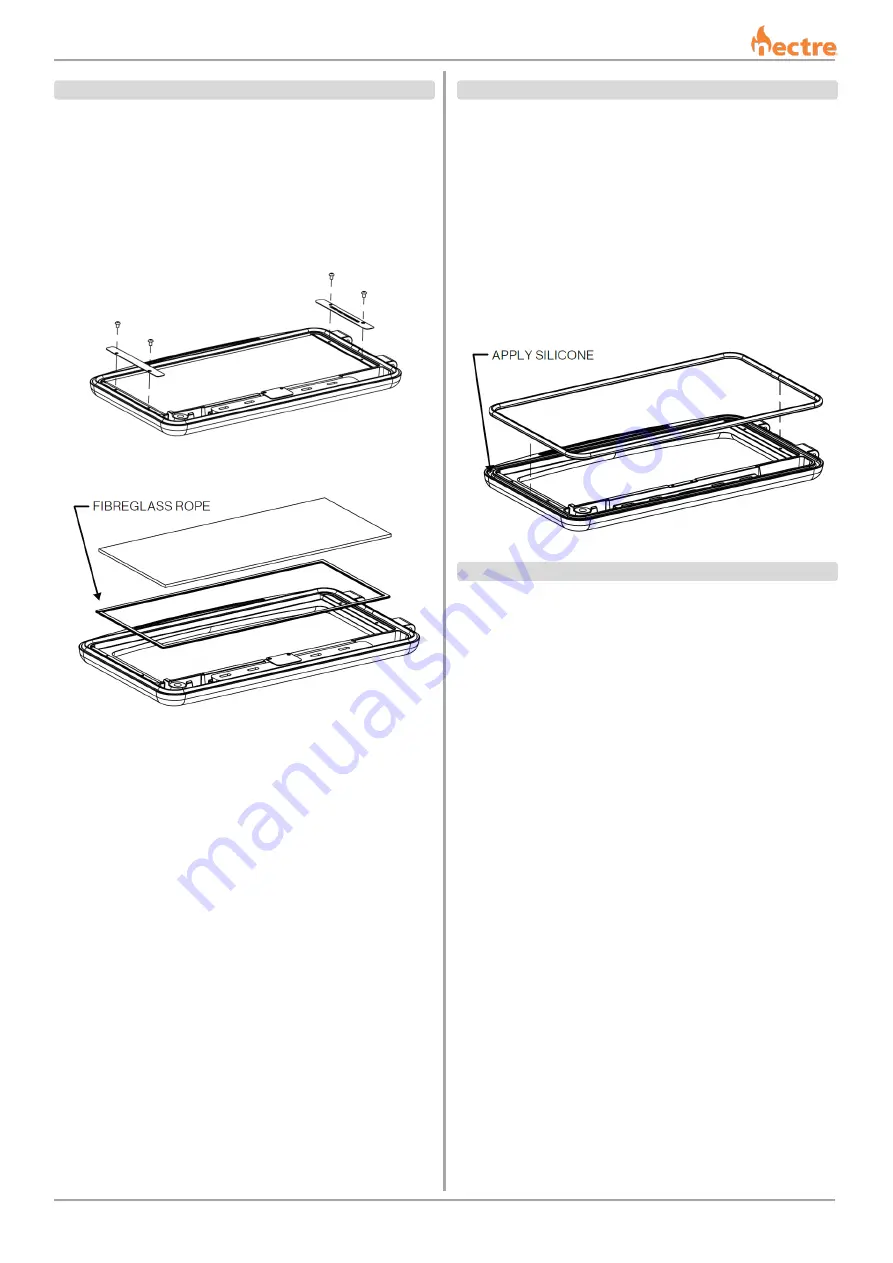
REPLACING DOOR GLASS 


This task may be easier with the door removed from the 
appliance and laid horizontally on a work-bench. 

To replace the door glass: 

1)


Two stainless steel strips hold the glass in place. Remove 
the four screws from the stainless steel strips with a 
3mm hex key.  


2)


Take out the glass, and check if the grey rope beneath 
needs replacing. If so, replace this rope as well.  


3)


Position the new glass on top of the grey rope and re-fit 
the stainless steel strips and screws.  

4)


Take extra care not to over-tighten the screws, otherwise 
the glass will crack when the heater gets hot and the 
door expands.  

5)


Dispose of the old glass in a responsible manner.  


2.7.


REPLACING THE DOOR SEAL 


This task may be easier with the door removed from the 
appliance and laid horizontally on a work-bench. 

1)


Remove any remains of the old seal from the door. 

2)


Clean out the groove in the door that the seal was 
bedded in, using a flat head screw driver or equivalent. 

3)


Run a thin bead of clear roof and gutter silicone along the 
groove. 

4)


Starting at one end, press the new door seal into the 
groove on the door. 

5)


Refit the door if it has been removed. 


2.8.


REPLACEMENT SPARE PARTS LIST 

Firebricks 

4 Rectangular @ 230mm x 115mm x 38mm 

2 Triangular @ 50mm x 70mm x 250mm 


Brick Retainer 

Stainless steel 495mm x 48mm x 25mm 


Baffle Plate 

Steel 248mm x 463mm x 6mm 


Side Shields 

Left and right pair @ 370mm x 255mm x 8mm 


Door Seal 

1610mm x 13mm round braided ceramic rope 


Glass Seal 

1360mm x 8mm x 3mm flat adhesive back 


Door Glass 

476mm x 200mm x 5mm pyro ceramic 


Summary of Contents for Nectre Big Bakers Oven

Page 1: ...on B Nectre Big Bakers Oven Operating Instructions Keep these instructions for future reference Glen Dimplex Australia proudly supports the activities of Landcare Australia through its membership of the AHHA ...

Page 2: ...Y THE TESTING AUTHORITY IS CONSIDERED AS BREACHING AS NZS 4013 WARNING DO NOT USE FLAMMABLE LIQUIDS OR AEROSOLS TO START OR REKINDLE THE FIRE WARNING DO NOT USE FLAMMABLE LIQUIDS OR AEROSOLS IN THE VICINITY OF THIS APPLIANCE WHEN IT IS OPERATING WARNING DO NOT STORE FUEL WITHIN HEATER INSTALLATION CLEARANCES WARNING WHEN OPERATING THIS APPLIANCE AS AN OPEN FIRE USE A FIRE SCREEN WARNING OPEN AIR C...

Page 3: ... re occur 1 4 RECOMMENDED FUELS Burn only seasoned hardwood timber with a moisture content of less than 20 Newly cut wood should be split and allowed to dry season for 12 to 18 months before use Wood should be stored in an environment protected from the weather to minimise any potential moisture content For best results wood should not exceed of the firebox front to back dimension in length and 15...

Page 4: ... than one large piece 4 Close the door with the top air slide fully open and leave for a minimum of 10 minutes to allow the fresh wood to catch 5 After 10 or more minutes the air slide can be adjusted to the desired heat output setting 1 7 OPERATING THE OVEN When using the oven ensure the bypass damper is in the closed position and the bottom air slide in the oven door is closed To maintain a cons...

Page 5: ... torch shining towards it and look for black creosote build up It is normal to see a fine black powdery layer but if built up layers of creosote can be seen the flue requires cleaning 3 If no cleaning is required re fit the baffle plate To clean the flue 1 A flue cleaning brush can be purchased from most wood heater retail outlets or large hardware stores Alternatively hire a flue cleaning service...

Page 6: ...tle due to the excessive heat This will not affect the way the fire burns Eventually the baffle plate will burn through 5 years and must be replaced To remove the baffle plate 1 Slide the baffle plate forward until the rear edge is clear of the brick retainer 2 Lowering the rear of the baffle will allow the front to slide past the front support pins 3 Once the baffle has cleared the front support ...

Page 7: ...REPLACING THE DOOR SEAL This task may be easier with the door removed from the appliance and laid horizontally on a work bench 1 Remove any remains of the old seal from the door 2 Clean out the groove in the door that the seal was bedded in using a flat head screw driver or equivalent 3 Run a thin bead of clear roof and gutter silicone along the groove 4 Starting at one end press the new door seal...

Page 8: ...e normal service to maintain them Under the terms of this warranty Glen Dimplex Australia Pty Ltd assumes no responsibility for the labour costs involved in removing or replacing the stove Nor shall Glen Dimplex Australia Pty Ltd be liable for any injury loss or damage direct indirect or consequential arising out of the use or inability to use the product or its removal and replacement All other s...

Reviews: