background image

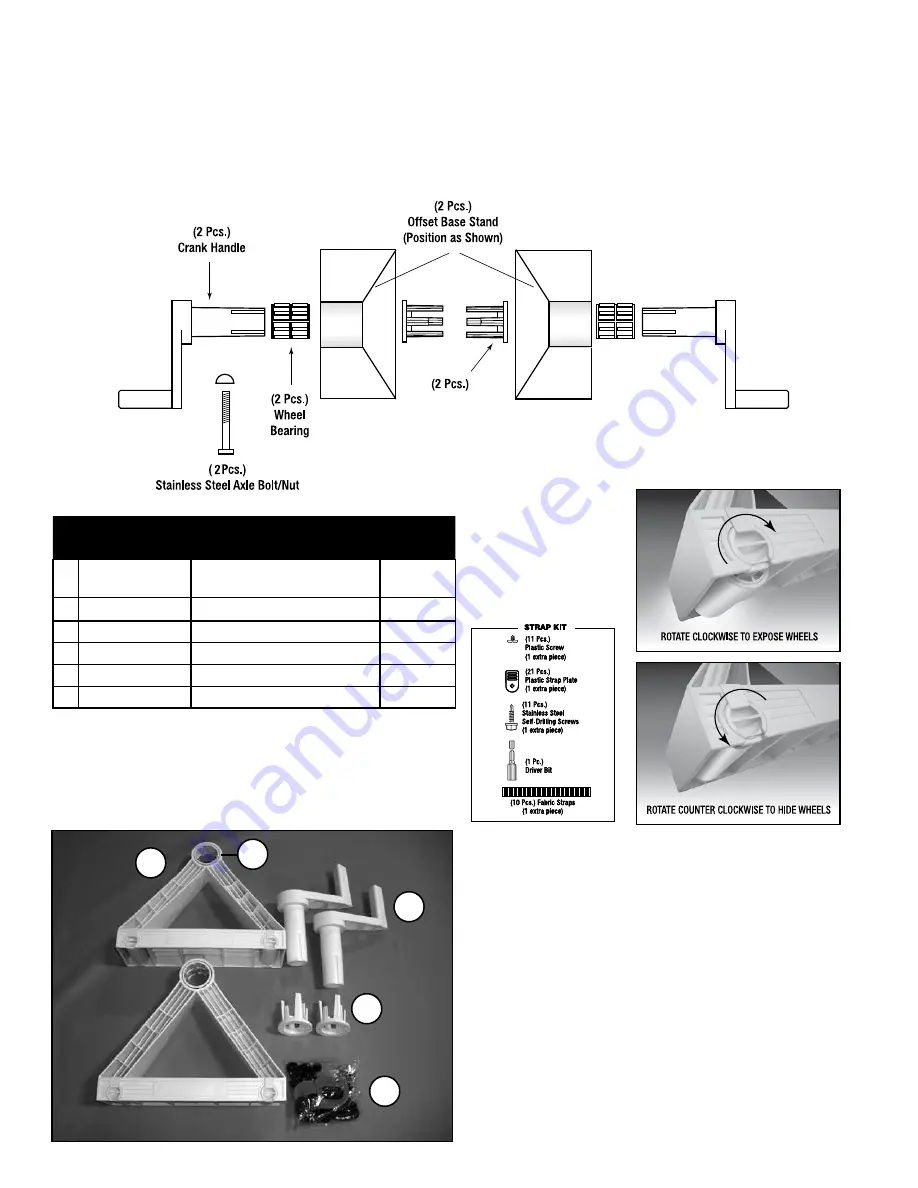
PARTS BREAKDOWN

PART NUMBER

DESCRIPTION

QUANTITY

1

99-55-4395026

Off-set triangular base with built in 

casters

2

2

99-55-4395002

Crank handle

2

3

99-55-4395003

Resin roller bearings - Installed

2

4

99-55-4395004

3” Resin insert adaptor

2

5

99-55-4395013

2.83” Axle bolt  (In Hardware Bag)

2

6

99-55-4395015

Strap Kit/Hardware Bag

1

INSTALLATION INSTRUCTIONS

1.  CONGRATULATIONS on your purchase of our Premium Resin Solar Reel for Inground Pools.  Please follow the instructions carefully so as to not void 

warranty.

2.  Please use your solar blanket and reel assembly in the manner it was intended for:


a. Your solar blanket is not a safety cover


b. Remove the solar blanket and solar reel assembly from the pool completely before swimming use.


c. Do not store the solar blanket on the ground in direct sunlight, as it will burn the lawn

3.  Preparation & Assembly: Check inventory of all items and assemble as illustrated below:

Resin

Insert

Adaptor

1

RETRACTABLE WHEEL FEATURE:

To expose wheels, tilt the reel stand in one 

direction to remove weight from the stand.  

Raise locking tooth and rotate thumbwheel 

clockwise.  Lower the locking tooth to 

re-lock.  To hide wheels, raise locking tooth 

and rotate thumbwheel counter clockwise.  

Lower locking tooth to re-lock.

2

3

4

6

Summary of Contents for 55-0000CY-BK

Page 1: ...ungstown Ohio 44510 www glipoolproducts com REGISTER WARRANTY ONLINE AT WWW GLIPOOLPRODUCTS COM PLEASE REGISTER WITHIN 10 DAYS OF PURCHASE IF YOU WISH TO MAKE A CLAIM CALL TOLL FREE 1 800 448 2343 FOR REPLACEMENT PARTS FOR YOUR REEL SYSTEM PLEASE VISIT WWW GLIPROMOTIONS COM ...

Page 2: ...our solar blanket and reel assembly in the manner it was intended for a Your solar blanket is not a safety cover b Remove the solar blanket and solar reel assembly from the pool completely before swimming use c Do not store the solar blanket on the ground in direct sunlight as it will burn the lawn 3 Preparation Assembly Check inventory of all items and assemble as illustrated below Resin Insert A...

Page 3: ... is inserted more than 9 but not less d Once you determine length and have proper spacing of tubes mark each tube at the connection point for reference Image 3 This will eliminate the need to re measure if your tubes get moved during the remain der of the installation process e Each connection will be fastened together with the through bolts supplied in your Storage Kit Use the pre drilled holes i...

Page 4: ... hole Image 16 d Fasten tube to base unit using the 3 75 axle bolt that is packaged with your storage kit Image 17 Note the 2 83 axle bolt that is packaged with your base kit can be discarded as it will not be used e Repeat same procedure on opposite end Image 11 Image 12 Image 13 Image 14 Image 15 Image 16 Image 17 Youngstown Ohio 44510 www glipoolproducts com 8 Attach Straps to Tubes Come in 6 i...

Reviews: