25
q
7) Remove the cowl and measure the distances
from the guide marks on the fuselage to the center of
the cowl mounting blocks.
q
8) Slide the cowl back into position and hold it
in place using pieces of masking tape. Use the guide
marks and measurements to position the holes on the
cowl for the three mounting screws.
q
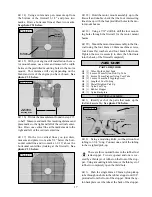
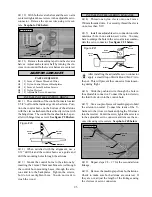
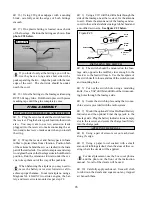
9) Drill 5/64” holes into the cowl and through
the hardwood blocks at the mounting hole positions.
Remove the cowl and enlarge the holes through only
the cowl using a 1/8” drill bit. Secure the cowl in
place using the three 3mm x 10mm wood screws. See
photo # 49 below.
q
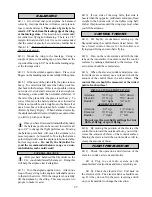
10) Cut holes in the cowl to access the glow plug,
high and low speed needle valves and cylinder head
clearance, if using a four cycle engine or a two cycle
engine larger than the Magnum XL .46. Remove the
cowl and install the muffler onto the engine. We rec-
ommend using an in-cowl Pitt's style muffler, but you
can use a stock muffler, if using a .40 - .46 displace-
ment engine. Make the cutout for muffler clearance
and reinstall the cowl to check the fit. A Dremel Tool
with a rotary sanding bit works best for this. See
photo # 50 below.
Photo # 49
Photo # 50
q
11) Remove the cowl. Using a 5/16” drill bit, drill
a hole through the cowl to accept the nylon fuel filler
housing. We suggest drilling the hole on the bottom of
the cowl, so the housing is out of the way.
INSTALLING THE FUEL FILLER
q
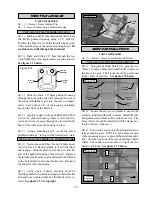
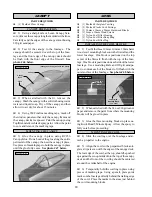
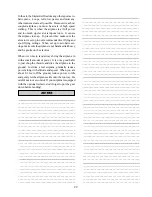
12) Push the fuel filler housing into the hole and
snap the nylon snap ring over the housing from the
inside of the cowl. See figure # 22 below.
Figure # 22
q
13) Cut to length and attach the vent line to the
muffler pressure nipple and fuel pickup line to the
fuel nipple on the carburetor (if using a standard car-
buretor engine) or on the fuel nipple on the needle
valve assembly (if using an engine equipped with a
remote mounted needle valve).
q
14) Slide the fuel filler line through the fuel filler
housing mounted in the cowl. Leave about 1” of line
exiting the outside of the cowl and cut off the remainder.
Attach the nylon fuel filler plug to the fuel line and push
the plug into the housing. Refer to figure # 22.
To fill the fuel tank you must first completely
close the needle valve on the engine. Pull the
fuel filler line out the housing by gently grasping the
fuel filler plug. Remove the vent line from the muf-
fler and fill through the fuel filler line. When the
tank is full, reattach the vent line to the muffler and
install the fuel filler plug into the filler line and push
it back into the housing to keep it in place. Reopen
the needle valve to the original setting.
INSTALLING THE FUEL LINES
INSTALLING THE COWL FAIRINGS
q
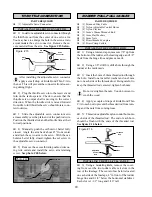
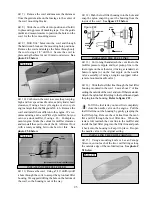
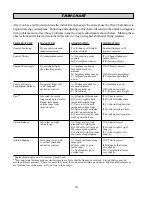
15) Using a modeling knife or Lexan Canopy
Scissors, cut out each of the two cowl fairings along
the outside edge of the molded radius. See photo #
51 below.
Photo # 51
Wood
Screw
Wood
Screw
(Recommended Pitts Style muffler shown)
Exhaust
Stacks
Cut
Opening
SNAP
RING
HOUSING
FUEL
TUBING
COWL
PLUG
PUSH IN
1
2
3


