5
g.)
Make sure that the drain line has not been
dislodged or broken during shipping and that the
drain trap terminates properly in the condensate
pan or floor drain. (
See Condensate Pan on Top
Mounted Compressor.
)
h.)
Listen for any unusual noise such as lines vibrating,
fan blades hitting etc. Correct problem by
tightening screws, slightly bending tubing, etc.
i.)
Check proper tension on doors. (See
Door Closer
Adjustment
.)
Thermostat Settings
The refrigerator or freezer is shipped from the factory
with a thermostat setting of approximately the mid-point
of the operating range. Final thermostat setting must be
made in the field. Allow the cabinet to operate until the
compressor cycles on the thermostat.
The normal operating temperature ranges are: 42°F to
36°F for Refrigerator models;
20°F to -20°F for Display freezers;
0°F to -20°F for Storage freezers;
0°F to -30°F (or-40°)F for Hardening freezers;
The thermostat is easily adjusted with a standard screw-
driver. In models where the thermostat has control
settings 1 through 7, turn the thermostat to a higher
number to lower the cabinet temperature. See the
section Electronic Control for thermostat adjustment on
units so equipped.
NOTE: DO NOT OPERATE MEDUIM TEMPERATURE
CABINETS (REFRIGERATORS) BELOW 32°F
Door Adjustment & Removal
Glass doors use an internal torsion rod to adjust closing
tension; solid doors use a cam in the hinges to control
closing.
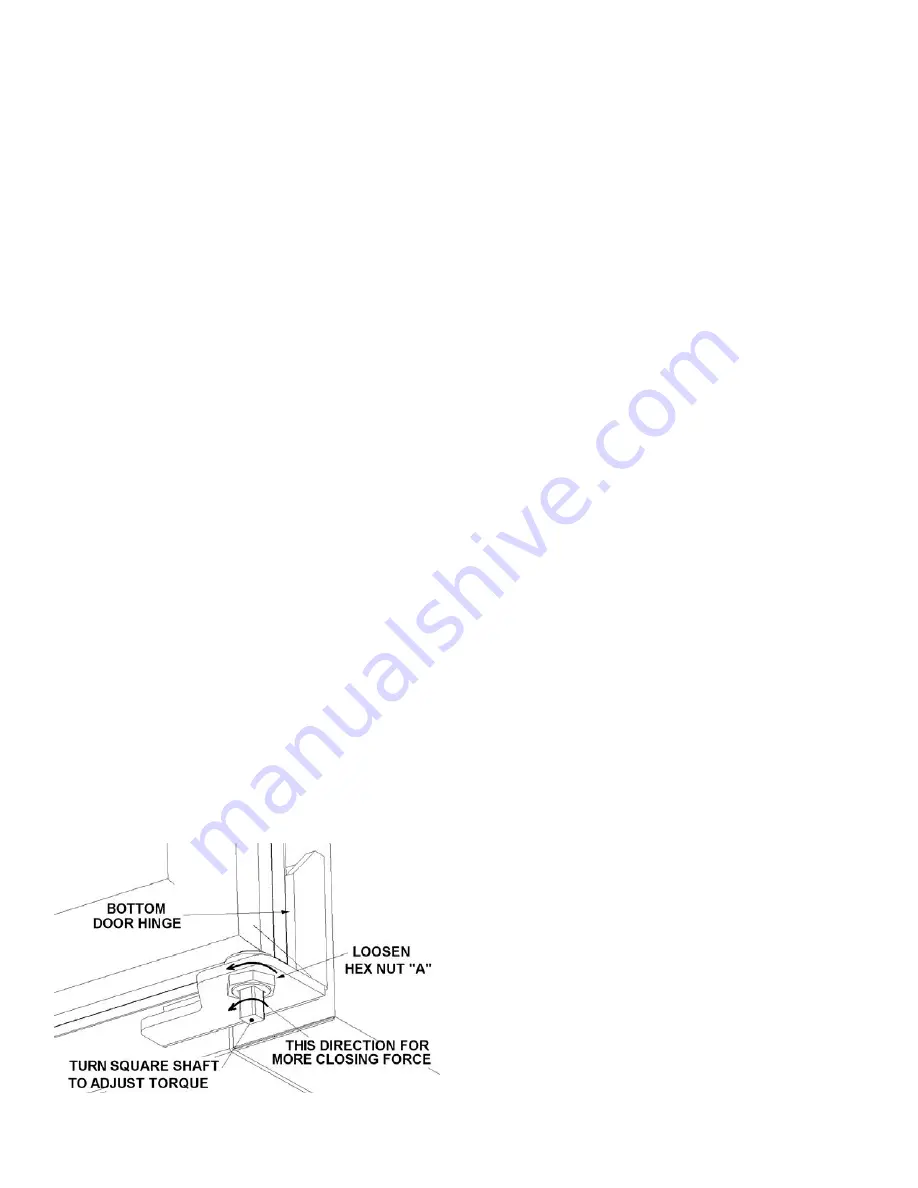
Door Closer Adjustment
( Glass Doors)
Loosen Nut "A" and turn the square shaft to increase or
decrease the torsion rod tension to the desired torque.
Turn the square shaft towards door handle to increase
torque; then tighten
Nut
"A" to lock.
The door should be set to swing smoothly and should
not slam. Also the door should self-close when opened
only a couple. of inches
Removing Outer Doors
(Solid Doors)
If the assembled cabinet is too wide to move through narrow
doorways, the cabinet doors can be removed as follows:
1 )Open the door 180°and support the outer edge.
Remove the screws in the upper hinge at the cabinet,
leaving the hinge attached to the door. Lift and
remove from lower hinge pin. CAUTION: The upper
hinge cam is under significant spring tension. Leave
the hinge in the open position (KEEP HANDS
CLEAR)
2) After legs are on and the cabinet is in final position,
set the doors back on the hinge pins.
Energy Conservation Measures
These cabinets are designed for efficiency with heavy
foam insulation. However, there are things that the user
can do to maintain the cabinet in operating condition.
1) Do not operate the cabinet any colder than necessary
to maintain safe, product storage temperatures.
2) Make sure the cabinet is located to prevent direct
exposure to sunlight, air ducts, etc.
3) Keep the doors closed except for normal use. Inspect
the doors often to see that they self-close and that the
4) Do not overstock the product in the cabinet which will
block normal air flow.
5)
Keep the condenser coil clean. The coils should be
inspected at least twice a year.
6) Have at least annual inspections by a qualified service
company to see that the fan motors are functioning
properly and that the refrigerant charge is correct.
7) These cabinets operate more efficiently in a cooler
ambient than in a "hot ambient. Try to maintain an
ambient below 80°F (27°C) and 65% RI-I. for maxi-
mum efficiency.
ROUTINE MAINTENANCE
Cleaning the Interior
Wash the inside surface of the storage one tablespoon
of baking soda per quart of water.) Rinse thoroughly
with clean, warm water and wipe dry. The procedure
can also be used for cleaning the door gasket. Be sure
the power is turned off before cleaning.
Cleaning the Exterior
Wipe the cabinet exterior occasionally with a cloth
damp-ened in mild detergent water, rinse and wipe dry
with a soft cloth. Do not use abrasive or caustic
cleaners or scouring pads.
Cleaning the Condenser
Clean the condenser periodically by brushing the coil with
a soft brush and/or using a vacuum cleaner with a brush
attachment. Be sure that the power is disconnected


