0020313973_01 Compact Installation and maintenance instructions
31
Caution.
Risk of material damage and oper-
ating faults caused by incorrect gas
connection pressure/gas flow pres-
sure.
If the gas connection pressure/gas flow
pressure lies outside the permissible
range, this can cause operating faults in
and damage to the product.
▶
Do not make any adjustments to the
product.
▶
Do not start up the product.
▶
If you are unable to eliminate the fault, contact the
gas supply company.
▶
Close the gas stopcock.
9.6.5
Checking the CO
₂
content
1
1
1
1.
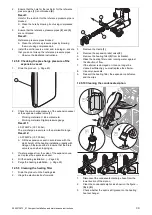
Open the test opening at the flue gas analysis point
(1)
.
2.
Position the sensor for the CO
₂
analyser in the centre
of the flue pipe.
3.
Start up the product with check programme
P.01
.
4.
Wait at least five minutes until the product reaches its
operating temperature.
5.
Measure the CO
₂
content at the flue gas analysis point
and log the measured value.
Checking the CO
₂
content
Great
Bri-
tain
Fitted front
casing
Natural gas
H
9.2
±
1 %
Liquefied petro-
leum gas
P
10.6
±
0.5 %
Result 1:
If the value is outside of the permitted range:
▶
Measure the CO
₂
content at the flue gas analysis
point again and log the measured value.
▶
If the value is still outside of the permissible range,
do not start up the product and, instead, report this
to customer service.
Result 2:
If the value is inside the permitted range:
▶
Continue with the process of starting up the
product.
6.
Remove the sensor for the CO
₂
analyser and close the
test opening at the flue gas analysis point.
9.6.6
Performing a gas conversion
2
1
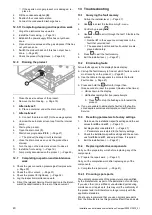
1.
Press the on/off button
in order to switch off the
product.
◁
The display shows
oF
and then goes out.
2.
Disconnect the product from the power grid.
3.
Remove the plug
(1)
.
4.
To convert the gas type, turn the screw
(2)
by the spe-
cified number of rotations clockwise (
↻
) or anti-clock-
wise (
↺
).
Setting the gas valve assembly
H
→
P
Clockwise rotation
Three re-
volutions
P
→
H
Anti-clockwise rotation
Three re-
volutions
5.
Check the CO
₂
content and adjust this. (
6.
Set diagnostics code
d.85
in order to adjust the pro-
duct's minimum output. (
Setting diagnostics code D.85
H
→
P
P
→
H
24c-AS/1 (H-GB)
9 kW
6 kW
24c-AS/1 (P-GB)
9 kW
6 kW
28c-AS/1 (H-GB)
8 kW
7 kW
28c-AS/1 (P-GB)
8 kW
7 kW
Summary of Contents for Compact 24c-AS/1
Page 59: ......


