background image

www.glp.de


AC mains power


18 


Fusion MBL20 User Manual Rev. A


5.


AC mains power 


Warning!

 Read ‘Safety’ starting on page 5 for important safety information that 

you must understand before you install or operate the fixture. 
Check that all cables and connectors are suitable for the installation 

environment and application (see recommendations in ‘Avoiding damage to 
the fixture’ on page 10)

Use H07 RN-F 3 x 2.5mm / SJT 12 AWG cables with original Neutrik powerCON 
TRUE1 connectors to supply power to fixtures. 
Line up the keyways in connectors carefully. Do not try to insert or twist a 
connector if it feels excessively stiff. Resistance to insertion or twisting is a sign 
that connectors may be incorrectly lined up. 
Keep connectors sealed with their rubber caps at all times when not in use. 

Included items 

The MBL20 is supplied with a power cord with Neutrik powerCON TRUE1 connector. 

Connecting to power 

The AC mains power supply must include a connection to ground / protective earth. It must 
be protected against ground / earth leakage and overload. The fixture’s internal auto-
sensing power supply accepts AC power at 100-240 V, 50/60 Hz. Do not connect the fixture 
to power at any other voltage or to an external dimmer. 
The MBL20 does not have a power ON/OFF switch. Power is applied to the fixture as soon as 
the power cable becomes live. 
The MBL20 has a 3-conductor Neutrik powerCON TRUE1 Mains IN power input socket that 
accepts AC power from a TRUE1 female cable connector. Although TRUE1 connectors 

support hot plugging, it is still good practice to shut down power to power cables before 
connecting them to fixtures. 
To connect the fixture to power: 

1.  If convenient, shut down power to the power input cable. 

2.  Note the position of the keys and keyways on the TRUE1 power cable connector and 

Mains IN socket and align them with each other. Insert the cable connector into the 
socket and twist clockwise to lock. Do not use force. If the connector feels excessively 
stiff, remove it and check again that it is lined up correctly. 

3.  Before applying power to the power cable, check that nobody is looking directly into 

the front of the fixture. 

To disconnect the fixture from power, pull the latch on the cable connector outwards to 
release it, then twist the connector counterclockwise and pull to remove it from the socket. 

Installing power connectors 

If you intend to draw power from convenience receptacles / consumer mains power 

sockets, it is possible to install a suitable cord cap / power plug on the supplied power cord 
/ input cable. If you do this, check that the cord cap / plug is rated minimum 250 V, 16 A, 

Summary of Contents for Fusion MBL20

Page 1: ...Fusion MBL20 User Manual Software version 1 0...

Page 2: ...companies disclaim liability for any injury damage direct or indirect loss consequential or economic loss or any other loss occasioned by the use of inability to use or reliance on the information co...

Page 3: ...Installation 15 Permitted mounting options 15 Securing fixtures with a safety cable 15 Installing on a surface at any angle 16 Installing on a rigging truss or similar structure 17 5 AC mains power 1...

Page 4: ...X Mode 2 Advanced 31 13 Service 33 Cleaning 33 Installing optional barndoors 33 GLP Service and Support 34 14 Technical specifications 35 Optics 35 Control 35 Installation 35 Electrical 35 Connections...

Page 5: ...annel Index is a separate guide to the DMX control channel layout and DMX commands available All documents are available for download from www glp de The Fusion MBL20 is intended for use by experience...

Page 6: ...by the end user Read and follow the user documentation for all additional equipment Electrical safety Do not allow the fixture to become immersed Do not expose the fixture to high pressure water proj...

Page 7: ...t that a fuse has blown disconnect the fixture from power and send it to a technician authorized by GLP for repair Fire safety and protection from burns Do not operate the fixture if the ambient tempe...

Page 8: ...meter of anyone working on or near the fixture Installation safety and protection from personal injury Installation must be performed by qualified personnel only and carried out in accordance with all...

Page 9: ...n withstand these forces Monitor weather forecasts constantly Take down the installation immediately if there is any risk of weather conditions that could destabilize the installation Check that all c...

Page 10: ...high powered beam lights directly at the fixture Do not operate the fixture in ambient temperatures above 40 C 104 F Allow free airflow around the fixture IP rating MBL20 fixtures are IP65 rated IP s...

Page 11: ...cable bends only Do not subject connections to bending forces or allow connections to bear the weight of long lengths of cable Avoiding damage from dust and airborne particles Carry out regular visual...

Page 12: ...www glp de Avoiding damage to the fixture 12 Fusion MBL20 User Manual Rev A GLP Asia 852 3151 7730 GLP Nordic 46 737 57 11 40...

Page 13: ...temporary installations Its rugged construction and IP65 rating mean that it can also be used outdoors in temporary installations if precautions are taken to prevent immersion in water and damage from...

Page 14: ...ng handwheel to adjust tilt of mounting bracket 2 DMX IN THRU 5 pin XLR 3 CCT rotary control knob see Rotary switches in section 8 4 Control panel with LCD display see section 9 5 Dimmer level rotary...

Page 15: ...eets all applicable codes and legal requirements Note the requirement to secure lighting fixtures with safety cables in temporary installations Permitted mounting options An MBL20 fixture may be insta...

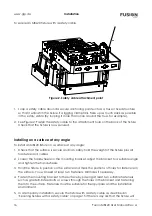
Page 16: ...at the surface is secure and can safely hold the weight of the fixture plus all hardware and cables 2 Loosen the handwheels on the mounting bracket adjust the bracket to a suitable angle and tighten t...

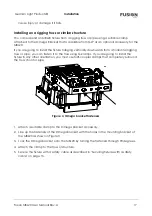
Page 17: ...pipe you can fasten it to the truss using G clamps If you are going to install the fixture in any other orientation you must use half coupler clamps that completely surround the truss chord or pipe Fi...

Page 18: ...xternal dimmer The MBL20 does not have a power ON OFF switch Power is applied to the fixture as soon as the power cable becomes live The MBL20 has a 3 conductor Neutrik powerCON TRUE1 Mains IN power i...

Page 19: ...tal to power in one chain at 200 240 V 50 Hz The power input cable supplied with the fixture is rated 16 A maximum Add together the maximum current draw ratings of all the devices that you intend to c...

Page 20: ...supply DMX data to fixtures Keep connectors sealed with their rubber caps at all times when not in use The MBL20 has two 5 pin XLR connectors for IN and THRU connections to a DMX data link MBL20 fixt...

Page 21: ...E1 mains power input connector supports hot plugging and connecting and disconnecting a live power cable is an option especially if you need to shut down power urgently but it is still good practice t...

Page 22: ...dimming range Theatrical is an S shaped curve that gives finer control at low and at high light levels Square Law gives finer control at low light levels and coarser control at high light levels Inver...

Page 23: ...NUAL menu option when the rotary switches are set to Manual position These settings are available via SETTINGS NO DMX on the fixture s control panel and using the Control Settings DMX channel Display...

Page 24: ...own or reduce a number ENTER Activate the control panel if it is in sleep mode Then enter a menu select a setting or implement a command When you apply power to the fixture it boots up After it has bo...

Page 25: ...display to lock after a period of time to prevent accidental changes to the options using the SETTINGS SCRNLOCK menu setting To unlock hold down the MENU and ENTER buttons together for 3 seconds When...

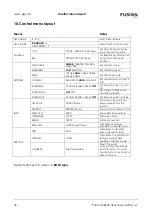
Page 26: ...OFF Set time for screen to turn off SCRNFLASH ON OFF Set screen to flash when no DMX is present SETTINGS SCRNLOCK 01 MIN 05 MIN 10 MIN OFF Set time for screen to lock TIME CUR 00 00 hh mm Shows how l...

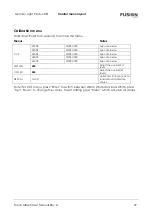
Page 27: ...ow 4200K W000C000 See note below 5800K W000C000 See note below CCT 6500K W000C000 See note below WW LED 000 Adjust the overall WW level CW LED 000 Adjust the overall CW levels DEF CAL LOAD Hold Enter...

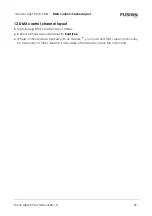
Page 28: ...DMX 60 23 5 no light will be output Mode 1 Standard 1 CCT 2 Master dimmer DMX Mode 2 Advanced provides a selection of fixed color temperatures on the first channel a master dimmer on the second channe...

Page 29: ...9 12 DMX control channel layout In the following DMX channel layout tables Default settings are indicated with bold type Where commands are marked with an asterisk you must send that value continuousl...

Page 30: ...8 6 5200 125 129 49 0 50 6 5100 130 134 51 0 52 5 5000 135 139 52 9 54 5 4900 140 144 54 9 56 5 4800 145 149 56 9 58 4 4700 150 154 58 8 60 4 4600 155 159 60 8 62 4 4500 160 164 62 7 64 3 4400 165 169...

Page 31: ...15 119 45 1 46 7 5300 120 124 47 1 48 6 5200 125 129 49 0 50 6 5100 130 134 51 0 52 5 5000 135 139 52 9 54 5 4900 140 144 54 9 56 5 4800 145 149 56 9 58 4 4700 150 154 58 8 60 4 4600 155 159 60 8 62 4...

Page 32: ...9 Dimmer speed Fast 85 89 33 3 34 9 Dimmer speed Smooth 90 94 35 3 36 9 No function 95 124 37 3 48 6 Dimmer curve Linear 125 129 49 0 50 6 Dimmer curve Theater 130 134 51 0 52 5 Dimmer curve Square La...

Page 33: ...mpened with a household or automotive glass cleaning product Do not apply pressure to the clear front or display on the back of the fixture as you may scratch these surfaces Installing optional barndo...

Page 34: ...stall a safety bond between one of the holes 3 in the top corner of the barndoors assembly and the main fixture to prevent the barndoors falling if they become detached from the main fixture GLP Servi...

Page 35: ...m distance to combustible materials 0 2 m 8 in Minimum distance to illuminated surfaces 0 2 m 8 in Installation environment Temporary or permanent indoor installation temporary outdoor installation Se...

Page 36: ...cifications 36 Fusion MBL20 User Manual Rev A Included items Power cable with Neutrik powerCON TRUE1 mains input plug Dimensions and weight Length 370mm 14 6 ins Width 250 mm 9 8 ins Height 170 mm 6 7...

Page 37: ...German Light Products Dimensions Fusion MBL20 User Manual Rev A 37 15 Dimensions All dimensions are in millimeters 370 250 170 270...

Page 38: ......

Reviews: