background image


W

W

W

W

W

W

C

C

C


&

&

&


C

C

C

C

C

C

W

W

W


S

S

S

t

t

t

a

a

a

t

t

t

i

i

i

c

c

c


GLP 

 German Light Products GmbH 

(Instruction version 1.00) / from software version 1.00/30)


4


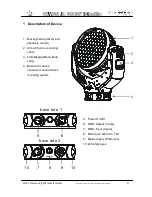
1  Description of Device  


1.  Moving head (actively and 

passively cooled) 

2.  Arm with various cooling 

vents  

3.  LCD-Display/Menu (data 

entry) 

4.  Base with various 

connectors and Camlock 

mounting system 

1

2

3

4


5

b a se sid e 1

6


b a se sid e 2

7

8

9

10

10

FUSE T4A


5.  Power On/Off  

6.  DMX- Output (3 pole) 

7.  DMX- Input (3 pole) 

8.  Micro-fuse 5x20mm, T4A 

9.  Mains supply (Powercon) 

10. 2x Safety eyes  

Summary of Contents for IMPRESSION CCW STATIC

Page 1: ...Instruction Manual from software version 1 00 30 Instruction version 1 00 e mail service glp de Internet http www glp de W W WW W WC C C C C CC C CW W W S S St t ta a at t ti i ic c c...

Page 2: ...Preface This manual serves for both systems the I IM MP PR RE ES SS SI IO ON N W WW WC C as well as the I IM MP PR RE ES SS SI IO ON N C CC CW W The two systems differ from each other only by the num...

Page 3: ...1 Mounting 6 2 1 1 Mounting on the Floor Upright 7 2 1 2 Mounting in hanging Position Head first 7 2 1 3 Mounting in sidewise Position 8 2 2 Secure the Device 9 2 3 Connections 9 2 3 1 Power Supply 9...

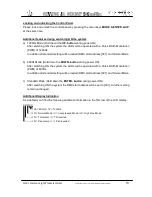
Page 4: ...iption of Device 1 Moving head actively and passively cooled 2 Arm with various cooling vents 3 LCD Display Menu data entry 4 Base with various connectors and Camlock mounting system 1 2 3 4 5 base si...

Page 5: ...ts Don t open it 5 It is necessary to wait at least 15 minutes after disconnecting the AC before changing the optical carrier Pay attention to possibly hot parts of the system Danger of BURNING 6 Neve...

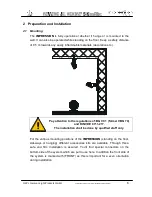
Page 6: ...inflammable materials decoration etc Pay attention to the regulations of BGV C1 former VBG 70 and DIN VDE 0711 217 The installation shall be done by qualified staff only For the various mounting posi...

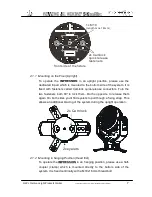
Page 7: ...ottom side of the system It is fixed with fasteners called Camlock quick release connectors Turn the two fasteners both 90 to lock them Do the opposit e to release them again On both sides you ll find...

Page 8: ...quick release connectors Two half couplers clamps are now used to mount the system to a standard truss bar This technique is necessary to cope with the torque which accrues in this mounting position...

Page 9: ...y wire that can hold at least 10 times the weight of the fixture Never use the carrying handles for this purpose The safety wire must be attached in a way that the height of drop is minimised A height...

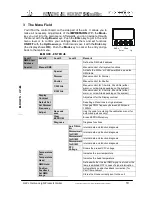
Page 10: ...Manual control for Shutter 1 3 White Manual control for 1 3 white 30x LEDs either warm or cold white depending on the system 2 3 White Manual control for 2 3 white 60x LEDs either warm or cold white...

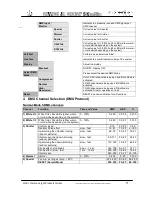
Page 11: ...High Resolution 7 DMX channels are being used if this Mode is activated Dimmer operates at 16 bit Reset RESET and new calibration for all functions 4 DMX Channel Selection DMX Protocol Normal Mode 5 D...

Page 12: ...er open 240 249 F0 F9 95 97 5 RESET Min 3 Sec 250 FA 98 4 Dimmer Dimmer 0 100 0 255 0 FF 0 100 High Resolution Extended Mode 11 DMX Channels Channel Function Time and Value DMX HEX 1 White 2 3 coarse...

Page 13: ...ting will be loaded DMX start address 001 and Normal Mode b 600Hz Mode Hold down the DOWN button during power ON After switching ON the system the LEDs will be operated with a Pulse Width Modulation P...

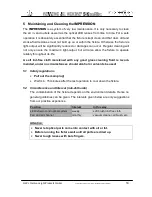
Page 14: ...m light output but will also allow the fixture to operate reliably throughout its life A soft lint free cloth moistened with any good glass cleaning fluid is recom mended under no circumstances should...

Page 15: ...ion 60x LEDs cold white 30x LEDs warm white WWC version 30x LEDs cold white 60x LEDs warm white Optical System High efficient Collimator cluster Exchangeable optical carrier with 10 light distrib utio...

Page 16: ...ter key 10 Eyelets 7 H Half couplers clamps 8 I Instruction Version 1 Internet 1 L LED Class 2M 5 Locking the Control Panel 13 Luxeon K2 15 M Maintenance 14 Menu Field 10 Micro fuse 9 Mode key 10 Moun...

Page 17: ...W W WW W WC C C C C CC C CW W W S S St t ta a at t ti i ic c c GLP German Light Products GmbH Instruction version 1 00 from software version 1 00 30 17...

Reviews: