background image

German Light Products® 


21 

Rev. 20220607-1 

7.


Replacing the disinfectant container 

The Santinel controls disinfectant consumption and current disinfectant level by 
counting the number of disinfecting processes carried out, measuring the disinfectant 
fluid level in several stages and checking the pipe system for empty running. If the 
Santinel runs out of disinfectant, it will indicate the need for a new container and shows 
a message on the display. If the hose system is running empty, it is reported as an error 
for safety reasons.  
When the Santinel runs out of disinfectant we recommend that you always replace the 
disinfectant container with a new one. Refilling a container that has already been 
used can create a risk of contamination or exceeding the use-by date. Doing so may 
also contravene health regulations in your region. Do 
not mix different disinfectant liquids (different brands, 
types or compositions). 
To replace the disinfectant container: 
1.


Open the lockable flap on the top of the Santinel. 

2.


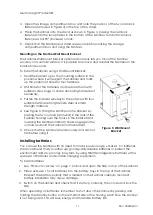
See Figure 10. Push the metal lock (arrowed) 
towards the connector to release the disinfectant 
tube connector. Pull the tube connector 
vertically upwards to remove it from the 
connector stub on top of the disinfectant 
container. 

3.


Lift the empty container vertically up and out of 
the Santinel, making sure that no liquid (on the 
outside of the container for example) drips into 
the Santinel. 

4.


Clean the container compartment inside the Santinel 
and make sure that there is no fluid in this area. If 
necessary, clean the interior with a dry cloth. 

5.


See Figure 11. Lower the new fluid container into its 
compartment inside the Santinel.  

6.


Remove the sealed lid from the top of the new fluid 
container. Take the lid with the hose connector stub from 
the old container and screw it onto the new container. 

7.


Connect the fluid hose to the hose connector stub on top 
of the new container by pushing the metal connector 
lock (arrowed in Figure 10) and pushing the hose 
connector onto the connection on the top of the 
container. 

8.


Purge any air that is trapped in the system by performing 
a few disinfection processes until the Santinel sprays 
disinfectant correctly. 

9.


Reset the counters in the control menu by scrolling to 
Information 

 Counters, then pressing and holding 

[ENTER] for 3 seconds. Press [MENU/BACK] to return to the 
top level of the control menus. 

Figure 11. Inserting 

a fluid container 

Figure 10. Releasing the 

disinfectant tube 

Summary of Contents for Santinel Cellular

Page 1: ...Santinel WiFi Santinel Cellular Hand Disinfecting Station User Manual User Manual Rev 20220607 1 Firmware V 1 0 0...

Page 2: ...contained in this document is subject to change without notice German Light Products GmbH and all affiliated companies disclaim liability for any injury damage direct or indirect loss consequential or...

Page 3: ...e 9 Physical installation 9 Installing batteries 11 Connecting to mains power 12 4 Using the Santinel 13 Switching on and off 13 Disinfecting hands 13 5 Control panel 15 Control buttons 15 LCD display...

Page 4: ...microbial and viral infection via the hands To protect from infection in shared spaces in the presence of customer traffic at events in public institutions and in similar applications Contraindication...

Page 5: ...w around the product Do not allow children to use the product unsupervised Fire safety The disinfectant has a low flash point of around 23 C 73 4 F and is therefore highly inflammable Do not allow the...

Page 6: ...ry give him something sweet to keep the blood sugar from dropping In any case call medical assistance If you need to transfer disinfectant from one container to another do so under aseptic conditions...

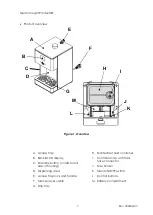
Page 7: ...on on left hand side of housing D Dispensing area E Access flap lock and handle F Mains power cable G Drip tray H Disinfectant fluid container I Container cap with fluid hose connector J Fuse holder K...

Page 8: ...fluid container and all sensitive components are hidden under a tamper proof locking service flap where there is also a 4 button control panel that works together with the LCD display on the front of...

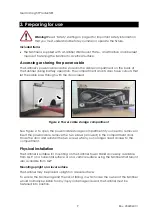
Page 9: ...sed See Figure 2 To open the power cable storage compartment if you need to remove or insert the power cable remove the two screws arrowed in the compartment door Close the door and reinstall the two...

Page 10: ...base of the Santinel and turn each fastener a full 90 clockwise to lock it 3 Make sure that the Santinel is held securely Make sure that the fasteners are not accessible to unauthorized persons Mounti...

Page 11: ...milar strength material 4 See Figure 5 Hang the Santinel on the bracket by passing the two cutouts arrowed in the rear of the Santinel housing over the hooks in the bracket and lowering the Santinel u...

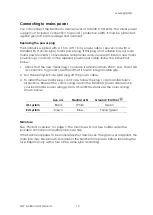
Page 12: ...is rated minimum 250 V 16 A that it has a connection to ground earth and that it has an integral cable grip 2 Cut the existing Schuko type plug off the power cable 3 To install the new mains plug cor...

Page 13: ...ant If you are operating the Santinel on battery power we recommend that you always put the Santinel into standby mode when it is not being used To put the Santinel into standby mode press and hold th...

Page 14: ...ay on the front of the Santinel shows a smiley icon The disinfecting area lights up with a green light as a signal to the user to remove their hands When the user has removed their hands the Santinel...

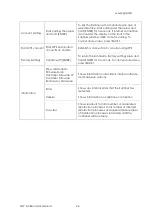
Page 15: ...to use the control panel open the flap and Press MENU BACK once to call up the following information in the display Volume amount per disinfection process Dispensing volume approx total amount of disi...

Page 16: ...work LTE and the signal strength is excellent The rest of the display shows the control menus In Figure 8 the Santinel is showing the main information display that is called up with one press on MENU...

Page 17: ...airing control menu and start the pairing process The Santinel web interface and smartphone app chapter on page 19 explains these procedures in detail Standby Button Enable or disabling the standby bu...

Page 18: ...stom configuration settings and return the Santinel to factory settings press and hold ENTER for 3 seconds or if you do not want to return to factory settings press MENU BACK to cancel and escape Info...

Page 19: ...e If your Santinel does not already have the correct module installed GLP can convert it by installing the module Your GLP supplier will be happy to give you details WiFi configuration The Santinel Wi...

Page 20: ...evice with a Santinel account using account pairing To do this 1 Connect the Santinel to the Internet when a Santinel WiFi or Santinel Cellular is powered on it looks for a WiFi signal or cellphone si...

Page 21: ...Pull the tube connector vertically upwards to remove it from the connector stub on top of the disinfectant container 3 Lift the empty container vertically up and out of the Santinel making sure that n...

Page 22: ...close and lock the top flap 11 Take the sealed lid that was on the new container and screw it onto the old empty container Recycle or dispose of the empty container properly If in doubt about where t...

Page 23: ...s not dispensing disinfectant in order to save energy B Ambient Light The Santinel dispenses fluid The disinfectant area ambient lighting and the WiFi cellular module are enabled while the Santinel is...

Page 24: ...Factory Settings Confirm with ENTER To return the Santinel to factory settings press and hold ENTER for 3 seconds To cancel and escape press BACK Information Show Information Firmware Main Controller...

Page 25: ...ectant fluid carefully WARNING Any service operation that requires removal of a cover must be performed by a professional service technician with the necessary tools skills qualifications and personal...

Page 26: ...hould now be free and the Santinel should work normally again Important Do not turn the nozzle too far or it may come off and expose the sealing mechanism If this happens reassemble it carefully and r...

Page 27: ...e drip tray and put it back into position in the Santinel Leaking or defective disinfectant container or hose Disconnect the Santinel from power Check if the leakage is coming from the container or th...

Page 28: ...of disinfection processes Number of disinfection processes remaining for current disinfectant fluid container Construction Housing color Silver black other colors on request Housing material Hygienic...

Page 29: ...12 W 0 110 A Standby power 230 V 3 2 W 0 035 A Thermal Ambient temperature operating range From 5 C 40 F to 45 C 115 F Dimensions and weight Santinel Height 453 mm 17 9 in Width 250 mm 9 9 in Depth 30...

Page 30: ...www glp de GLP Santinel User Manual 30 12 Dimensions...

Page 31: ...Base Access flap...

Page 32: ...Wall Mount Plate...

Page 33: ......

Page 34: ......

Page 35: ......

Page 36: ......

Reviews: