background image

1049

Installation Manual - Plate Processor 150

2-21

Installation

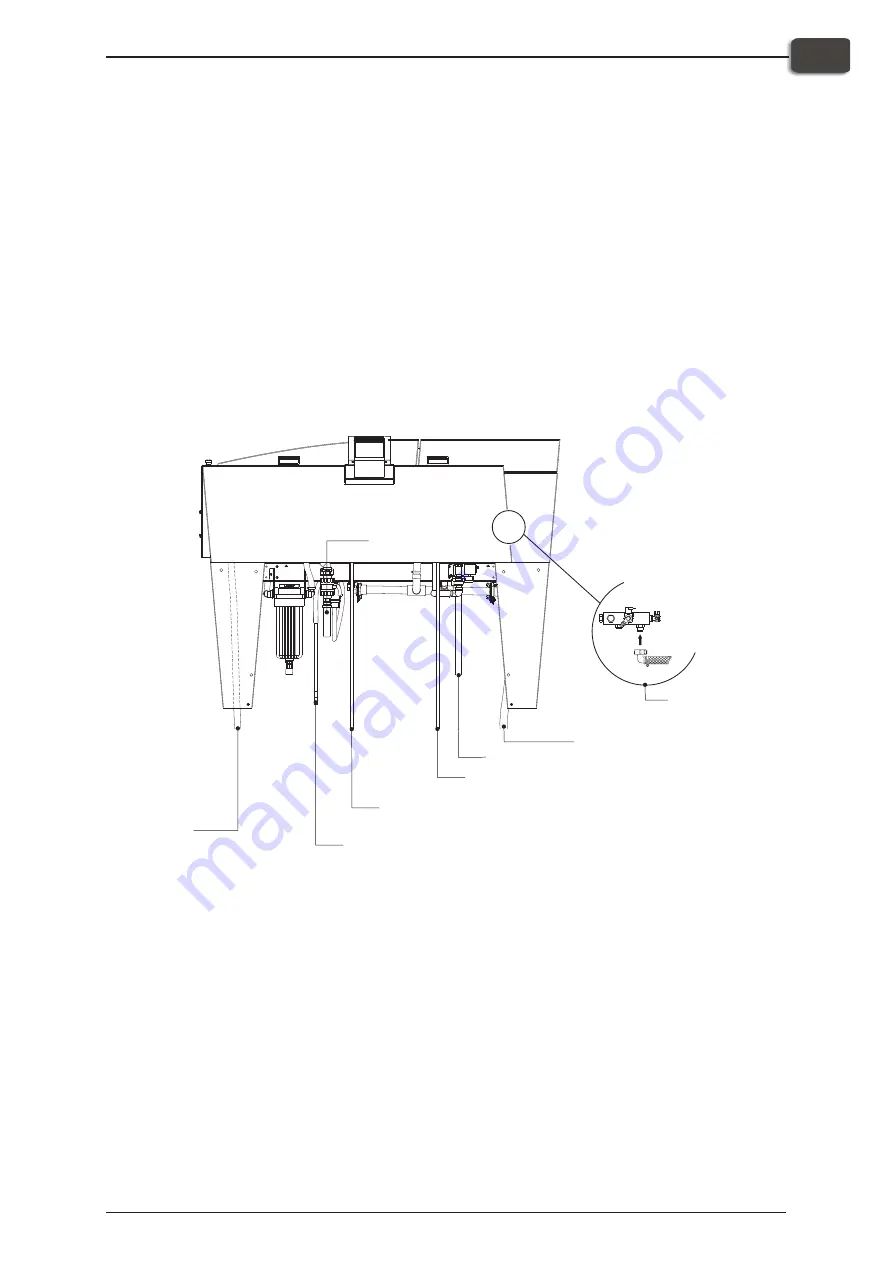
Preparation for processing

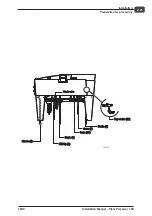
Gum (7)

Fill-Up (3)

Repl. (1)

Waste (4)

Gum (10)

Drain (5)

Waste valve

T31687

Tap water (22)

Summary of Contents for Plate Processor 150

Page 1: ...Installation Manual Plate Processor 150 ...

Page 2: ......

Page 3: ...Installation Manual Plate Processor 150 Edition AA December 2010 This manual has part No 10060441 T31684 ...

Page 4: ...z jensen com Copyright 2010 by GLUNZ JENSEN A S This manual is intended for Service Technicians only The directions given must not be followed by unauthorized personnel Read the Safety Instruction Manual part No 21741 before installing the equipment Keep manuals near the machine for reference at all times Installation Manual Plate Processor 150 1049 0 2 ...

Page 5: ... Installation 2 1 Installation hours 2 1 Customer training hours 2 1 Important before installation 2 3 Preparing the installation site 2 4 Unpacking Preparing the Processor 2 7 Lifting Transporting 2 8 Electrical specifications 2 10 Preparation for processing 2 16 Part 3 Finishing the Installation 3 1 Mounting fenders and panels 3 1 Software user settings 3 3 Safety check 3 4 Access level 3 4 ...

Page 6: ...Installation Manual Plate Processor 150 1049 0 4 ...

Page 7: ...accidents caused by unintended use of the equipment As the equipment is certified by accredited test laboratory UL International Demko A S it is absolutely prohibited to make any modifications electrical nor mechanical of the equipment If however this prohibition is disregarded Glunz Jensen s warranty will no longer apply and the certification labels for UL C UL and CE certification of the equipme...

Page 8: ...nel of the processor Notes Cautions and Warnings Throughout the manual notes cautions and warnings are indicated with various icons and written in bold like the example below When lifting be careful not to damage any of the drain equipment at the right side of the processor Explanations Symbol Meaning Explanation Note The operator should observe and or act according to the information in order to ...

Page 9: ...d will stay in the room and all electrical water and drain installations are in place the estimated installation time including interface installation and connection to the setter is 6 8 hours If the machine must be disassembled to get into the room before installation add another 4 5 hours for disassembling and reassembling Unpacking and transportation from pallet to the floor add 2 3 hours Custo...

Page 10: ...hours T31516_G2 User s Manual Quick Intro 1 2 51436D X min Power on Sleep power save Ready Ready Sleep Screen save Example Example Example 1 sec Overview 2 1 3 4 5 6 7 8 Example Service Manual Processor Safety Instructions 1 3 Software Manual 5 User s Guide 4 Installation Manual 2 ...

Page 11: ... with the equipment in any way In each manual is a table of contents for the actual manual The installation procedure in this manual will guide you to a few instructions described in the other manuals When the installation is finished and the customer has been introduced to the processor he will need the following manuals when working with the processor User Manual for the Control Panel 4 The Cont...

Page 12: ...imum free space around the machine is specified in the illustra tions below and opposite For CTP Online processors the space requirements at the processor front must be decided separately Installation Manual Plate Processor 150 1049 2 4 Installation Preparing the installation site T31686 60 cm 50 cm 50 cm 60 cm 60 cm Processor Delivery table option Feed table option 197 cm 123 5 cm 154 cm ...

Page 13: ...6 Length total L1 421 5 cm 165 9 Length processor L2 154 cm 60 6 Length feed table L3 60 cm 23 6 Length feed extension L4 40 5 cm 15 9 Length exit table L5 123 5 cm 48 6 Length exit extension L6 44 cm 17 3 Height total H1 116 131 cm 45 7 51 6 Height feed H2 87 5 102 5 cm 34 4 40 4 Height exit H3 86 5 101 5 cm 34 1 40 0 1049 Installation Manual Plate Processor 150 2 5 Installation Preparing the ins...

Page 14: ... of the sink is 160 x 40 cm 63 x 15 7 Drain Connections Never lead drain hoses from the developer section to a drain as most developers are strong pollutants and it is strictly forbidden to empty this type of chemistry into the public sewer system When establishing central reception systems for waste chemicals copper or brass should not be used in the draining system as the chemicals involved are ...

Page 15: ...rts See the packing list s delivered with the equipment for further information Removing the Fenders and Stand Panels To lower the processor and to make the installation you must first remove the fenders and the stand panels from the processor Remove the screws 1 securing the fenders to the stand Lift off the fenders 2 and 3 Release the locks 4 of the stand panels by pulling them outwards two on e...

Page 16: ...rom under the planks 1 using a pallet fork 6 on each side and moved away from the pallet in the direction shown Transporting The assembled processor can be transported either from the side by raising it from un der the wooden planks 1 on both sides using two hand powered pallet forks or from the front by raising it from under two crossbars 2 one of which is taken from the crate lid inserted undern...

Page 17: ...1049 Installation Manual Plate Processor 150 2 9 Installation Lifting Transporting 6 5 3 1 2 3 6 4 T 31662 ...

Page 18: ...ng capacity of min 100 kA If using automatic circuit breakers make sure they are Type D When selecting a cable type take the following into account Chemical resistance Chemicals may leak onto cable Mechanical resistance The operator may step onto cable Additional protection Provide for additional cable protection e g cable covers if cable is exposed to heavier transport such as forklift trucks etc...

Page 19: ...0 VAC 2 x 25 A 50 60 Hz Min 3 x 12 AWG type SJO 3W PE 230 VAC 3 x 20 A 50 60 Hz Min 4 x 12 AWG type SJO JAP 2W PE 200 VAC 2 x 25 A 50 60 Hz Min 3 x 12 AWG type SJO 3W PE 200 VAC 3 x 20 A 50 60 Hz Min 4 x 12 AWG type SJO Max power consumption 150 EUR US 230 400 VAC operation 5 100 Watt 17 400 BTU hour Stand by Approx 500 Watt 1 710 BTU hour JAP 200 VAC operation 3 900 Watt 17 400 BTU hour Stand by ...

Page 20: ...processor is wired for 3W N PE 400V EUR MODELS Before operating the processor you may need to perform a rewiring to match your local supply voltage Connect the cable to the terminal block 1 Lead the cable as shown opposite If required make rewiring as described on page 2 13 Installation Manual Plate Processor 150 1049 2 12 Installation Electrical specifications Processor T31669 Front Processor 1 ...

Page 21: ...tween terminal L1 and L2 and between L3 and N Connect the power supply cable to terminal L1 adn L3 and PE For an installation without neutral wire fuses F33 F34 F35 F36 F 37 and F38 must be installed Jumpers x69 x70 c x71 x72x x73 and x74 located on the fuse PCB must be removed 1049 Installation Manual Plate Processor 150 2 13 Installation Electrical specifications 2 1 2 3 4 X7 F10 1 RED YELLOW BR...

Page 22: ...ication must be made to transformer T1 and T2 Turn the main switch to 0 OFF Remove the left side panel from the processor Remove the screw securing the lid of the electronics cabinet and open it by pulling outwards with a firm grip Measure AC supply as follows Line to line if supply is from 3W PE or 2W PE Line to neutral if supply is from 3W N PE and set tapping of the transformer as follows 180V ...

Page 23: ...eadily accessible areas Processor setter connections ctp online processors The interface can be either a feed table or a setter interface Whether or not the processor is already fitted with some kind of interface panel you should refer to the separate INTERFACE MANUAL for installation instructions and other information relevant for your present type of interface Conveyor connection Not all models ...

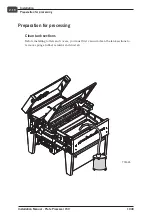
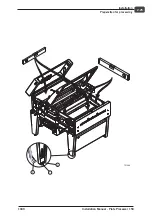
Page 24: ...nk sections Before installing rollers and covers you must first vacuum clean the tank sections to remove sponge rubber remains and dust etc Installation Manual Plate Processor 150 1049 2 16 Installation Preparation for processing T 31665 ...

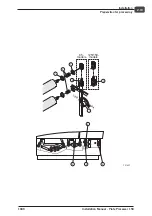
Page 25: ...over with a corresponding set of markings Install the rollers as follows 1049 Installation Manual Plate Processor 150 2 17 Installation Preparation for processing T 31219 Developer section Wash section Gum section Dryer section Roller with drive gear Not all models Brush DV 1U DV 1L DV 2L DV 5L W 1L W 3L G 1L DR 1L DV 2U DV 4U DV 3U DV 5U W 2U G 1U W 1U W 3U DR 1U NOTE The code indications are mou...

Page 26: ... the lower exit roller 4 Normally the brushes are already installed but if not make sure that all rollers 5 below the brushes are also fitted with the bearings springs 2 the bigger springs 6 and washers 7 must be installed between the rollers and bearings in the end opposite the drive gears on the gum section rollers 3 and 8 Lower the rollers into the grooves and then close the locks 1 Installatio...

Page 27: ...1049 Installation Manual Plate Processor 150 2 19 Installation Preparation for processing 6 125 150 models 85 models 2 2 1 CLOSE OPEN 7 7 5 T 31637 8 4 3 ...

Page 28: ...lic sewer system Particularly when preparing the drain connection ensure that copper or brass is not used in the draining system since the chemicals involved might corrode it Plastic or rubber is therefore recommended Check with your chemicals supplier for details Be careful that the drain hoses do not sag or form water traps Repl 1 Red Container sensor optional Connect to Developer Replenishment ...

Page 29: ...1049 Installation Manual Plate Processor 150 2 21 Installation Preparation for processing Gum 7 Fill Up 3 Repl 1 Waste 4 Gum 10 Drain 5 Waste valve T31687 Tap water 22 ...

Page 30: ...st be equipped with a DIN 1988 approved return valve A water tap should be installed next to the installation site of the machine Max dis tance to the water tap should be 5 m 16 4 ft The tap must be able to accept a rein forced hose minimum 15 mm 19 32 inner diameter This hose is not included with the machine Another possibility is to provide the machine with tempered water through a thermo static...

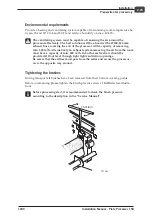
Page 31: ...oom must have a capacity of min 800 m 3 h In both cases fresh air should be provided at floor level through light tight ventilation openings Be aware that the airflow must pass from the setter and across the processor never the opposite way around Tightening the brushes During transport all brushes have been released from their normal working points Before commencing please tighten the brush press...

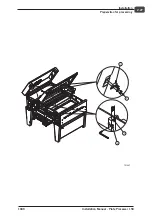
Page 32: ... before being able to turn the feet and counter nuts Level out the processor lengthwise by placing a spirit level on the left and right tank side Level out the processor crosswise by placing the spirit level on a roller at the front and rear of the processor Check levelling in all four positions and make final levelling if required Level out the preheat section with the appropriate screws Install ...

Page 33: ...1049 Installation Manual Plate Processor 150 2 25 Installation Preparation for processing T31666 3 1 2 ...

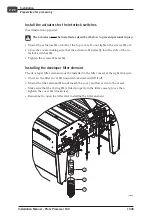
Page 34: ...ews 2 and 4 Installing the developer filter element The developer filter element must be installed in the filter vessel at the right tank side Unscrew the filter cover 1 counterclockwise and lift it off Mount the filter element 2 underneath the cover and lower it into the vessel Make sure that the O ring 3 is fitted properly in the filter vessel groove then tighten the cover 1 clockwise Remember t...

Page 35: ...1049 Installation Manual Plate Processor 150 2 27 Installation Preparation for processing 1 2 3 4 T31667 ...

Page 36: ...pment that has not already been installed such as Exit Table Cooling Unit Stacker Feed Table Extension Hand Shower Container sensor you should install them now using the installation instructions or manuals delivered with them Installation Manual Plate Processor 150 1049 2 28 Installation Preparation for processing ...

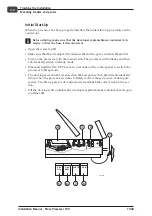
Page 37: ...nd 2 and secure them with the screws 3 Mount the left and right stand panels 4 and 5 and secure them by closing the locks 6 two on each panel Close dryer section cover 7 Close wet sections cover 8 1049 Installation Manual Plate Processor 150 3 1 Finishing the Installation Mounting fenders and panels 3 1 4 2 5 6 7 8 T31670 ...

Page 38: ...ally switch to Ready mode Press and hold the ON OFF key min 3 seconds on the control panel to switch the processor to Sleep mode The developer section 2 wash section 3 and gum section 4 will automatically fill up when the processor switches to Ready mode if the system is a double gum system The fill up pump will continuously reestablish the correct level in the sec tion Fill the developer fill con...

Page 39: ... Hardware and check all parameters Also make sure to check all parameters in Configuration Choices Calibration of valves and pumps Pumps Refer to Calibration in Part 4 in the Software Manual Gum valve Adjust the gum valve as illustrated in Part 3 in the processor service manual Setter interfaces If the processor is installed as an online system you should now install the setter inter face as descr...

Page 40: ... Service Manual Access level Set control panel access level to User Please refer to the Software Manual Control Panel Service Guide for a detailed description on access levels Installation is now complete Installation Manual Plate Processor 150 1049 3 4 Finishing the Installation Safety check ...

Reviews: