background image

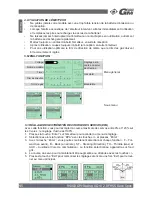
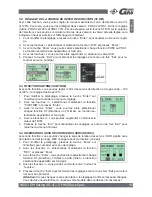
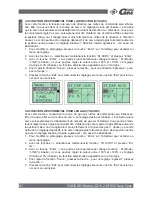
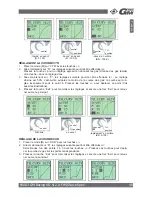
59                                           94003 GM-Racing XG-4i 2.0 FHSS Race Spec

Graupner-Zentralservice

Servicestellen / Service / Service après-vente

Italia

France

UK

Sverige

Espana 

Schweiz

Ceská Republika/Slovenská 
Republika

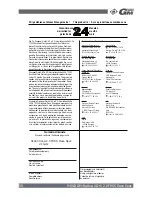
Wir gewähren auf dieses Erzeugnis eine /  

This product is /  Sur ce produit nous accordons une 

24

Monaten
months
mois

Die Fa. Graupner GmbH & Co. KG, Henriettenstraße 94-96,
73230 Kirchheim/Teck gewährt ab dem Kaufdatum auf 
dieses Produkt eine Garantie von 24 Monaten. Die Garan-
tie gilt nur für die bereits beim Kauf des Produktes vorhan-
denen Material- oder Funktionsmängel. Schäden, die auf 
Abnützung, Überlastung, falsches Zubehör oder unsach-
gemäße Behandlung zurückzuführen sind, sind von der 
Garantie ausgeschlossen. Die gesetzlichen Rechte und 
Gewährleistunsansprüche des Verbrauchers werden durch 
diese Garantie nicht berührt. Bitte überprüfen Sie vor ei-
ner Reklamation oder Rücksendung das Produkt genau 
auf Mängel, da wir Ihnen bei Mängelfreiheit die entstan-
denen Unkosten in Rechnung stellen müssen.

Graupner GmbH & Co. KG, Henriettenstraße 94-96, 73230 
Kirchheim/Teck, Germany guarantees this product for a pe-
riod of 24 months from date of purchase. The guarantee 
applies only to such material or operational defects witch 
are present at the time of purchase of the product. Dama-
ge due to wear, overloading, incompetent handling or the 
use of incorrect accessories is not covered by the guaran-
tee. The user´s legal rights and claims under garantee are 
not affected by this guarantee. Please check the product 
carefully for defects before you are make a claim or send 
the item to us, since we are obliged to make a charge for 
our cost if the product is found to be free of faults.

La société Graupner GmbH & Co. KG, Henriettenstraße 
94-96, 73230 Kirchheim/Teck, Allemagne, accorde sur ce 
produit une garantie de 24 mois à partir de la date d´achat. 
La garantie prend effet uniquement sur les vices de fonc-
tion-nement et de matériel du produit acheté. Les dom-
mages dûs à de l´usure, à de la surcharge, à de mauvais 
accessoires ou à d´une application inadaptée, sont ex-
clus de la garantie. Cette garantie ne remet pas en cau-
se les droits et prétentions légaux du consommateur. 
Avant toute réclamation et tout retour du prouit, veuillez 
s.v.p. cotrôler et noter exactement les défauts ou vices.

Garantie-Urkunde

Warranty certifi cate / Certifi cate de garantie

Übergabedatum
Date of purchase/delivery

Date de remise

Name des Käufers
Owner´s name
Nom de I`achateur

Straße, Wohnort
Complete adress

Domicie et rue

Firmenstempel und Unterschrift 
des Einzelhändlers
Stamp and signature of dealer
Cachet de la fi rme et signature 

du detailant 

Graupner GmbH & Co. KG
Henriettenstrasse 94-96
D-73230 Kirchheim / Teck

Servicehotline 

 (+49) 01805 47 28 76

Montag - Freitag 7:30 -11:45 
und 12:30 -16:00 Uhr

Anguera Hobbies
C/Terrassa 14
E 43206 Reus (Tarragona)

 (+34) 97 77 55 32 0

Graupner Service France
Gérard Altmayer
86, rue St. Antoine
F  57601 Forbach-Oeting

 (+33) 3 87 85 62 12

GiMax
Via Manzoni, no. 8
I  25064 Gussago

 (+39) 30 25 22 73 2

Baltechno Electronics
P.O. Box 5307
S 40227 Göteborg

 (+46) 31 70 73 00 0

Graupner Service Schweiz

Kirchweg 18
CH-5614 Sarmenstorf

 (+41) 56 66 71 49 1

Graupner Service UK
Brunel Drive
GB, NEWARK, Nottingham-
shire
NG242EG

 (+44) 16  36 61 05 39

RC Service Z. Hnizdil
Letecka 666/22
CZ-16100 Praha 6 - Ruzyne

 (+42) 2 33 31 30 95

Kit Flammang
129, route d’Arlon
L 8009 Strassen

 (+35) 23 12 23 2

Jan van Mouwerik
Slot de Houvelaan 30
NL 3155 Maasland VT

 (+31)10 59 13 59 4

Garantie

 von 

warrantied for

garantie de

CD-Electronics GmbH

Belgie/Nederland

Luxembourg

94002 XG-6i 2.0 FHSS Sport-Spec 2.4 GHz

94003 XG-4i 2.0 FHSS Race Spec 
           2.4 GHz

Summary of Contents for XG-4i

Page 1: ...003 GM Racing XG 4i 2 0 FHSS Race Spec XG 4i 2 0 FHSS Race Spec 2 4 GHz Bedienungsanleitung Instruction Manual Manuel d utilisation Garantie Warranty Garantie Deutsch 01 20 English 21 40 Francais 41 60 61 ...

Page 2: ...Inbetriebnahme 5 3 Binden der Fernsteuerung 5 4 Bedienung der Fernsteuerung 6 5 Menü Funktionen 6 5 1 Servoendpunkteinstellung EPA 6 5 2 Servowegeinstellung Lenkung ST D R 7 5 3 Sub Trimmfunktion S_TRIM 7 5 4 Servoreverse REV 7 5 5 Exponentialfunktion Lenkung ST CURV 8 5 6 Exponentialfunktion Gas TH CURV 8 Einstellen der VTR Kurve 9 Einstellen der CUR Kurve 9 5 7 Antiblockierfunktion ABS 10 5 8 Mo...

Page 3: ...e darauf dass auch kein sonstiger Gegen dürfen keinesfalls berührt werden Achten Sie darauf dass auch kein sonstiger Gegen stand mit angetriebenen Teilen in Berührung kommt stand mit angetriebenen Teilen in Berührung kommt Bei angeschlossenem Antriebsakku oder laufendem Motor gilt Halten Sie sich niemals im Bei angeschlossenem Antriebsakku oder laufendem Motor gilt Halten Sie sich niemals im Gefäh...

Page 4: ...ender und Empfängerakku anschließen Trennen Sie immer alle Stromquellen von ihrem Modell wenn Sie es längere Zeit nicht mehr benützen wollen Kapazität und Betriebszeit Für alle Stromquellen gilt Die Kapazität verringert sich mit jeder Ladung Bei niedrigen Temperaturen nimmt die Kapazität darüber hinaus stark ab daher sind die Betriebszeiten bei Kälte kürzer Häufiges Laden oder Benutzen von Batteri...

Page 5: ...ehinweise Reinigen Sie Gehäuse Senderantenne etc niemals mit Reinigungsmitteln Benzin Wasser und dergleichen sondern ausschließlich mit einem trockenen weichen Tuch Die Fa GRAUPNER übernimmt für nicht freigegebene Teile oder Zubehörprodukte von ande ren Herstellern keine Haftung und kann auch nicht jedes einzelne Fremdprodukt beurteilen ob es ohne Sicherheitsrisiko eingesetzt werden kann Haftungsa...

Page 6: ...ll geknickt oder gekürzt werden Die eigentliche Antenne ist das abisolierte Ende des Antennenkabels und muß soweit oben wie möglich im Fahr zeug installiert werden Vermeiden Sie Beschädigungen des Antennenkabels Batt 4 8 6 0 V Kanal 3 AUX Kanal 2 Gas Kanal 1 Lenkung S S S S 3 BINDEN DER FERNSTEUERUNG 3 BINDEN DER FERNSTEUERUNG 1 Schalten Sie zuerst den Sender ein Drücken Sie anschließend den Bindi...

Page 7: ...n oder verkleinern 6 Drücken Sie Exit um die Einstellungen zu speichern und noch mal Exit um zum Hauptmenü zurückzukehren 4 BEDIENUNG DER FERNSTEUERUNG Fahren Sie Ihr Modell nie mit schwachen Sender oder Empfängerbatterien Wenn am Sender der Batteriealarm ertönt Betrieb sofort einstellen und Batterien ersetzen oder Akkus laden Lassen Sie den EIN AUS Schalter nie nach der Fahrt an sonst halten die ...

Page 8: ...asten wählen Sie nun die Funktion D R und drücken Enter 3 Mit der Enter Taste können Sie nun die jeweilige Funktion anwählen POS0 oder POS1 Die angewählte Funktion wird grau hinterlegt 4 Mit den Tasten können Sie nun den D R Wert vergrößern oder verkleinern 5 Drücken Sie Exit um die Einstellungen zu speichern und noch mal Exit um zum Haupt menü zurückzukehren 5 3 SUB TRIMMFUNKTION S_TRIM Mit diese...

Page 9: ...ste können Sie nun die jeweilige Funktion anwählen M Modus LINE linear EXP exponential hier können Sie Werte zwischen 100 bis 100 einstel len Werkseinstellung ist 0 linear Die angewählte Funktion wird grau hinterlegt 4 Um die Lenkung milder einzustellen drücken Sie die Taste für eine aggressivere Lenkung die Taste 5 Drücken Sie Exit um die Einstellungen zu speichern und noch mal Exit um zum Haupt ...

Page 10: ... CUR KURVE 1 Stellen Sie den Modus M mit Tasten auf CUR 2 Gehen Sie nun auf R hier können Sie folgende Einstellungen vornehmen Wählen Sie mit der Enter Taste einen der Punkte 1 bis 3 an Drücken Sie die Tasten um den Verlauf der Gaskurve an den entsprechenden Punkten zu verändern 3 Drücken Sie Exit um die Einstellungen zu speichern und noch mal Exit um zum Haupt menü zurückzukehren 4 Um die Funktio...

Page 11: ...cle auszuwählen Mit den Tasten wählen Sie nun einen Wert zwischen 0 und 30 Mit CY stellen Sie das Intervall ein wie oft die Bremse wieder gelöst wird Je kleiner der Wert desto kürzer wird das Intervall 6 Drücken Sie Enter um DL Delay auszuwählen Mit den Tasten wählen Sie nun einen Wert zwischen 0 und 100 Bei 0 setzt das ABS ohne Verzögerung ein je höher der Wert desto größer die Verzögerung bis da...

Page 12: ...Zeichen eingeben 2 Drücken Sie dazu im MODEL Menü die Tasten und wählen EDT aus 3 Mit den Tasten können Sie nun die Zeichen auswählen und mit ENTER bestätigen 4 Zum Schluss müssen Sie die Eingaben mit dem ENTER Zeichen auf der Display Tasta tur speichern siehe auch Abb 5 Drücken Sie Exit um die Einstellungen zu speichern und noch mal Exit um zum Haupt menü zurückzukehren KOPIEREN VON EINEM MODELLS...

Page 13: ...e Tasten und wählen ST Lenkung oder TH Gas und bestätigen die Auswahl mit Enter 4 Mit den Tasten können Sie die Werte ändern SPD FL Geschwindigkeit einlenken oder Vollgas SPD BK Geschwindigkeit zurücklenken Die Werte können zwischen 0 und 100 eingestellt werden Werkseinstellung ist 0 keine Verzögerung 5 Drücken Sie Exit um die Einstellungen zu speichern und noch mal Exit um zum Haupt menü zurückzu...

Page 14: ...Voreinstellung zu ändern drücken Sie am Sender Enter um in das Einstellmenü zu gelangen 2 Mit den Tasten wählen Sie nun die Funktion ATS und drücken Enter 3 Drücken Sie Enter um TRI Throttle Trigger Position Gashebelstellung auszuwäh len Mit den Tasten können Sie den Wert von 100 bis 100 einstellen 4 Drücken Sie Enter um POS Preset Position voreingestellte Servoposition auszu wählen Mit den Tas te...

Page 15: ... und noch mal Exit um zum Haupt menü zurückzukehren Beispiel ST L 50 R 30 Wenn das Gasservo auf 60 rechts und das Lenkservo auf 50 rechts steht dann steht das Gasservo nach der Mischerprogrammierung 50 x30 60 x50 45 also auf 45 Das Gasservo reagiert somit auf das Lenkservo da es als Subkanal programmiert wurde TH L 20 R 50 EN ON Deutsch 94003 GM Racing XG 4i 2 0 FHSS Race Spec 14 5 12 TH HOLD Mit ...

Page 16: ...e Funktion EN auszuwählen Mit den Tasten können Sie die Failsafe Funktion komplett ein oder ausschalten OFF ausgeschaltet ON einge schaltet 6 Drücken Sie Exit um die Einstellungen zu speichern und noch mal Exit um zum Haupt menü zurückzukehren 5 14 NEUTRAL Mit dieser Funktion kann die Neutralstellung des Lenk und Gasservos kalibriert werden 1 Um die Voreinstellung zu ändern drücken Sie am Sender E...

Page 17: ... 30 Sekunden 1 Um die Voreinstellung zu ändern drücken Sie am Sender Enter um in das Einstellmenü zu gelangen 2 Mit den Tasten wählen Sie nun die Funktion RESET und drücken Enter 3 Drücken Sie Enter um den Reset zu starten 4 Drücken Sie Exit um die Einstellungen zu speichern und noch mal Exit um zum Hauptmenü zurückzukehren 5 17 MODELLSPEICHER ZURÜCKSETZEN MODEL RESET Mit dieser Funktion wird der ...

Page 18: ...omatisch wenn Sie zum ersten Mal Gas geben Anschließend ertönt jede Minute ein Signalton und nach Ablauf der Zeit ein Schlusssignal B B B Achtung Der Timer läuft nur solange der Gashebel gezogen bzw gedrückt wird 6 TRIMMFUNKTION 1 Stecken Sie alle benötigten Servos in den Empfänger und schalten dann Sender und Empfänger ein 2 Stellen Sie die Lenkungs und Gastrimmung am Sender auf neutral Lenkungst...

Page 19: ...n sein Einstellungen an der Trimmung können den Servoweg beeinflussen kontrollieren Sie daher immer anschließend den Servoweg ST D R SERVICE UND REPARATUREN In Problemfällen oder bei Fragen und Reparaturen wenden Sie sich bitte die Servicestelle Ihres Landes siehe Seite 59 oder an GRAUPNER Service Henriettenstrasse 94 96 D 73230 Kirchheim Teck Tel 49 1805 472876 7 TECHN DATEN SENDER EMPFÄNGER Freq...

Page 20: ...onischen Geräten abgegeben werden Die Werkstoffe sind gemäß ihrer Kennzeichnung wieder verwertbar Mit der Wieder verwendung der stofflichen Verwertung oder anderen Formen der Verwertung von Altgeräten leisten Sie einen wichtigen Beitrag zum Umweltschutz Batterien und Akkus müssen aus dem Gerät entfernt werden und bei einer entsprechenden Sammelstelle getrennt entsorgt werden Bei RC Modellen müssen...

Page 21: ...ed standards applied EN EN 60950 1 A11 2009 50371 2002 EN 301 489 1 V1 8 1 EN 301 489 17 V2 1 1 EN 300 328 V1 7 1 Health and safety requirements pursuant to 3 1 1 Article 3 1 a Protection requirement concernig electromagnetic compatibility 3 1 2 Artikel 3 1 b Measures for the efficient use of the radio frequency spectrum 3 2 Article 3 2 Kirchheim 25 Mai 2011 Stefan Graupner Geschäftsführer Stefan ...

Page 22: ... CONTENTS CONTENTS Safety Notes 22 1 Transmitter 24 2 Getting started 25 3 Binding process 25 4 Operating the remote control 26 5 Menu functions 26 5 1 End Point Adjustment EPA 26 5 2 Steering Range ST D R 27 5 3 Sub Trim S_TRIM 27 5 4 Servoreverse REV 27 5 5 Exponential function Steering ST CURV 28 5 6 Exponential function Throttle TH CURV 28 Adjustment VTR curve 29 Adjustment CUR curve 29 5 7 An...

Page 23: ...ustion engine or electric motor is connected to the system take great care to avoid any possibility of it bursting into life when you are programming the transmitter We to avoid any possibility of it bursting into life when you are programming the transmitter We recommend that you disconnect the fuel supply or the drive battery beforehand recommend that you disconnect the fuel supply or the drive ...

Page 24: ...y manufacturer s instructions and don t leave the batteries on charge for a Keep to the battery manufacturer s instructions and don t leave the batteries on charge for a longer period than stated Do not leave batteries on charge unsupervised longer period than stated Do not leave batteries on charge unsupervised Never attempt to recharge dry cells as they may explode Never attempt to recharge dry ...

Page 25: ...luence the way you install ope As manufacturers we at GRAUPNER are not in a position to influence the way you install ope rate and maintain the radio control system components For this reason we are obliged to refu rate and maintain the radio control system components For this reason we are obliged to refu te all liability for loss damage or costs which are incurred due to the incompetent or incor...

Page 26: ...control system and its various functions and settings Before the first trip should be sure all of these functions and settings have read and understood Be careful with the installation of the receiver Never bend or shorten the coaxial antenna wire The actual antenna is the stripped end of the antenna wire and must be installed in the vehicle so far above as possible Avoid damages of the antenna ca...

Page 27: ...ponding item 3 Press EXIT to save your setting and leave EPA interface and back to the function menu interface TERMS F FORWARD B BACK ST STEERING TH THROTTLE AUX AUXILLIARY 5 MENU FUNCTION 4 OPERATING THE REMOTE CONTROL Run your car never with low transmitter or receiver batteries If the low battery alarm on the transmitter starts stop running your model and change or recharge batteries Never forg...

Page 28: ...sing D R will make the steering wheel action more sensitive D R adjusting value range 0 120 POS0 default value is 100 POS1 default value is 70 Press the ST D R dial to select POS0 or POS1 and the value will display in the LCD when it is on the main screen 1 Press ENTER to see FUNCTION MENU 2 Press or to choose D R and press ENTER to enter D R adjusting inter face 3 Press to increase and to decreas...

Page 29: ...on quicker or milder It has no effect on the servo maximum operation amount For the high side selection from among three kinds of curves EXP VTR CUR is also possible Note When the course conditions are good and there is no sense of torque at the power unit set each curve to the side quick side When the road surface is slippery and the drive wheels do not grip it set each curve to the minus mild si...

Page 30: ...ou want to set 3 When ending setting return to the initial screen by pressing the EXIT ADJUSTMENT METHOD FOR CUR CURVE Select CUR at setup item M select setup item R and make the following adjustments 1 Curve setup Select the setting item 1 1st point by ENTER button and use the and buttons to set the 1st point Set the throttle curve by sequentially setting 2 2nd point 3 3th point 2 When ending set...

Page 31: ... Use to change the value Range 0 100 8 Press ENTER to select SM item Use to change the value Range 0 100 If this value is 0 disable the steering mix 9 Press ENTER to select MODE item Use to change INH OFF or TH ON 10 Press EXIT twice to save and return to FUNCTION MENU press EXIT again to return to the Main Screen TERMS PT Operation Throttle Trigger point WD Brake return amount Sets the rate at wh...

Page 32: ...MORY TO ANOTHER 1 Press or to choose CPY 2 Press ENTER to enter copy mode Press or to choose Mod01 Mod15 3 Press ENTER to save your setting and Press EXIT leave CPY interface and back to the function menu interface 5 8 MODELL MEMORY MODEL Press ENTER in the power on interface and enter function menu interface Press or to choose MDL and press ENTER to enter MODEL adjusting interface 1 Press ENTER t...

Page 33: ...n the set speed the steering servo is not affected understeer spin Steering without steering speed steering with steering speed smooth cornering SPD FL SPD BK Throttle without speed Throttle with speed 2 THROTTLE SPEED Sudden throttle trigger operation on a slippery road only causes the wheels to spin and the vehicle cannot accelerate smoothly Setting the throttle speed function reduces wasteful b...

Page 34: ...Use the Keys to select the ATS function and press ENTER 3 Press ENTER to select TRI Throttle Trigger item Use to change the value Range 100 100 4 Press ENTER to select POS Preset Position item Use to change the value Range 0 100 5 Press ENTER to select DLY ATS delay time item Use to change the value Range 0 100 6 Press ENTER to select MOD ATS Ready setting item Use to change INH or RDY 7 Press EXI...

Page 35: ...0 6 Third Press ENTER to select EN item Use to select ON to enable the function and OFF to disable the function 7 Press EXIT twice to save and return to FUNCTION MENU press EXIT again to return to the Main Screen Example ST L 50 R 30 If throttle servo is 60 on the right and rudder servo is 50 on the right and then after setting throttle servo is 50 30 60 50 45 Thrott le servo will act along with t...

Page 36: ...urn to FUNCTION MENU press EXIT again to return to the Main Screen Note Don t move the STEERING wheel or THROTTLE trigger in the calibrate procedure 5 15 SOUND This function can open or close the buzzer sounding 1 Press ENTER to see FUNCTION MENU 2 Use the Keys to select the SOUND function and press ENTER 3 Use the Keys to select INH or ACT 4 Press EXIT twice to save and return to FUNCTION MENU pr...

Page 37: ...a of the current model memory to default values 1 Press ENTER to see FUNCTION MENU 2 Use the Keys to select the M_RES function and press ENTER 3 Use the Keys to select YES 4 Press ENTER to reset the data 5 Press EXIT twice to save and return to FUNCTION MENU press EXIT again to return to the Main Screen 5 18 TIMER Use the timer by selecting one of the two timers UP TIMER and DOWN TIMER and if the ...

Page 38: ...nced by sounding of a buzzer each minute after starting The buzzer will sound B B B when the timer is up to the stop time Down timer function Press ENTER to select the MODE Use Keys to select DN_T DOWN TIMER The DOWN TIMER can be used to count the time from preset time 0 minute 0 second The preset time is set form 0 minute 0 second to 99 minute 30 second The first start operation will be linked to...

Page 39: ...this product comes to the end of its useful life you must not dispose of it in the ordinary domestic waste The correct method of disposal is to take it to your local collection point for recycling electrical and electronic equipment The symbol shown here which may be found on the product itself in the operating instructions or on the packaging indicates that this is the case Individual markings in...

Page 40: ...G Article 3 of the R TTE Directive Angewendete harmonisierte Normen Harmonised standards applied EN EN 60950 1 A11 2009 50371 2002 EN 301 489 1 V1 8 1 EN 301 489 17 V2 1 1 EN 300 328 V1 7 1 Health and safety requirements pursuant to 3 1 1 Article 3 1 a Protection requirement concernig electromagnetic compatibility 3 1 2 Artikel 3 1 b Measures for the efficient use of the radio frequency spectrum 3...

Page 41: ...on Vitesse réglable pour les servos de gaz et de direction Fonction Auto Start ATS Fonction Auto Start ATS Fonction Throttle Hold pour le servo de gaz Fonction Throttle Hold pour le servo de gaz Timer et compte à rebours intégré Timer et compte à rebours intégré Prise de charge sur l émetteur Prise de charge sur l émetteur SOMMAIRE SOMMAIRE Instructions de sécurité 41 1 Émetteur 43 2 Mise en servi...

Page 42: ...Une hélice en mouvement peut facilement vous sectionner un doigt pendant leur rotation Une hélice en mouvement peut facilement vous sectionner un doigt Portez une attention toute particulière à tout objet à proximité de la rotation de l hélice qui Portez une attention toute particulière à tout objet à proximité de la rotation de l hélice qui pourrait être happé pourrait être happé Une fois que l a...

Page 43: ...ns contrainte physique Pour maintenir le ralenti du moteur il faut que la commande soit installée de telle sorte que le carburateur soit complètement fermé quand le manche des gaz est au minimum ainsi que son trim Veillez particulièrement à ce qu aucune gaine de commande métallique ne frotte à une autre partie métallique vous risqueriez des top radio particulièrement intempestifs et dangereux pour...

Page 44: ...doux Limite de responsabilité et garantie constructeur Comme le respect des instructions de montage et d utilisation ainsi que les méthodes d ins tallation de I ensemble R C ne peuvent pas être surveillés par la firme GRAUPNER la sociéte GRAUPNER décline toute responsabilité pour les pertes les dommages ou les coûts entraînés par une mauvaise utilisation ainsi que sa participation d une manière qu...

Page 45: ...UX Voie 2 Gaz Voie 1 Direction S S S S LE SYSTÈME DE RADIOCOMMANDE Vous aurez à la suite un aperçu sur le système de radiocommande XG 4i 2 0 FHSS Race Spec 2 4 Ghz à 3 voies sur ses différentes fonctions et sur ses réglages Avant la première mise en service vous devrez absolument avoir lu et assimilé la totalité de ces instructions 3 LIAISON DE L ENSEMBLE R C 1 Tout d abord mise en marche de l éme...

Page 46: ...uche Exit pour mémoriser les réglages et encore une fois Exit pour retour ner au menu principal 4 UTILISATION DE L ÉMETTEUR Ne pilotez jamais votre modèle avec une trop faible tension de la batterie d émission ou de réception Lorsque l alarme acoustique de l émetteur intervient arrêtez immédiatement l utilisation et remplacez les piles ou rechargez les accus de la batterie Ne laissez jamais l inte...

Page 47: ... préréglage pressez la touche Enter sur l émetteur pour accéder au menu de réglage 2 Avec les touches sélectionnez maintenant la fonction SUB TRIM et pressez Enter 3 Avec la touche Enter vous pourrez alors sélectionner chaque fonction ST Direction ou TH Gaz La fonction sé lectionnée apparaîtra sur fond gris 4 Avec les touches vous pourrez augmenter ou diminuer la valeur de TRIM 5 Pressez la touche...

Page 48: ... direction agressive pres sez la touche 5 Pressez la touche Exit pour mémoriser les réglages et encore une fois Exit pour retour ner au menu principal 5 6 FONCTION D EXPONENTIEL POUR LES GAZ TH CURV Avec cette fonction la réaction du servo de gaz aux ordres de commande sera influencée Elle n a aucun effet sur la course du servo Le réglage d usine est linéaire c est à dire que le servo suit exactem...

Page 49: ...ce point Voir aussi les illustrations 4 Pressez la touche Exit pour mémoriser les réglages et encore une fois Exit pour retour ner au menu principal RÉGLAGE DE LA COURBE CUR 1 Placer le mode M sur CUR avec les touches 2 Allez maintenant sur R les réglages suivants pourront être effectués ici Sélectionnez l un des points 1 à 3 avec les touches Pressez ces touches pour dépla cer la courbe de gaz sur...

Page 50: ...valles 6 Pressez Enter pour sélectionner DL Délai Avec les touches sélectionnez main tenant une valeur entre 0 et 100 Avec 0 l ABS agit sans retardement plus haute est la valeur plus grand est le retardement jusqu à ce que l ABS agisse 7 Pressez Enter pour sélectionner DT Qui place la proportion Frein ABS Avec les touches sélection nez maintenant une valeur entre 0 et 100 8 Pressez Enter pour séle...

Page 51: ...es caractères avec le signe ENTER sur l affichage Flèche retournée voir aussi les illustrations 5 Pressez la touche Exit pour mémoriser les réglages et encore une fois Exit pour retour ner au menu principal COPIE D UNE MÉMOIRE DE MODÈLE VERS UNE AUTRE 1 Sélectionnez un modèle avec les touches 2 Pressez ensuite les touches dans le menu et sélectionnez CPY et confirmez la sé lection avec Enter 3 Ave...

Page 52: ...es touches sélectionnez maintenant la fonction SPEED et pressez Enter Pressez ensuite les touches dans le menu et sélectionnez ST Direction ou TH Gaz puis confirmez la sélection avec Enter Vous pourrez changer la valeur avec les touches SPD FL Vitesse de braquage ou plein gaz SPD BK Vitesse de contre braquage Les valeurs pourront être réglées entre 0 et 100 Le réglage d usine est 0 pas de retardem...

Page 53: ...sition du servo préréglée Avec les touches vous pourrez régler une valeur de 0 à 100 5 Pressez Enter pour sélectionner DLY Delay time Retardement Avec les touches vous pourrez ré gler une valeur de 0 à 100 6 Pressez Enter pour sélectionner MOD Mode Avec les touches cous pourrez commuter ou dé com muter la fonction ATS INH Dé commutée RDY Commu tée 7 Pressez la touche Exit pour mémoriser les réglag...

Page 54: ... mémoriser les réglages et encore une fois Exit pour re tourner au menu principal Exemple ST L 50 R 30 Lorsque le servo de gaz est réglé sur 60 et le servo de direction sur 50 le servo de gaz est ensuite sur 50 x30 60 x50 45 Après la programmation du mixeur Le servo de gaz réagit ainsi sur le servo de direction car il a été programmé comme voie secondaire TH L 20 R 50 EN ON 5 13 FAILSAFE F S Avec ...

Page 55: ...z durant le processus de calibrage 5 15 SON SOUND Avec cette fonction les avertissements acoustiques de l émetteur pourront être commutés ou dé commutés 1 Pour modifier le préréglage pressez la touche Enter sur l émetteur pour accéder au menu de réglage 2 Avec les touches sélectionnez maintenant la fonction SOUND et pressez Enter 3 Avec les touches sélectionnez maintenant INH Coupé ou ACT Contact ...

Page 56: ... préréglage pressez la touche Enter sur l émetteur pour accéder au menu de réglage 2 Avec les touches sélectionnez maintenant la fonction M _ RES et pressez En ter 3 Avec les touches sélectionnez maintenant YES 4 Pressez Enter pour démarrer le Reset 5 Pressez la touche Exit pour mémoriser les réglages et encore une fois Exit pour retour ner au menu principal 5 18 TIMER L émetteur XG 4i Race Spec e...

Page 57: ... et le palonnier ou le protège servo seront ensuite fixés dans la position la plus centrale possible Des réglages de trim extrêmes seront ainsi évités Les réglages de trim peuvent influencer la course des servos pour cette raison contrôlez toujours ensuite la course des servos ST D R Trim de gaz TH TRIM Vous pouvez décaler le trim de gaz en déplaçant le levier en dessous du volant vers la droite o...

Page 58: ...indique Les matériaux selon leurs reconnaissances sont réutilisables Avec le recyclage de matériaux et autres formes d appareils vous contribuez à la protection de l environnement Les batteries et accus doivent être retirés de l appareil et doivent être remis à un dépôt homo logué pour ce type de produits Pour les modèles radiocommandes les pièces électroniques comme par exemple les servos récepte...

Page 59: ...le 3 of the R TTE Directive Angewendete harmonisierte Normen Harmonised standards applied EN EN 60950 1 A11 2009 50371 2002 EN 301 489 1 V1 8 1 EN 301 489 17 V2 1 1 EN 300 328 V1 7 1 Health and safety requirements pursuant to 3 1 1 Article 3 1 a Protection requirement concernig electromagnetic compatibility 3 1 2 Artikel 3 1 b Measures for the efficient use of the radio frequency spectrum 3 2 Arti...

Page 60: ...G Henriettenstraße 94 96 73230 Kirchheim Teck Allemagne accorde sur ce produit une garantie de 24 mois à partir de la date d achat La garantie prend effet uniquement sur les vices de fonc tion nement et de matériel du produit acheté Les dom mages dûs à de l usure à de la surcharge à de mauvais accessoires ou à d une application inadaptée sont ex clus de la garantie Cette garantie ne remet pas en c...

Page 61: ...______________________ _________________________________________________ _________________________________________________ _________________________________________________ _________________________________________________ _________________________________________________ _________________________________________________ _________________________________________________ ___________________________...

Page 62: ...______________________ _________________________________________________ _________________________________________________ _________________________________________________ _________________________________________________ _________________________________________________ _________________________________________________ _________________________________________________ ___________________________...

Page 63: ...____________________________ _________________________________________________ _________________________________________________ _________________________________________________ _________________________________________________ _________________________________________________ _________________________________________________ _________________________________________________ _____________________...

Page 64: ...02 2011 V1 0 ...

Reviews: