background image

11

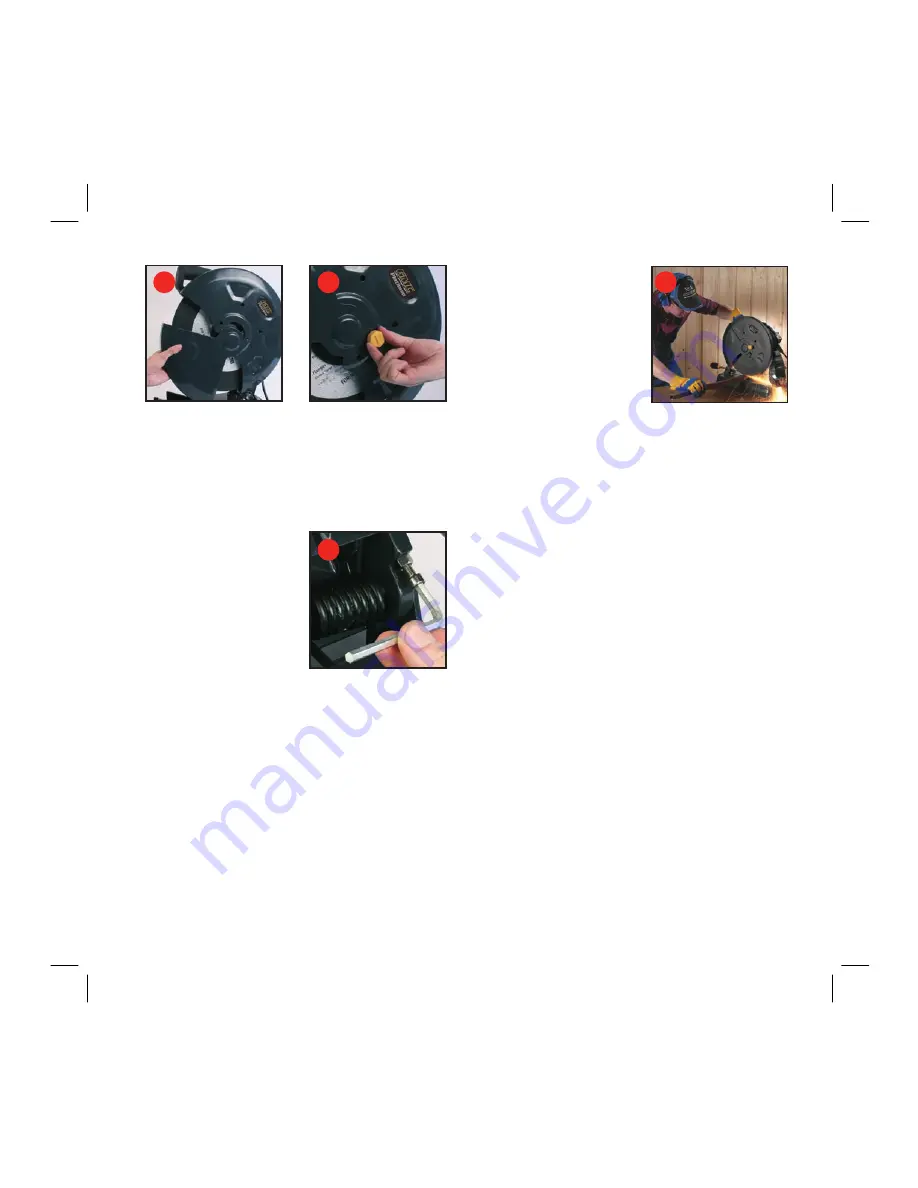
bottom exposed (fig U). After locating centrally, lift the 

spark guard FULLY, ensuring the two parts rotate correctly 

and do not detach. With the guard in the FULLY upright 

position, there is only one threaded hole exposed. Replace 

the spark shield locking screw fully in this hole (fig V). 

Operate the spark guard up and down to ensure it is 

correctly located prior to turning the cut off saw on.

NOTE.


Ensure that the depth 

stop is adjusted to the correct 

height before commencing 

operation. The adjustable 

depth stop is threaded into the 

base of the machine at the 

rear. By raising and lowering 

the depth stop bolt with the 

5mm hex key (fig W) the 

travel of the cut off wheel can be controlled. This feature is 

particularly useful to prevent contact with the work bench 

surface when a new disc is fitted or increase disc travel as 

the abrasive disc wears. The depth stop should be checked 

and adjusted everytime a new disc is fitted.

Operation

1. Make all adjustments including 

setting the vice, fence position 

and fence angle. 

2. Ensure that the workpiece is 

fully secured before starting 

any cutting.

NOTE.

 Ensure you are wearing 

the appropriate safety gear 

including eye protection and hearing protection.
3. Check that the disc, guard and tool are in good condition.
4. Plug the cordset into the mains socket.
5. Push the lock-off button and pull the trigger to start 

the tool.

6. Bring the disc down onto the workpiece and allow it to 

cut its way through the workpiece without undue force. 

(fig X)

7. Once the cut is finished, raise the arm to clear the disc 

from the workpiece, release the trigger and the cut off 

saw will stop. Please note that the disc will continue to 

turn for a few revolutions even though the saw is switched 

off. Keep your hands well away from the moving disc.

U

V

W

X

Summary of Contents for MX355C

Page 1: ...Auckland Hong Kong Shanghai Taipei New York Verona London Paris Black Cyan Magenta Yellow Code MX355C Date 060105 Edition 04 Op DCR 2 YEAR WARRANTY 30 DAY MONEY BACK GUARANTEE 2 YEAR WARRANTY 30 DAY MONEY BACK GUARANTEE 2400W 355mm 14 Cut Off Saw ...

Page 2: ...rade use from the date of the original purchase If found to be defective in materials or workmanship the tool or the offending faulty component will be replaced free of charge with another of the same item A small freight charge may apply The warranty replacement unit is only made available by returning the tool to the place of purchase with a confirmed register receipt Proof of purchase is essent...

Page 3: ... spare part or user information please phone our Help Line for an immediate response Phone 1300 880 001 in Australia or 0800 445 721 in New Zealand Introduction Your new GMC power tool will more than satisfy your expectations It has been manufactured under stringent GMC Quality Standards to meet superior performance criteria You will find your new tool easy and safe to operate and with proper care...

Page 4: ... tools or attachments to do the job best handled by a heavier duty tool Never use a tool for a purpose for which it was not intended 7 Dress correctly Do not wear loose clothing or jewellery They can be caught in moving parts Rubber gloves and non slip footwear are recommended when working outdoors If you have long hair wear a protective hair covering 8 Use safety accessories Safety glasses and ea...

Page 5: ...ng the disc on your finger Listen for the ring If the tone is dull do not use the disc It may be cracked When the disc is installed stand to one side out of line with the disc and run the tool for at least a minute to make sure that it is not faulty Always stay out of line of the disc when using the saw Do not use a cut off disc marked with a lower RPM than that of the no load speed shown on the r...

Page 6: ...y adjustments or maintenance including changing the disc Accessories The GMC MX355C chop saw is supplied with the following accessories as standard 1 8mm Hex key 2 5mm Hex key 3 Vice handle 4 Hex screw spring washer and flat washer for vice handle 5 355mm Cut off disc fitted 6 Rear spark shield 7 Hex screw spring washer and flat washer for rear spark shield 8 Rubber feet x4 9 Instruction manual 10...

Page 7: ...ld 5 Spark shield locking knob 6 Cut off disc 7 Spindle lock 8 Rear spark shield 9 Base 10 Rubber foot 18 2 7 11 Vice lock release lever 12 Vice handle 13 Vice 14 Fence 15 Carry handle 16 Lock down knob 17 Depth stop 18 8mm Hex key 19 5mm Hex key 15 19 8 9 12 11 14 13 3 5 10 4 1 6 17 16 ...

Page 8: ...ted into the slots 4 Repeat for the other side and place the chop saw back on its base Attaching the vice handle 1 Fit the vice handle onto the end of the vice fig B 2 Fit the spring washer over the hex screw followed by the flat washer 3 Place the hex screw inside the vice handle and secure the vice handle to the vice by tightening the hex screw in a clockwise direction fig C 4 Fit the cap onto t...

Page 9: ...e fence using the 8mm hex key supplied fig J 2 Move the rear fence to the desired angle using the scale as a guide fig K 3 Tighten the 2 hex bolts to secure the fence in position CAUTION Only perform mitre cuts when the fence is set at the most forward position NOTE For accurate cuts test the cutting angle on some similar scrap material and adjust the angle to suit your requirements The scale is o...

Page 10: ... use the 8mm hex key supplied to remove the disc bolt Note that the bolt unscrews in an anti clockwise direction fig R 5 Remove the disc lock bolt washer outer flange blotter and cut off disc fig S 6 Clean any grinding dust from the inner flange and after checking that it is in good condition mount a new disc between two paper blotters The rear blotter should be mounted onto the inner flange and t...

Page 11: ...sc is fitted or increase disc travel as the abrasive disc wears The depth stop should be checked and adjusted everytime a new disc is fitted Operation 1 Make all adjustments including setting the vice fence position and fence angle 2 Ensure that the workpiece is fully secured before starting any cutting NOTE Ensure you are wearing the appropriate safety gear including eye protection and hearing pr...

Page 12: ...tool can also cause the cutting disc to cut on an angle Ensure the beginning of the cut is a gradual start and apply the firm and constant pressure as the cut gets deeper When cutting sections always try and cut the sections so as the actual cutting length is as short as possible through the section For example angle iron has two sections to be cut If the material is cut where both sections are cu...

Page 13: ...13 ...

Page 14: ...14 ...

Page 15: ...15 ...

Page 16: ...t any GMC product With continuing product development changes may have occurred which render the product received slightly different to that shown in this instruction manual The manufacturer reserves the right to change specifications without notice Note Specifications may differ from country to country The GMC 777 Helpline operates from 7am to 7pm 7 days a week EST This allows you to contact GMC ...

Reviews: