1. Grip the Palm Grip Handle (2) firmly, and switch the
sander on
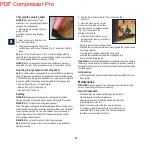
2. Move the machine in a circular
motion over the workpiece surface,
applying an even, moderate pressure
(Fig. D). until you reach the
desired surface finish
3. If there are still scratches on your
workpiece after sanding, try either of
the following:
• Return to a coarser grit sanding sheet
and sand the marks out before recommencing with the original choice
of sanding sheet or,
• Try using a new sanding sheet of the same grit to
eliminate the unwanted marks before progressing to a
iner grit and inishing the job
WARNING:
Do not allow the sandpaper to completely wear down before
replacing it. Failure to observe these precautionary measures can lead to
damage to the hook and loop surfaces, resulting in sanding sheets failing
to attach properly.
Accessories
• A full range of sanding sheets and accessories is available from your
GMC dealer
Maintenance
WARNING:
Always disconnect from the power supply before carrying
out any inspection, maintenance or cleaning.
General inspection
• All the bearings are sealed ball bearings, lubricated for
life, and require no further maintenance
•
Regularly check that all the ixing screws are tight. They
may vibrate loose over time
• Inspect the supply cord of the tool, prior to each use,
for damage or wear. Repairs should be carried out by an
authorised GMC service centre. This advice also applies
to extension cords used with this tool
Changing the sanding sheet
WARNING:
Always switch off and
disconnect from the power supply before
changing the sanding sheet.
1. Remove the old sanding sheet by
pulling it off the
machine’s hook and loop Sanding
Base (4)
2. Clean any dust or debris from the
hook and loop surfaces
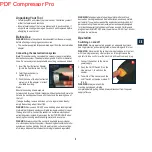
3. Align the dust extraction holes in the
sanding sheet with those of the base (Fig. C), and press it firmly in
place
Note:
Do not continue to use worn, torn, or heavily clogged sanding
sheets. Ensure foreign objects, such as nails and screws, are removed
from the workpiece before commencing sanding.
WARNING:
Do not use a sanding sheet on wood that has previously
been used on metal. This may cause scouring on the wooden surface.
Selecting the right grade of sanding sheet
Note:
This detail sander is supplied with a variety of different grit sanding
sheets. Always use good quality sanding sheets to maximise the quality
of the inished task. Always test the sander on a scrap piece of material to
determine whether the sanding sheet is suitable for the intended task:
• Coarse (60 grit) for use on rough material
• Medium (120 grit) for smoothing off
•
Fine (240 grit) for inishing
Sanding
WARNING
: Always wear safety goggles, an adequate dust mask,
hearing protection and suitable gloves, when working with this sander.
WARNING:
Do not touch the moving sanding sheet.
Note: This sander is designed for detailed sanding tasks on wood, metal,
plastic and similar materials, as well as painted surfaces. Use a different
type of sanding machine irst (e.g. a belt sander), should you need to
remove large amounts of material. This sander can then be used for
inishing tasks and detail work.
WARNING:
Do not use this sander for sanding magnesium.
Note:
Always use clamps to secure your workpiece to the workbench
wherever possible.
10
GB
C
D
Summary of Contents for SandKat KAT150B
Page 2: ...PDF Compressor Pro ...
Page 52: ...PDF Compressor Pro ...


