General Motors Tech2 User Guide
16
Getting Started
This section covers all Tech2 vehicle applications. Therefore, some of the information
provided may not be required for individual applications.
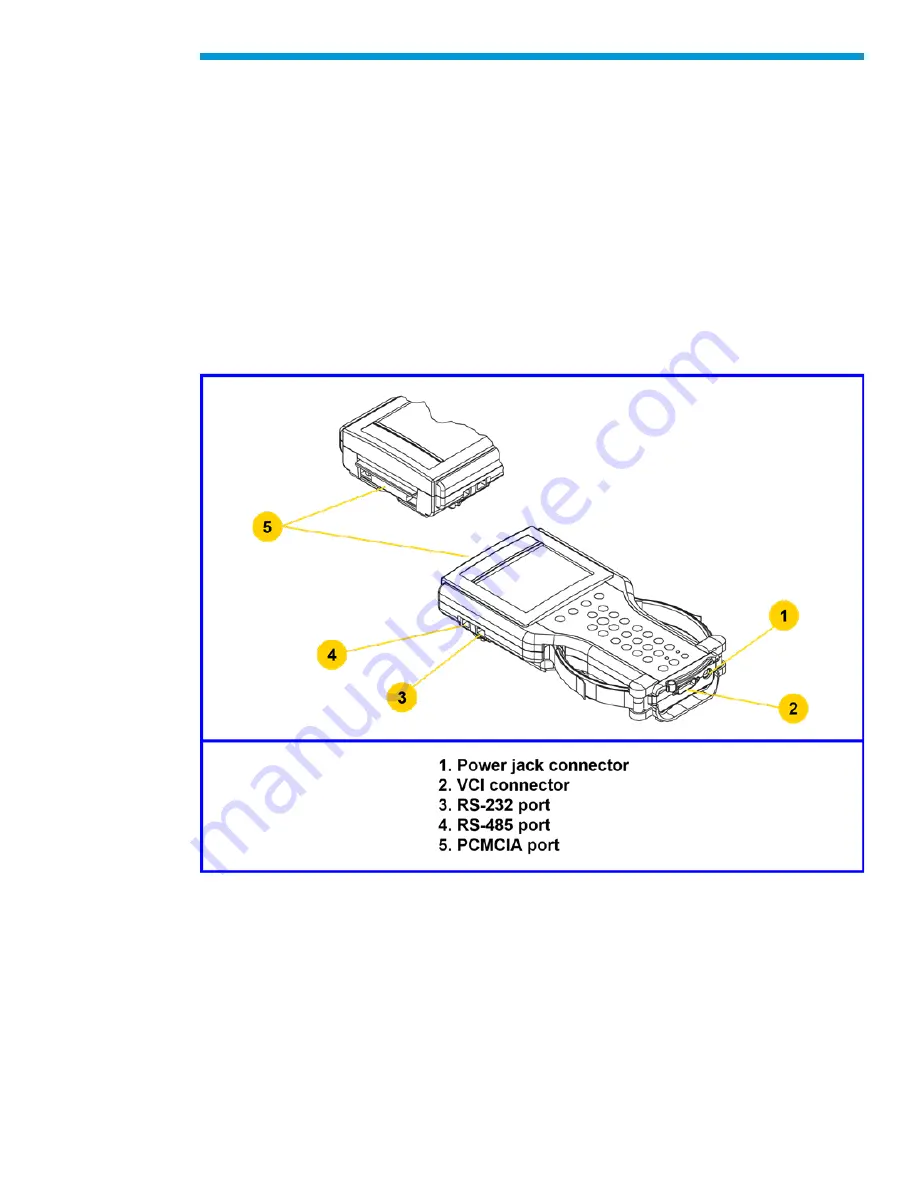
The Tech2 contains two serial communication ports: the RS-232 and the RS-485. Use the
RS-232 port for downloading data from another computer to the Tech2. The RS-485 port is
currently not used.
The Tech2 also contains two PCMCIA ports, a power jack connector, and a Vehicle
Communications Interface (VCI) connector. One of the PCMCIA slots contains a memory
card with diagnostic information. The power jack accepts power from the AC/DC power
supply, battery, or cigarette lighter power cable. The VCI connector accepts the DLC cable
or DLC loopback adapter.
Notice:
When using the Tech2 for vehicle communications, the power jack must be
connected to the Tech2 DLC loopback adapter
Identification of the Tech2
’s external ports
Initial Hardware Installation
The Tech2 hardware initial installation requires the following seven tasks:
1. Remove the RS-232 loopback adapter (P/N 3000112) from the storage case (P/N
3000116). Plug it into the RS-232 port
Summary of Contents for Tech2
Page 1: ...General Motors Tech2 User Guide 1 GM Tech2 User Guide ...
Page 20: ...General Motors Tech2 User Guide 20 Connection of the power jack to the DLC cable ...
Page 22: ...General Motors Tech2 User Guide 22 ...
Page 24: ...General Motors Tech2 User Guide 24 PCMCIA card keying ...
Page 26: ...General Motors Tech2 User Guide 26 VCI module removal ...
Page 32: ...General Motors Tech2 User Guide 32 Attaching the Tech2 to non OBD II equipped vehicles ...
Page 40: ...General Motors Tech2 User Guide 40 RS 232 cable connections ...
Page 46: ...General Motors Tech2 User Guide 46 Tech2 startup screen ...
Page 47: ...General Motors Tech2 User Guide 47 Tools Options selected on Main Menu ...
Page 52: ...General Motors Tech2 User Guide 52 Test Status ...
Page 53: ...General Motors Tech2 User Guide 53 Test Pass ...
Page 64: ...General Motors Tech2 User Guide 64 Selectable VCI test selected on Tech2 Self Test main menu ...
Page 65: ...General Motors Tech2 User Guide 65 First selectable VCI Self Test screen ...
Page 78: ...General Motors Tech2 User Guide 78 CANdi Diagnostics selected on Tool Options menu ...
Page 86: ...General Motors Tech2 User Guide 86 System Selection Menu ...
Page 97: ...General Motors Tech2 User Guide 97 Tool Controls Menu ...
Page 98: ...General Motors Tech2 User Guide 98 Hardware Menu ...
Page 101: ...General Motors Tech2 User Guide 101 Accept soft key on data screen ...
Page 103: ...General Motors Tech2 User Guide 103 Live Plot Screen with selectable items ...
Page 104: ...General Motors Tech2 User Guide 104 Min Max Adjustment screen ...
Page 106: ...General Motors Tech2 User Guide 106 Live Plot Resume soft key ...
Page 107: ...General Motors Tech2 User Guide 107 Live Plot Data List soft key ...
Page 136: ...General Motors Tech2 User Guide 136 Programming Failed Screen ...
Page 141: ...General Motors Tech2 User Guide 141 Controller Area Network diagnostic interface CANdi module ...


