background image


36 

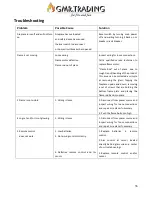
Troubleshooting


Problem


Possible Cause


Solution


Fireplace turns off and will not turn 
on. 

Fireplace has overheated 

and safety devise has caused 

thermal switch to disconnect 

or home circuit breaker has opened. 

Reset switch by turning main power 
off and waiting turning it back on or 
breaker circuit breaker. 

Flame is not moving. 

Loose wiring. 

Flame motor defective. 

Flame rod out of place 

Inspect wiring for loose connections. 

Call a qualified service technician to 
replace flame motor. 

“Flame Rod”  out of place  due to 
rough transit/handing of the product. 
This issue can be corrected as simple 
as removing the glass, flipping the 
fireplace upside and down, removing 
a set of screws that are holding the 
bottom frame plate and placing the 
flame rod back into place. 

3  Flame is not visible. 

1.


Wiring is loose 

3.


Disconnect from power source and 

inspect wiring  for loose connections 
and repair or replace if necessary. 

4.


Push the flame button to high 

4  Log set and /or is not glowing. 

1.


Wiring is loose 


1.


Disconnect from power source and 

inspect wiring for loose connections 
and repair or replace if necessary. 

5  Remote control 

    does not work. 

1.


Low batteries. 

2.


Not aiming control correctly. 


3.


Defective remote control and /or 

sensor 

1.


Replace batteries in remote 

control. 

2.


Aim control at sensor located 

directly behind glass screen in center 
of unit just above logs. 

3.


Replace  remote control and/or 

sensor. 

Summary of Contents for 00179

Page 1: ... uso comprese tutte le informazioni sulla sicurezza prima di collegare o utilizzare questo prodotto In caso contrario si potrebbero causare incendi scosse elettriche o gravi lesioni personali ATTENZIONE Conservare questo manuale d uso per riferimenti futuri Se vendi o regali questo prodotto assicurati che il manuale accompagni questo prodotto ...

Page 2: ... pag 3 Garanzia pag 3 Dichiarazione di conformità pag 4 Dati tecnici e dimensioni pag 4 Informazioni di sicurezza pag 5 Preparazione pag 7 Componenti pag 7 Funzionamento pag 7 Pulizia pag 16 Manutenzione pag 17 Smaltimento pag 17 Risoluzione dei problemi pag 18 ...

Page 3: ...o negligenza nell uso del dispositivo o da cattiva od omessa manutenzione I prodotti da noi venduti sono coperti da garanzia per quanto riguarda il dispositivo alle seguenti condizioni 1 La garanzia è valida per un periodo di 12 24 mesi a seconda della natura giuridica del cliente azienda privato 2 La Ditta produttrice si assume l impegno di sostituire a propria discrezione le parti mal funzionant...

Page 4: ...ne 2 Data di acquisto presentazione del documento di acquisto 3 Descrizione dettagliata del problema DICHIARAZIONE DI CONFORMITA Questo prodotto è conforme alle seguenti normative europee 2014 35 EU LVD 2014 30 EU EMC 2011 65 EU RoHS 2009 125 EC ERP DATI TECNICI DIMENSIONI Dati meccanici Dimensioni di ingombro 52 H x 66 L x 18 5 P cm Materiale Polyform Colori Bianco Dati Elettrici Alimentazione V ...

Page 5: ...rsi che siano prive di polvere lanugine o altri elementi bloccanti Scollegare l unità e pulirla SOLO con un aspirapolvere NON risciacquare o bagnare ATTENZIONE Solo per uso domestico NON per uso commerciale Non utilizzare MAI questo riscaldatore per scopi diversi da quelli previsti UTILIZZARE SEMPRE L UNITÀ in posizione verticale NON accendere o utilizzare se il riscaldatore è in posizione orizzon...

Page 6: ...ruttore di protezione termica Non controllare MAI questa unità con un timer o consentire che sia su un circuito spento in modo automatico Utilizzare questo riscaldatore SOLO su un circuito con messa a terra da 220 240 Volt 15 Amp Non sovraccaricare MAI il circuito Se questo riscaldatore fa scattare l interruttore automatico scollegare tutti gli altri apparecchi sullo stesso circuito prima dell uso...

Page 7: ...si che l alimentazione è spenta quando si avvia l installazione 2 Collegare l unità all alimentazione la potenza non deve essere inferiore a 10 Amp 230 V CA Se il cavo di alimentazione non è sufficientemente lungo è possibile utilizzare una prolunga la cui potenza non sia inferiore a 2000 W Inserire il cavo di alimentazione in una presa con messa a terra da 15 a 220 240 Volt consultare IMPORTANTI ...

Page 8: ...icare i 5 fori per le viti Inserire i 5 tasselli Ø6x35 nei fori nel muro con un martello di legno Posizionare nuovamente il supporto sulla parete e bloccarlo con le 5 viti da 4 2 40 mm Installare il supporto ad almeno 1 metro dal suolo Sollevare il riscaldatore e abbassarlo con attenzione sul supporto a muro assicurandosi che supporto e riscaldatore siano saldamente agganciati Per questo tipo di o...

Page 9: ...pondenza di quelli contrassegnati e inserire i due tasselli Sollevare il camino e fissare la staffa al muro con 2 viti ST3 5x8 Pannello di Controllo Bloccare i tasti Tenere premuto il tasto OK per più di 6 secondi per bloccare o sbloccare I tasti LOC viene visualizzato e indica che i tasti sono bloccati Una volta che i tasti sono bloccati LOC lampeggerà per 6 secondi premere qualsiasi tasto e LOC ...

Page 10: ...peratura corrente sul display b Premere il pulsante o per impostare la temperatura desiderata Premere il pulsante OK per confermare l impostazione Se la temperatura impostata è più alta della temperatura della stanza come indicato dall apparecchiatura il riscaldamento parte Il riscaldamento non partirà se la temperatura è inferiore a quella della stanza La spia del riscaldamento apparirà e inizier...

Page 11: ...ere il pulsante D MENU 2 volte per visualizzare L e la spia del riscaldamento lampeggiante come mostrato sotto Premere il pulsante OK per impostare la temperatura La temperatura di default è 10 C 50 F E visualizzata come sotto Premere il pulsante or per selezionare la temperatura Se la temperatura impostata è più alta della temperatura della stanza dichiarata dall apparecchiatura il riscaldamento ...

Page 12: ...one della luce bassa Premere il pulsante o per selezionare il livello della luce basso I livelli includono D1 D2 D3 D4 OFF D1 è il livello più luminoso OFF è senza luce NOTA Il display ritornerà alla schermata di default dopo 15 secondi senza effettuare alcuna operazione sul pannello di controllo o dal telecomando Selezione della Modalità Menu secondario Sulla schermata principale tenere premuto i...

Page 13: ...te o per accedere alle impostazioni dell orario Verrà visualizzato TIME come segue Premere OK per confermare poi il pulsante o per selezionare il giorno D1 per Lunedi D2 per Martedi D3 per Mercoledi D4 per Giovedi D5 for Venerdi D6 per Sabato e D7 per Domenica Premere OK per confermare il giorno poi il pulsante o per impostare l ora Premere OK per confermare l orario poi il pulsante o per impostar...

Page 14: ...zione premere il pulsante D MENU Per cancellare la programmazione selezionare OFF per spegnere la programmazione settimanale Impostazione manuale per la programmazione settimanale Tenere premuto il pulsante MENU per selezionare il menu Premere OK per confermare poi il pulsante o per accedere alle impostazioni manuali verrà visualizzato MANU come mostrato sotto Premere il pulsante o per selezionare...

Page 15: ... giorno per il 2 periodo di tempo Per terminare l impostazione premere il pulsante o fino a quando non compare FINSH poi premere OK per terminare l impostazione Periodi multipli di tempo possono essere usati per un giorno Stesso periodo di tempo può essere usato per giorni multipli NOTA Per le impostazioni in Selezione modalità menu secondario ricordarsi sempre di premere il pulsante OK per conval...

Page 16: ...e automaticamente Resettare il riscaldatore 1 Scollegare il cavo di alimentazione dalla presa 2 Portare l interruttore ON OFF sul PANNELLO DI CONTROLLO su OFF Aspettare 5 minuti 3 Ispezionare il caminetto per assicurarsi che non ci siano prese d aria ostruite o ostruite da polvere o lanugine Se sono utilizzare un aspirapolvere per pulire le aree di ventilazione 4 Con l interruttore POWER in posizi...

Page 17: ...caldatore in un luogo pulito e asciutto quando non in uso Smaltimento La possibilità di riutilizzare alcune parti del dispositivo è subordinata alla totale responsabilità dell utilizzatore Nell etichetta è stato riportato il simbolo indicato nel D Lgs n 49 del 14 Marzo 2014 che recepisce la direttiva 2012 19 UE il quale indica la necessità di smaltire il prodotto nei rifiuti differenziati nello sp...

Page 18: ...lare del prodotto Questo problema può essere corretto semplicemente rimuovendo il vetro capovolgendo il caminetto rimuovendo una serie di viti che tengono la piastra del telaio inferiore e rimettendo in posizione il meccanismo della fiamma La fiamma non è visibile Il cablaggio è allentato 1 Scollegare dalla fonte di alimentazione e ispezionare il cablaggio per eventuali collegamenti allentati e ri...

Page 19: ...is entire user manual carefully including all safety information before connecting or using this product Failure to do so could result in fire electric shock or serious personal injury ATTENTION Keep this user manual for future reference If you sell or gift this product please make sure the manual accompanies this product ...

Page 20: ...e pag 21 Warranty pag 21 Declaration of conformity pag 22 Technical data pag 22 Safety information pag 23 Preparation pag 25 Components pag 25 Operation pag 25 Cleaning pag 34 Maintenance pag 35 Storage pag 35 Hints on disposal pag 35 Troubleshooting pag 36 ...

Page 21: ...ill invalidate the warranty The warranty does not extend to damage caused by inexperience or negligence in the use of the device or by bad or omitted maintenance The products we sell are covered by a warranty with respect to the device under the following conditions 1 The warranty is valid for a period of 12 24 months depending on the legal status of the customer company private 2 The manufacturin...

Page 22: ...eplaced without proof of purchase invoice copy of payment otherwise the replaced part will be charged to the buyer Notice if it is deemed necessary to use the guarantee please indicate the following data 1 Type version 2 Date of purchase presentation of the purchase document 3 Detailed description of the problem DECLARATION OF CONFORMITY This product complies with the following European regulation...

Page 23: ...pect all vents to make sure they are free of dust lint or other blocking elements Unplug the unit and clean it with a vacuum cleaner ONLY DO NOT rinse or wet ATTENTION For home use only NOT for commercial use NEVER use this heater for purposes other than those for which it is intended ALWAYS USE THE UNIT in an upright position DO NOT turn on or use if the heater is horizontal on the floor ground o...

Page 24: ... cut out switch NEVER control this unit with a timer or allow it to be on an automatically shut off circuit Use this heater ONLY on a 220 240 Volt 15 Amp grounded circuit NEVER overload the circuit If this heater trips the circuit breaker disconnect all other appliances on the same circuit before next use Avoid connecting other appliances in the same circuit as this heater NEVER plug this heater i...

Page 25: ...and high traffic areas Please confirm the power is off when you start to installation Plug in the unit into the power the power should be no less than 10Amp 230V AC If the power cord is not long enough you can use an extension cord that the power is no less than 2000W A 10AMP 230V circuit is required to operate this appliance Dedicated circuit is preferred but not essential in all cases a dedicate...

Page 26: ...ew holes Drive the 5pcs Drywall anchors Ø6x35 into the holes in the wall with a wooden hammer Then hang the Wall support again and lock them in with 5pcs 4 2 40mm screws Recommended Wall support are installed at least 1000mm above the ground Have two people hold the appliance and lift the heater and carefully lower it onto the mounting bracket ensuring that bracket and heater are firmly engaged Fi...

Page 27: ... other end is fixed to the wall with 2pcs ScrewsST3 5x8 Control Panel Child Lock Press and hold OK button for more than 6 seconds to lock or unlock the buttons LOC is displayed and indicated that the buttons are locked Once it s locked LOC will be flashing for 6 seconds then disappear press any button LOC will flash again Long press OK button for 6 seconds to unlock the buttons Please note this fu...

Page 28: ...g Mode Quick Start Press button or in remote control to quick start heat setting Even though it s under weekly program as following Press either button or to see the current temperature on screen The heating icon will display and start heating when the room temperature is less than the default setting 10 C on the contrary it will not display and heat The clock icon will be flashing because the tim...

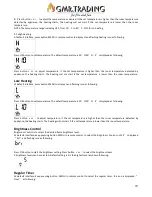
Page 29: ...At default interface press button MENU to display L and flashing icon as following Press OK button to set temperature The default temperature is 10 C 50 F It s displayed as following Press button or to adjust temperature If the set temperature is higher than the room temperature detected by appliance the heating starts The heating will not start if the set temperature is lower than the room temper...

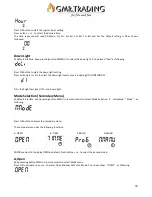
Page 30: ...ht levels Levels including D1 D2 D3 D4 OFF D1 is the brightness level OFF is no down light Mode Selection Secondary Menu At default interface keep pressing button MENU in remote control to select Mode Selection it s displayed Mode as following Press OK button to access the secondary menu The secondary menu has the following functions A OPEN B TIME C RROG D MANU MODE presses OK to display OPEN by d...

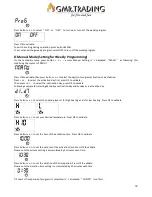
Page 31: ...to set time minute Press OK to validate the time setting To exit the setting during operation press button MENU If icon permanently flashes this indicates that the time is offset following a power cut It s flashing as a time has not been set C PROG Weekly Programming The time must be set before any programming 4 pre set programs are available Each program includes a time period or several time per...

Page 32: ...press or to select the inactivation day press OK to validate Following example for selecting Monday as activation day and Sunday as inactivation day Press button or to select the heating level H for high heating and L for low heating Press Ok to validate Press button or to set your desired temperature Press OK to validate Press button or to set the hour of the activation time Press OK to validate ...

Page 33: ...tion Secondary Menu always remember to press button OK to validate the setting Maximum 8 time periods could be used for one program After manual setting for weekly program the relevant program has done the manual setting will update the default program setting accordingly Restore Factory Defaults In the state of connecting the power plug if there is a 01 switch please be in the state of 1 The mach...

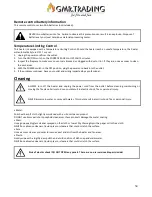
Page 34: ...ofessional Cleaning ALWAYS turn off the heater and unplug the power cord from the outlet before cleaning maintaining or moving the fireplace Failure to do so could result in electric shock fire or personal injury NEVER immerse in water or spray with water This could result in electric shock fire or personal injury Metal Polish with a soft cloth slightly moistened with a citrus oil based product DO...

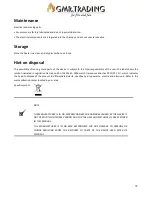
Page 35: ...ted in Legislative Decree no 49 of 14 March 2014 which transposes directive 2012 19 EU which indicates the need to dispose of the product in differentiated waste specifically in type waste electric and electronic Refer to the waste collection center located in your area Specific symbol NOTE THE MANUFACTURER IS IN NO WAY RESPONSIBLE FOR DAMAGES CAUSED BY THE DEVICE IF NOT USED IN THE INTEGRAL VERSI...

Page 36: ...emoving the glass flipping the fireplace upside and down removing a set of screws that are holding the bottom frame plate and placing the flame rod back into place 3 Flame is not visible 1 Wiring is loose 3 Disconnect from power source and inspect wiring for loose connections and repair or replace if necessary 4 Push the flame button to high 4 Log set and or is not glowing 1 Wiring is loose 1 Disc...

Reviews: