background image

- 28 - 


Wireless Heart Rate 

Wireless Chest Belt Monitor 

Your unit includes the pre-installed wireless heart rate receiver 

With console. The Wireless Chest Belt is an option is not 

Included with the equipment.    To use the wireless interactive 

Portion of the programming you can purchase the optional 

Wireless Chest Belt with the Store . 


STORAGE AND MAINTENANCE 

Dry  the  chest  belt  monitor  after  each  use. The  chest 

belt  monitor  is  activated  when  you  wet  the  electrode 

areas and put on the chest belt monitor; the chest belt 

Monitor shuts off when it is removed and the electrode 

areas  are  dried.  If  the  chest  belt  monitor  is  not dried 

after  each  use,  the  battery  may  be  drained 

prematurely 


Store the chest belt monitor in a warm, dry place. 

Do not store the chest belt monitor in a plastic bag 

or other container that may trap moisture. 


Do not excessively bend or stretch the sensor unit 

when using or storing the chest belt monitor. 


Clean the sensor units using a damp cloth- never 

use alcohol, aba dives, or chemicals. Hand wash 

and air dry the chest belt. 


If the chest belt monitor does not function 

properly, try the suggestions below. 


Make sure that you are wearing the chest belt 

monitor as described at the left. Note: If the chest 

belt monitor does not function when positioned as 

described, move it slightly lower or higher on your 

chest. 


Use saline solution such as saliva or contact lens 

solution to wet the two electrode areas on the 

sensor unit. If chest belt readings do not appear 

until you begin perspiring, re-wet the electrode 

areas. 


To use the chest belt heart rate, position yourself 

near the console. It is recommended that the user 
be within arm’s length of the console. 


The chest belt monitor is designed to work with 

people who have normal heart rhythms. Chest 

belt reading problems may be caused by medial 

conditions such as premature ventricular 

contractions (pvcs), tachycardia bursts, and 

arrhythmia 


The operation of the chest belt monitor can be 

affected by magnetic interference caused by high 

power lines or other sources, if it is suspected that 

this is a problem, try relocating the elliptical. 

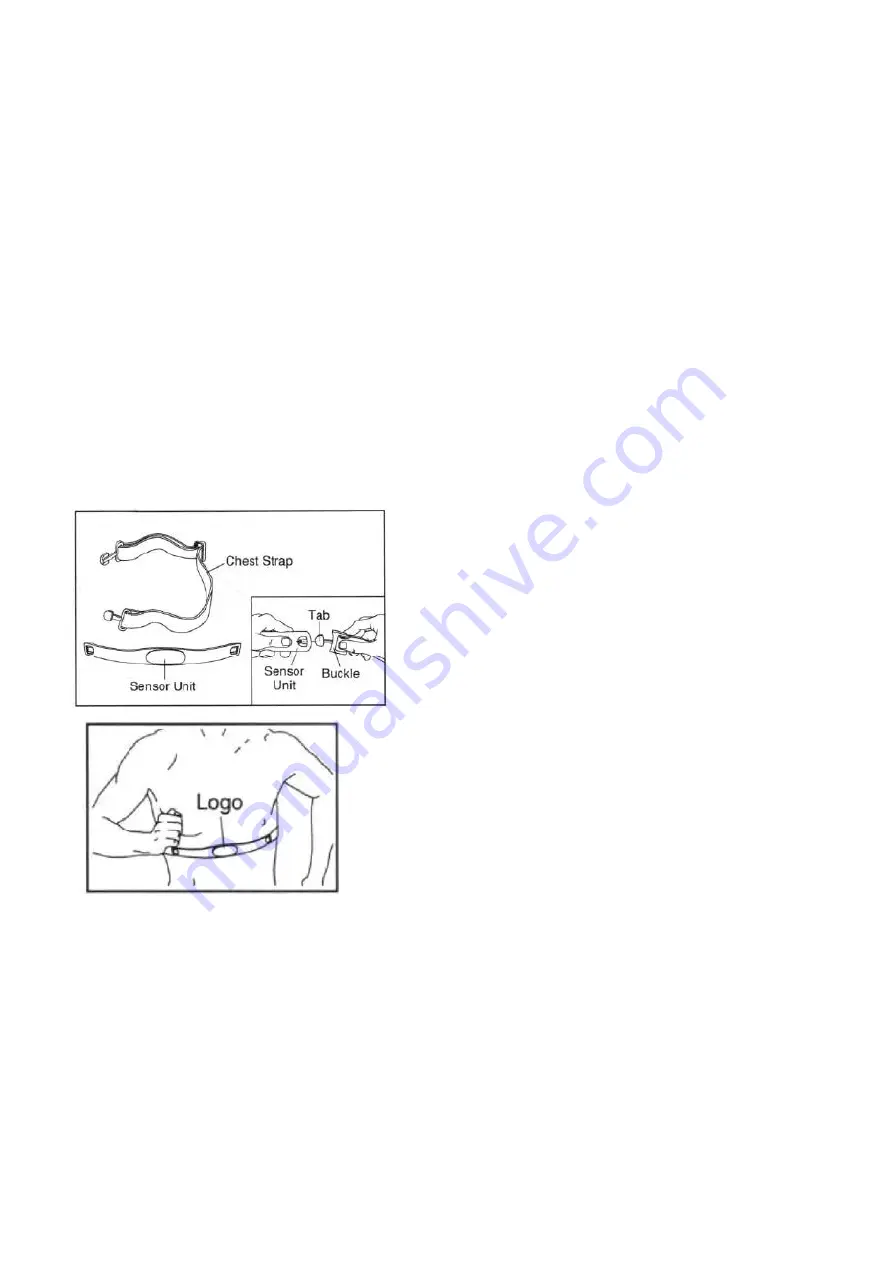
HOW TO WEAR THE WIRELESS CHEST BELT 

The  monitor  has  two  components:  a  chest  belt  and  a 

sensor unit (see the drawing below). Insert the tab  on 

one  end  of  the  chest  best  into  one  end  of  the  sensor 

unit, as shown  in the insert drawing. Press the end of 

the sensor unit under the buckle on the chest belt. The 

tab should be flush with the front of the sensor unit.   


Next,  wrap  the  chest  belt  monitor  around  your  chest 

and attach the other end of the chest belt to the sensor 

unit.  Adjust  the  length  of  the  chest  belt,  if  necessary. 

The chest belt monitor should be under  your clothes, 

tight against your skin, and as high under the pectoral 

muscles or breasts as is Comfortable. Make sure that 

the  logo  on  the  sensor  unit  is  facing  forward  and  is 

right-side-up Pull the sensor unit away from your body 

a few inches and locate the two electrode areas on the 

inner side (the electrode areas are covered by shallow 

ridges). Using saline solution such as saliva or contact 

lens  solution,  wet  both  electrode  areas.  Return  the 

sensor unit to a position against your chest.


Summary of Contents for T-300PX

Page 1: ...1 USER S MANUAL T 300PX T 700PX USER WEIGHT LIMITATION 300lbs 136kgs SERIAL NUMBER found on frame USA Dear User For Customer Service 1 267 808 3999 Email cs go elliptical com...

Page 2: ...Stride length system Pre assembled machine now will be very easy and simple to put together Suggest you get a second partner to assemble the machine together We are sure you will be able to put the ma...

Page 3: ...ve time and make the assembly quick and hassle free Clear your work area Make sure that you have cleared away a large enough space to properly assemble the unit Make sure the space is free from anythi...

Page 4: ...outlet surge protector with a UL 1449 rating as a Transient Voltage Surge Suppressor TVSS with a UL suppressed voltage rating of 400V or less and an electrical rating 120VAC 15 amps This treadmill mus...

Page 5: ...lebar Action Handlebar R Action Handlebar L Upright Tube Front Cover Upright Tube Rear Cover Power pack Action Arm Cover Front Pedal Support Tube Top L R Pedal Support Tube Bottom L R Action Arm Cover...

Page 6: ...6 Pedal Support Tube L Pedal L Pedal R Pedal Support Tube R Console Base Upright Post Cover L Upright Post Cover R Pedal Support Tube L Pedal Support Tube R Upright Tube Fan VST Board...

Page 7: ...7 TOOL included with machine General tools prepared by user MILLIMETERS M8 socket M8 M10 wrench Screw driver 5mm M8 wrench M10 wrench Screw driver 5mm...

Page 8: ...40 4 CE30XT 16 17 Washer 10 22 3T 2 CE30XT 17 18 Allen head bolt M8 1 25 15 38 CE30XT 18 19 Screw M8 1 25 65 4 CE30XT 19 20 Nylock nut M8 1 25 10 CE30XT 20 21 Plastic cap 5 16 4 CE30XT 21 22 Large squ...

Page 9: ...cover LH 1 CE30XT 57 58 Middle cover RH 1 CE30XT 58 59 Side cover LH 1 CE30XT 59 60 Side cover RH 1 CE30XT 60 61 Screw M3 10mm 1 CE30XT 61 62 Motor 1 CE30XT 62 63 D Axle 15 182mm 1 CE30XT 63 64 Magne...

Page 10: ...101 Swinging axle plate 2 CE30XT 101 102 Second step tube left 1 CE30XT 102 103 Second step tube right 1 CE30XT 103 104 Step foot cover Top 2 CE30XT 104 105 Step foot cover Bottom 2 CE30XT 105 106 Ped...

Page 11: ...e cover 1 CE30XT 132A 132B Right console cover 1 CE30XT 132B 133 Front console cover 1 CE30XT 133 134 Front cover 1 CE30XT 134 135 Screw M4 16mm 1 CE30XT 135 136 Screw M4 16mm 1 CE30XT 136 137 Protect...

Page 12: ...12 ASSE...

Page 13: ...A Attach the front support to the base frame with the wheels facing outward B Align the 2 bolt holes in the front support with the bolt holes in the main frame C Secure the front support to the main f...

Page 14: ...he machine A Attach the rear support to the base frame B Align the 2 bolt holes in the rear support with the bolt holes in the main frame C Secure the rear support to the main frame by using 2 x 19 bo...

Page 15: ...that the data cable can be connected prior to assembly B After the data cable is connected slide the upright tube onto the round base frame tube C Check to make sure the upright tube is facing the co...

Page 16: ...to the right pedal tube by using 4 x 122 screws H Repeat this process for the left side Using Rear pedal tube covers 106 107 Tighten all fasteners now I Insert the front right of the pedal tube 86 on...

Page 17: ...th parts due to the samll axle is in spec if with difficulty to set it thru both parts add nut 12 to outside of small axle with the hex wrench to back forth rotate the axle it will be easy to put thru...

Page 18: ...h the Foot Pedals A Locate and attach the right pedal to the second pedal support tube foot plate B Secure the foot pedal to the foot plate by using 4x 18 Allen head bolts C Repeat the process for the...

Page 19: ...he center of the alignment PP bars with ease if not check with the Screws that suppose to Tightened with finger tighten if some are tightened too much With assembly steps 3 4 and 7 if not loose them a...

Page 20: ...20...

Page 21: ...shown secure both screw 16 tighten up the Fix Handlebar to the upright tune 68 There is a set of cable out from the pre assembled Fix Handlebar routing The cable thru the square hole locate on the up...

Page 22: ...me E Tuck the excess wire into the upright post or into the back of the computer display F Secure the rear console base cover with 2 x 30 screws taking care not to pinch the computer wires between the...

Page 23: ...23 Console cables connecting instruction...

Page 24: ...ng 2 x 18 Allen head bolt 2x 65 flat washer and 2 x A Spring lock washer C Repeat the process above for the right side D Completely tighten all bolts E Place the front and back decorative covers 123an...

Page 25: ...A Connect the water bottle holder 127 to the rear cover and secure the two pieces together by using 4 x 126 screws B Place the rear with the water bottle attached and the front cover 126 around the up...

Page 26: ...se the Air Circulation during exercise by turn the Cooling Fan key ON or Press the Key again to TURN IT OFF Please follow these instructions when carrying and moving the equipment about because liftin...

Page 27: ...ide the knob up or down through the 4 different settings When the adjuster arrow is aligned with the desired stride length release the knob Verify the knob is locked I place them turn the knob clockwi...

Page 28: ...ar until you begin perspiring re wet the electrode areas To use the chest belt heart rate position yourself near the console It is recommended that the user be within arm s length of the console The c...

Page 29: ...lower body muscle groups These muscle groups are shown in gray color on the chart below MUSCLE GROUPS A Shoulder muscles Calf muscles G B Pectoral muscles Trapezius muscles H C Bicep muscle Tricep mus...

Page 30: ...ncrease your workouts to four or five times per week Warming up is an important part of your workout and should begin every session It prepares your body for more strenuous exercise by heating up and...

Page 31: ...unts Relax and then repeat with left leg extended Side Stretch Open your arms to the side and continue lifting them until they are over your head Reach your right arm as far upward toward the ceiling...

Page 32: ...Yes AGE 10 100 Yes WEIGHT METRIC 20 330 Lb 10 150 KG Yes HEIGHT 36 84 INCH 90 210 CM Yes TIME 0 00 99 59 0 00 99 00 0 00 No DISTANCE 0 0 99 99 0 00 99 50 0 00 No CALORIES 0 999 0 990 0 00 No SPEED 0...

Page 33: ...tes of inactivity Setting Up User Profile At first the LCD will show a blinking U1 and will also display only factory default setting values for user HEIGHT WEIGHT AGE and GENDER Press the RESISTANCE...

Page 34: ...orner the computer will display the default 70 or previous setting and begin blinking Press the RESISTANCE UP DOWN button to adjust the user height information then press ENTER to confirm WEIGHT entry...

Page 35: ...wish to continue until the other values reach 0 then press start after the initial value has ended the program PRESET PRORGAMS After selecting the category program Press the keys to select P1 P12 The...

Page 36: ...36...

Page 37: ...TARGET HEART RATE CONTROL PROGRAMS This program with allow you to choose the best type of work out so that you can achieve your fitness goals The HRC program provides three different target heart rate...

Page 38: ...r work out press the recovery button discontinue exercising and immediately place your hands on the contact heart rate sensors Continue to hold the sensors for approximately 60 seconds for the evaluat...

Page 39: ...all times No person weighing over 136 KGS 300 LBS should use this elliptical exerciser NEVER allow more than one person on the elliptical exerciser at a time Wear appropriate clothing when using the...

Page 40: ...40 For Customer Service 1 267 808 3999 Email cs go elliptical com...

Reviews: