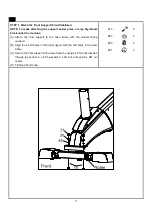
background image

PREASSEMBLY 

For future service or related questions: 


Please staple your receipt and/or write in the name and phone number of the retail store where you purchased your item.   


Name: ______________________________ Phone Number: ___________________ Receipt: ______________________ 


Open the boxes: 


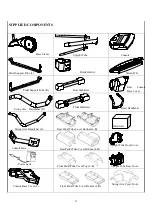
You are now ready to open the boxes of your new equipment.    Make sure to inventory all of the parts that are included in the boxes.   

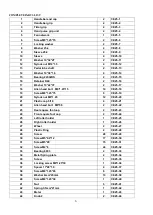
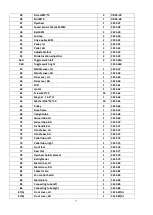
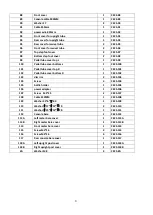
Check the Parts List for a full count of the number of parts included for this product to be assembled properly.    . 
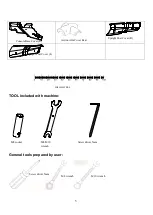
 

Gather your tools: 


Before starting the assembly of your unit, make sure that you have gathered all the necessary tools you may require to assemble the 

unit properly.    Having all of the necessary equipment at hand will save time and make the assembly quick and hassle-free. 


Clear your work area: 


Make  sure  that  you  have  cleared  away  a  large  enough  space  to  properly  assemble  the  unit.    Make  sure  the  space  is  free  from 

anything that may cause injury during assembly.    After the unit is fully assembled, make sure there is a comfortable amount o f free 

area around the unit for unobstructed operation. 


Invite a friend: 


Some of the assembly steps may require heavy lifting.    It is recommended that you obtain the assistance of another person when 

assembling this product. 


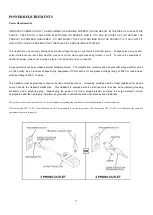
User Weight Limitation: 


Please note that there is a weight limitation for this product.    If you weigh more than 325lbs. it is not recommended that you use this 

product.    Serious injury may occur if the user’s weight exceeds the limit shown here.    This product is not intended to support users 

whose weight exceeds this limit. 


For Customer Service 

1-267-808-3999


Email

cs@go-elliptical.com


Summary of Contents for V-950PU

Page 1: ...1 USER S MANUAL V 950PU SERIAL NUMBER found on frame USA For Customer Service 1 267 808 3999 Email cs go elliptical com...

Page 2: ...at hand will save time and make the assembly quick and hassle free Clear your work area Make sure that you have cleared away a large enough space to properly assemble the unit Make sure the space is f...

Page 3: ...r recommends a single outlet surge protector with a UL 1449 rating as a Transient Voltage Surge Suppressor TVSS with a UL suppressed voltage rating of 400V or less and an electrical rating 120VAC 15 a...

Page 4: ...andlebar Swing Arm Handlebar R Swing Arm Handlebar L Upright Tube Front Cover Upright Tube Rear Cover Power pack Console Base Swing Arm Cover Front Console Base Cover L Front Pedal Tube Cover Top L R...

Page 5: ...th machine General tools prepared by user Action Arm Cover Rear Console Base Cover R Upright Post Cover R Upright Post Cover L MILLIMETERS M8 socket M8 M10 wrench Screw driver 5mm M8 wrench M10 wrench...

Page 6: ...crew M8 1 25 75 6 CE25 19 20 Nylock nut M8 1 25 12 CE25 20 21 Plastic cap 5 16 4 CE25 21 22 Allen head bolt M8 50 2 CE25 22 23 Rear square foot cap 2 CE25 23 24 Front square foot cap 2 CE25 24 25 Left...

Page 7: ...0 16 CE25 63 64 Magnet 14 5 7L 1 CE25 64 65 Washer 5 16 16 1 0 10 CE25 65 66 Pulley 2 CE25 66 67 Base frame 1 CE25 67 68 Upright tube 1 CE25 68 69 Swivel tube LH 1 CE25 69 70 Swivel tube RH 1 CE25 70...

Page 8: ...be cover top R 1 CE25 101 102 Pedal tube cover bottom R 1 CE25 102 103 disc rim 2 CE25 103 104 Screw 4 CE25 104 105 bottle holder 1 CE25 105 106 power adapter 1 CE25 106 107 Screw M4 25 2 CE25 107 108...

Page 9: ...Attach the front support to the base frame with the wheels facing outward B Align the 2 bolt holes in the front support with the bolt holes in the main frame C Secure the front support to the main fr...

Page 10: ...he machine A Attach the rear support to the base frame B Align the 2 bolt holes in the rear support with the bolt holes in the main frame C Secure the rear support to the main frame by using 2 x 19 bo...

Page 11: ...d base frame tube C Check to make sure the upright tube is facing the correct direction See Fig 3 A D Secure the upright tube to the base frame by using 6 x 18 Allen head bolts E Hand tighten all the...

Page 12: ...C E Secure the pedal tube to the base frame crank arm by using 1 x 17 washer and 1 x 12 M10 lock nut Completely tighten with a wrench F Attach and secure the Rear pedal tube covers 101 and 102 to the...

Page 13: ...d secure the covers together by using 4 x 29 screws and 4 x 30 screws See Fig 5B Do not completely tighten these screws until step 6 D Feed the Heart rate wire of the hand grips through the small hole...

Page 14: ...vers See Fig 6A B Take the fan wire and route it with the other wires from the handrail assembly C Secure the fan cover 114 by using 4 x 116 screws D Attach the Handlebar cover 88 and secure by using...

Page 15: ...e sure not to punch the wires between the computer and the frame D Secure the computer to the console base using 4 x E screws and tighten completely E Place the console base rear cover on the other co...

Page 16: ...70 B Secure the upper and lower swing arms together by using 4 x 18 Allen bolts 4 x A spring washer and 4 x 65 washers C Tighten all bolts now D Place the Place the front and rear swing arm covers 96...

Page 17: ...ear cover with the bottle holder attached around the upright tube and secure by using 4 x 29 screws See Fig 9A C Locate the left and right pedals Place them on the pedal tubes with the side opening fa...

Page 18: ...wer Supply A Before plugging in the power supply verify the voltage specifications on the lable B Plug the adaptor jack in to the inlet on the bottom rear of the elliptical C Plug the power supply in...

Page 19: ...MP3 or IPOD Cooling Fan Cooling Fan is included with the unit to increase the Air Circulation during your exercise To operate press the Fan key to turn on To turn the fan off press the Fan key again...

Page 20: ...arily lower body muscle groups These muscle groups are shown in gray color on the chart below MUSCLE GROUPS A Shoulder muscles Calf muscles G B Pectoral muscles Trapezius muscles H C Bicep muscle Tric...

Page 21: ...with the soles of your feet together with your knees pointing outward Pull your feet as close into your groin as possible Gently push your knees towards the floor Hold for 15 counts Hamstring Stretch...

Page 22: ...ory SEX MALE FEMALE Yes AGE 10 100 Yes WEIGHT METRIC 20 330 Lb 10 150 KG Yes HEIGHT 36 84 INCH 90 210 CM Yes TIME 0 00 99 59 0 00 99 00 0 00 No DISTANCE 0 0 99 99 0 00 99 50 0 00 No CALORIES 0 999 0 9...

Page 23: ...manual workout directly Note using quick start will use the default settings as the user profile Use the plus and minus keys to select User profile data program selections heart rate values and resis...

Page 24: ...ues for user HEIGHT WEIGHT AGE and GENDER Press the RESISTANCE UP DOWN buttons to choose the User ID from U1 to U2 and press the ENTER button to select the user ID shown GENDER entry After the User ID...

Page 25: ...W t will flash in the upper right corner the computer will display the default 150 lbs or previous setting and begin blinking Press the RESISTANCE UP DOWN button to adjust the user weight information...

Page 26: ...itial value has ended the program PRESET PRORGAMS After selecting the category program Press the keys to select P1 P12 The program profile will be displayed on the display as you scroll through the ch...

Page 27: ...27...

Page 28: ...program TARGET HEART RATE CONTROL PROGRAMS This program with allow you to choose the best type of work out so that you can achieve your fitness goals The HRC program provides three different target he...

Page 29: ...r work out press the recovery button discontinue exercising and immediately place your hands on the contact heart rate sensors Continue to hold the sensors for approximately 60 seconds for the evaluat...

Page 30: ...iser at all times No person weighing over 136 KGS 300 LBS should use this elliptical exerciser NEVER allow more than one person on the elliptical exerciser at a time Wear appropriate clothing when usi...

Page 31: ...Manufacturer Full address LMX International Inc 11Floor No 93 Nanking East Road Taipei Taiwan www go elliptical com To use the machine must notice the min area required with space not less than 0 6M g...

Page 32: ...ate Code placed at rear frame of the equipment with a Label Year month serial 5 Warning The equipment is not with a free wheel system machine the equipment therefore the moving parts can not stopped i...

Page 33: ...ol program under the Condition of HRC program the equipment be operate with the Speed independent out of the HRC program equipment be operated all with Speed dependent When The Equipment with a coolin...

Page 34: ...34 For Customer Service 1 267 808 3999 Email cs go elliptical com...

Reviews: