background image

15

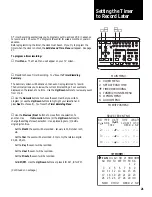
Either deck of your Dual-Deck VCR may be used to make recordings.  You can
immediately begin recording any program you are watching if a blank tape is left in
one of the decks.  You then press that deck Source button, select Tuner and press
Record.
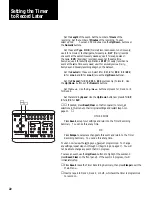
For recording purposes you can change from SP (Standard Play) which is the
default speed to LP (Long Play) or SLP (Super Long Play) in the Video Menu.  See
page 26.
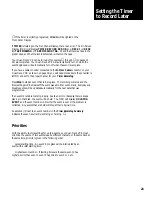
Your Dual-Deck VCR can also be programmed in advance to record up to 10
hours of TV programs.  To program a Timer Recording see pages. 21-24.

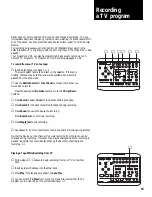
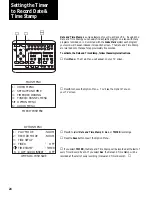
To record from your TV onto a tape:

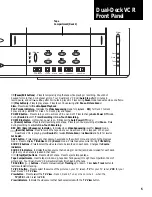
Insert a blank tape into Deck 1 or 2.
The record safety tab must be intact on the cassette.  If the tab is

missing, the tape may Auto Play and will be ejected when Record is
pressed from the Stop mode.

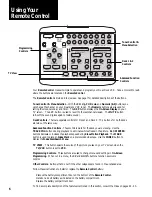
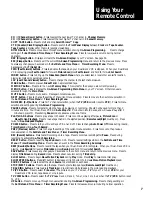
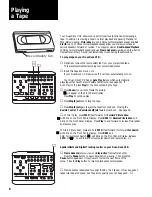
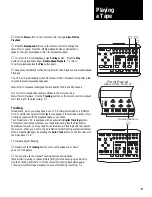
Use the 

Remote Control

 or 

Front Panel


to choose the channel you

would like to record.

Press the appropriate 

Numeric

 buttons or use the 

Ch Up/Down

buttons.

Press 

Source 

to select 

Tuner


for the deck containing the tape.

Press 

Record 

for the deck containing the tape to begin recording.

Press 

Pause 

if you wish to pause the recording.

Press 

Record 

again to continue recording.

Press 

Stop/Eject

 to end recording.

▲ 

See pages 36 - 40 for connections to record one channel while viewing another.

Neither the Source nor the channel, if you are recording from the tuner, can be
changed during recording.  However, they may be changed while the recording is
paused.  Be careful not to accidentally change the Source in the middle of a
recording. 

 ▲

Playing a Tape While Recording from TV

Follow steps 


above to begin recording from your TV onto either

deck.

Insert a prerecorded tape into the other deck.

Press 

Play 

if the tape does not begin to 

Auto Play

.

▲ 

You can switch 

TV View

 from Deck 1 to Deck 2 to watch either the TV

program you are recording or the prerecorded tape.


 ▲

Recording
a TV program

1

2

STOP/EJECT

REW

FWD

PAUSE

SOURCE

REC

SAVE

ESC

MENU

UP

DOWN

NEXT

PREV

4

5

6

9

0

7

8

COPY
TAPE

POWER

CTR

RESET

MEMORY

VCR/TV

CH

LCV

DSP

PLAY/LOAD

STOP/EJECT

SOURCE

REC

PLAY/LOAD

SLOW

TV VIEW

INDEX

MARK

TRACKING

SLOW  SPEED

MUTE

1

2

3

REW

FWD

PAUSE

1

2

STOP/EJECT

REW

FWD

PAUSE

SOURCE

REC

SAVE

ESC

MENU

UP

DOWN

NEXT

PREV

4

5

6

9

0

7

8

COPY
TAPE

POWER

CTR

RESET

MEMORY

VCR/TV

CH

LCV

DSP

PLAY/LOAD

STOP/EJECT

SOURCE

REC

PLAY/LOAD

SLOW

TV VIEW

INDEX

MARK

TRACKING

SLOW  SPEED

MUTE

1

2

3

REW

FWD

PAUSE

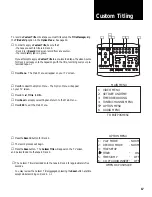
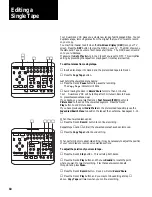
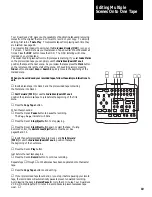
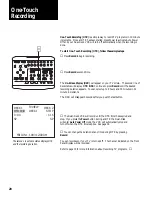
Summary of Contents for GV-30 Series

Page 1: ...America s only Dual Deck VCRs Vi d e o Te c h n o l o g y i n F a s t F o r w Owner s Guide Featuring ENHANCED AMERICHROME circuitry 4 Head x 4 Head Hi Fi Stereo...

Page 2: ...eo specialty store h l Department store c l Discount store f l Gift i l Other ________________________ How important were each of the following reasons in your decision to purchase a Dual Deck VCR Ple...

Page 3: ...pr venir les chocs lectriques ne pas utiliser cette fiche polaris e avec un prolongateur une prise de courant ou une autre sortie de courant sauf si les lames peuvent etre ins r es fond sans en laisse...

Page 4: ...the safety purpose of the polarized plug 1 READ INSTRUCTIONS All the safety and operating instructions should be read before the unit is operated 2 RETAIN INSTRUCTIONS The safety and operating instruc...

Page 5: ...ouch dangerous voltage points or short out parts that could result in a fire or electric shock Never spill liquids of any kind onto the unit Should spillage occur unplug unit and have it checked by a...

Page 6: ...he antenna cable from your TV it will be either a round coaxial cable or a flat twin lead cable Attach this cable to the In from Ant connection on the back panel of your Dual Deck VCR If your antenna...

Page 7: ...Playing a Tape While Recording from TV 15 Recording Two Programs from TV 16 Custom Titling 17 Editing a Single Tape 18 Editing Multiple Scenes Onto One Tape 19 One Touch Recording 20 Setting the Time...

Page 8: ...he title message buffer The title message will be appear for 5 seconds when using Copy Tape and during manual recordings Copy one tape to another with one touch simplicity Page 10 The Copy Tape button...

Page 9: ...rse Set a timed recording with a single button Page 20 One Touch Recording is a simple way to record a TV program Set the timer to record up to 16 hours of programs for weeks months or even years in a...

Page 10: ...e Front Panel Display between Clock and Tape Counter Tape Counter is displayed for the most recently viewed deck DOWN button Press to move down through menu selections during On Screen Programming Pre...

Page 11: ...ecord mode Rewind buttons Press to rewind the tape when your Dual Deck VCR is stopped When your Dual Deck VCR is playing press Rewind for reverse Picture Scan press Rewind and hold for reverse Jet Sea...

Page 12: ...ck Controls There are separate controls for Deck 1 and Deck 2 The buttons for both decks are laid out the same way Advanced Function Controls These controls work for the deck you are viewing Use the T...

Page 13: ...eck VCR will Auto Stop after 5 minutes in record pause and will Auto Play after 5 minutes in play still Press during Pause mode to advance video one frame PLAY LOAD buttons Press to play a tape in the...

Page 14: ...will now automatically turn on Your Dual Deck VCR has an Auto Play feature which automatically plays tapes that have the record safety tab removed see page 34 If Auto Play is off press Play for the d...

Page 15: ...designed to work best at the SP and SLP speeds It is normal to occasionally see some streaks in the picture during Slow Motion Playback Use the Tracking buttons on the remote control to adjust the Tra...

Page 16: ...6 and 34 To duplicate a tape using AmeriChrome Copy Insert into Deck 1 the tape to be duplicated Press the Deck 1 Stop Eject button if the tape begins to Auto Play Insert into Deck 2 a blank tape of s...

Page 17: ...ntial or Loop Play Press Menu The Main Menu will appear on your TV screen Press 5 to select the Option Menu The Option Menu will appear on your TV screen Press 1 to set Play Mode to SEQ or LOOP Press...

Page 18: ...or Deck 1 and Deck 2 to be certain they are set to the same source For example if Deck 1 Record Source is set to Tuner be sure the Record Source for Deck 2 is also set to Tuner Press the REC button on...

Page 19: ...ch Menu Recording An Index Mark An Index Mark is recorded on the tape automatically each time the Record button is pressed The Index indicator on the fluorescent display will blink as the Index Mark i...

Page 20: ...ch Menu will appear on your TV screen To enter the Index Mark number use the Numeric 01 99 buttons Press the FWD fast forward or REW rewind button to advance the tape in the desired direction The Dual...

Page 21: ...f you wish to pause the recording Press Record again to continue recording Press Stop Eject to end recording See pages 36 40 for connections to record one channel while viewing another Neither the Sou...

Page 22: ...ce Press the Deck 1 Record button If the second tuner s antenna is connected to the Out To TV connector on your Dual Deck VCR set the TV VCR button to TV and do not change this during recording Otherw...

Page 23: ...s ESC to exit the Main Menu Press the Record button for Deck 2 The record process will begin Press the Save button The Custom Title will appear on the TV screen and be recorded onto the tape in Deck 2...

Page 24: ...n the prerecorded tape simply use the Index Scan Search Menu to position the tape at the next scene See pages 13 14 When the unwanted scene ends Press the Deck 2 Record button to continue recording Re...

Page 25: ...orded tape to just before the beginning of the first scene Press the Copy Tape button When the scene ends Press the Deck 2 Pause button to pause the recording The Copy Tape indicator will blink Press...

Page 26: ...ecord until the OTR timer has expired and stop If you press the Power button during an OTR the Dual Deck will enter Auto Power Off mode the VCR will automatically stop and turn off when the OTR timer...

Page 27: ...to another Use the Numeric buttons or the Up Down buttons to change the settings for each selection Use a preceding zero 0 before single digit entries Set the Month the event will be recorded January...

Page 28: ...and 5 for Line 2 or use the Up Down buttons Set the Channel for CH SC1 SC2 sources only to record Use the Up Down buttons or the Numeric buttons Set the Deck Use the Up Doen buttons or press 1 for De...

Page 29: ...The recording will stop and the timer settings will be cleared if the event was a Normal event Daily Everyday and Weekly events will be updated automatically for the next date that was programmed If...

Page 30: ...ordings Press the Save button to exit the Option Menu If you select TIMER the Date and Time Stamp will be recorded at the start of every Timer Record Event If you select ALL the Date and Time Stamp wi...

Page 31: ...ttons choose that selection and then change the settings if necessary If programming from the Front Panel use Down to highlight your selection Use Next to change settings or choose the current highlig...

Page 32: ...corded at SP Standard Play unless you change the recording speed SP Standard Play provides the best picture LP Long Play provides twice the recording time of SP SLP provides three times the recording...

Page 33: ...panel to return all entries to current time and continue with step You can do this at any time Press Save to accept your settings and return to the Main Menu You can do this at any time OR Press Escap...

Page 34: ...he Main Menu To automatically program Channel Memory Follow steps and above Use the Up Down buttons to highlight Auto Program Press Next to begin Auto Program The Auto Program feature scans each chann...

Page 35: ...elete the channel Press Save to return to the Main Menu To add all channels to Channel Memory Follow steps and on the preceding page Use the Up Down buttons to highlight Add All Press Next to add all...

Page 36: ...Press the Save button to advance to the next position in the Title Message Repeat steps and until the Title Message is complete Press the Menu button to exit the Title Set Up edit screen Press the ESC...

Page 37: ...Line 1 of your Dual Deck VCR Simul 2 receives Mono or Stereo audio input from the Audio In connections on the rear panel Line 2 of your Dual Deck VCR Use Simul 1 or 2 to record Simulcasts see page 42...

Page 38: ...f the Memory Stop mode is active OTR and duration are displayed when One Touch Recording is in progress AmeriChrome Copy indicator Indicates that AmeriChrome Copy duplication is in progress Source ind...

Page 39: ...not in operation Hi Fi During playback indicates the prerecorded tape has Hi Fi audio INDEX Indicates when an Index Mark is being placed on a tape MONO Indicates that the Audio Source is set to Mono R...

Page 40: ...end of the tape is reached during play or fast forward You can turn Auto Rewind on or off in the Video Menu it is preset to ON See page 26 Auto Stop Your Dual Deck VCR will stop if a deck is left in R...

Page 41: ...eing viewed To see the Tape Counter on the Front Panel Display press the Ctr Clock button on the front panel CTR on the remote control of your Dual Deck VCR Press the Ctr Clock button CTR on the remot...

Page 42: ...stallation that fits your needs and your equipment follow these steps If you don t have a cable system see Antenna Connections on this and the following page If you have a cable system but have no pre...

Page 43: ...ED OPERATION CAUTION Risk of Electrical Shock DO NOT OPEN AVIS Risque de Choc Electrique NE PAS OUVRIR Separate VHF and UHF Antennas If one antenna cable is coaxial and one is twin lead use a VHF UHF...

Page 44: ...al Deck VCR Cable supplied Coaxial Cable IN OUT VIDEO R L AUDIO OUT TO TV IN FROM ANT MONITOR OUT CH4 CH3 THIS DEVICE COMPLIES WITH FCC RULES PART 15 OPERATION IS SUBJECT TO THE FOLLOWING TWO CONDITIO...

Page 45: ...d in above The above instructions apply when your Dual Deck VCR is on If you wish to view your cable system when your Dual Deck VCR is off set your TV tuner to channel 2 3 or 4 whichever is used by yo...

Page 46: ...ever is used by your cable system Set the TV VCR selector to TV On both the Dual Deck VCR and the converter select the channel to view and record Start the recording page 15 To record a basic channel...

Page 47: ...Audio jacks on the front panel of your Dual Deck VCR Set the camcorder to Play mode Set the Source to Line 1 and press the Record button This may be done on both decks to make two recordings at the s...

Page 48: ...V Sound MTS Stereo You can enjoy MTS broadcast stereo by connecting your Dual Deck VCR to your stereo amplifier and speakers MTS will allow you to enjoy full stereo sound when your Audio Source is set...

Page 49: ...Dual Deck VCR to the Input on an audio mixer Connect the Output of the mixer into the Audio Line Input on the Dual Deck VCR Now you can mix existing audio from Deck 1 along with new audio or narration...

Page 50: ...current TV View when it is switched to the Dual Deck VCR The Monitor Out connection on the Dual Deck VCR is useful for editing Connect Monitor Out to your video mixing console or video monitor input...

Page 51: ...aning tape can shorten head life Cleaning by any means other than a cleaning tape will void your warranty Care of Videotapes Do not expose tapes to direct sunlight extreme heat or extreme cold Do not...

Page 52: ...Stereo 42 Mute 35 Adapter iv Inside Front Cover AmeriChrome Copy 10 AmeriChrome Copy Indicator 4 Antenna Connections 36 37 Antenna Source 28 Audio Insert 35 Audio In and Out 4 16 41 Audio Menu 31 Aud...

Page 53: ...ume Control 43 Next Button 4 7 Numeric Buttons One Touch Recording 20 On Screen Display 32 On Screen Programming 25 31 Option Menu 30 Pause Button 7 Pause Edit Button 4 Picture Scan 8 Play Button 5 7...

Page 54: ...l track 1 audio track VIDEO INPUT Video In connection RCA 1 0 V p p 75 ohms unbalanced OUTPUT Video Out connection RCA 1 0 V p p 75 ohms unbalanced HORIZ RES Color Monochrome more than 220 lines S N R...

Page 55: ...on your Dual Deck VCR Page iv Is the TV VCR button set to VCR Pages 4 7 Is the fine tuning correctly adjusted on your TV Are the tape heads dirty Use a high quality commercially available wet head cle...

Page 56: ...k within 5 minutes of another Index Mark Try moving past the Index Mark and approaching it from the opposite direction Check to be certain the Deck 2 Record Source is set to the same input as Deck 1 P...

Page 57: ...t the warranty period shall be 90 days from the date of manufacture HOW TO OBTAIN WARRANTY SERVICE All warranty service will be provided by our service centers or by our authorized servicers during no...

Page 58: ...Code Sections 501 and 506 This product is not made or sold for unauthorized recording or playback or copyrighted works includ ing without limitation unauthorized recording from precorded copyrighted c...

Reviews: