


CNC#STUDIO#USB#USER#MANUAL#35#
Tool#length#sensor#
Sometimes it’s necessary to use different tools when working on a workpiece. In such cases it’s important to
make sure that, when changing the tools, the height of the tool above the defined zero point is the same. Since
most tools have different lengths, they have to be measured after being inserted in the milling spindle and the
zero point has to be recalculated.
CNC Studio supports the tool change function. Tools are changed manually, while the measurements and
corrections of the zero points are done automatically by CNC Studio. In this example, we are assuming that
your machine and your CNC Studio have been configured correctly. You have installed a tool length sensor
properly and entered it in the settings. The sensor must be installed securely on the table and be connected to
an input of your controller card. The input of the card on which you have connected a tool length sensor must
be assigned as a “Sensor” in the settings of the LPT port. Furthermore, you must define the position X and Y
and the position of the tool length sensor in “Settings.”
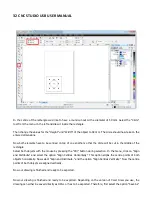
This is how to define the position of the tool length sensor:
Install the tool length sensor on the machine table. The sensor should be securely installed in a position
where it does not interfere with work, but is still readily accessible.
Perform a homing run of the machine.
After homing, use the “Manual drive” to position the machine as close as possible directly above the tool
length sensor. Use “Manual drive” to lower the Z axis carefully and check the position. The inserted tool should
be centred above the sensor.
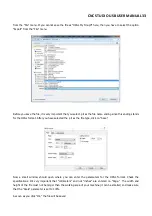
Once the tool is centred above the sensor, change the window from “Program” to “Settings.”
Click the mouse on the button “Accept current positions” in the “Tool length sensor” section.
Save the settings.
Your tool length sensor is now set up and its position has been saved.
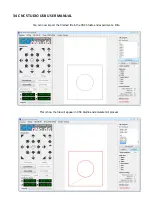
Tool#change#procedure:#
Insert the first tool in the milling motor of your machine and start a homing run.
Upon completion of the homing run, move the tip of your tool manually to the workpiece zero point and save
the position with “Save zero point.”
Now move your machine manually to a position where you can easily replace the tool and save it under “Save
park position.”
Click on “Measure tool.” The machine should now lift the Z axis to the reference switch and move it to the
position in which the sensor is installed. As soon as it has arrived over the sensor, the Z axis will be lowered
until it triggers the tool length sensor. The Z axis path is measured between the defined workpiece zero point
and the switching point of the tool length sensor. After measurement, the Z axis will be raised to the machine
zero point. The first tool has been measured.
Now if you click on “Go to zero point,” the machine should move to the zero point on your workpiece that you
set earlier.


