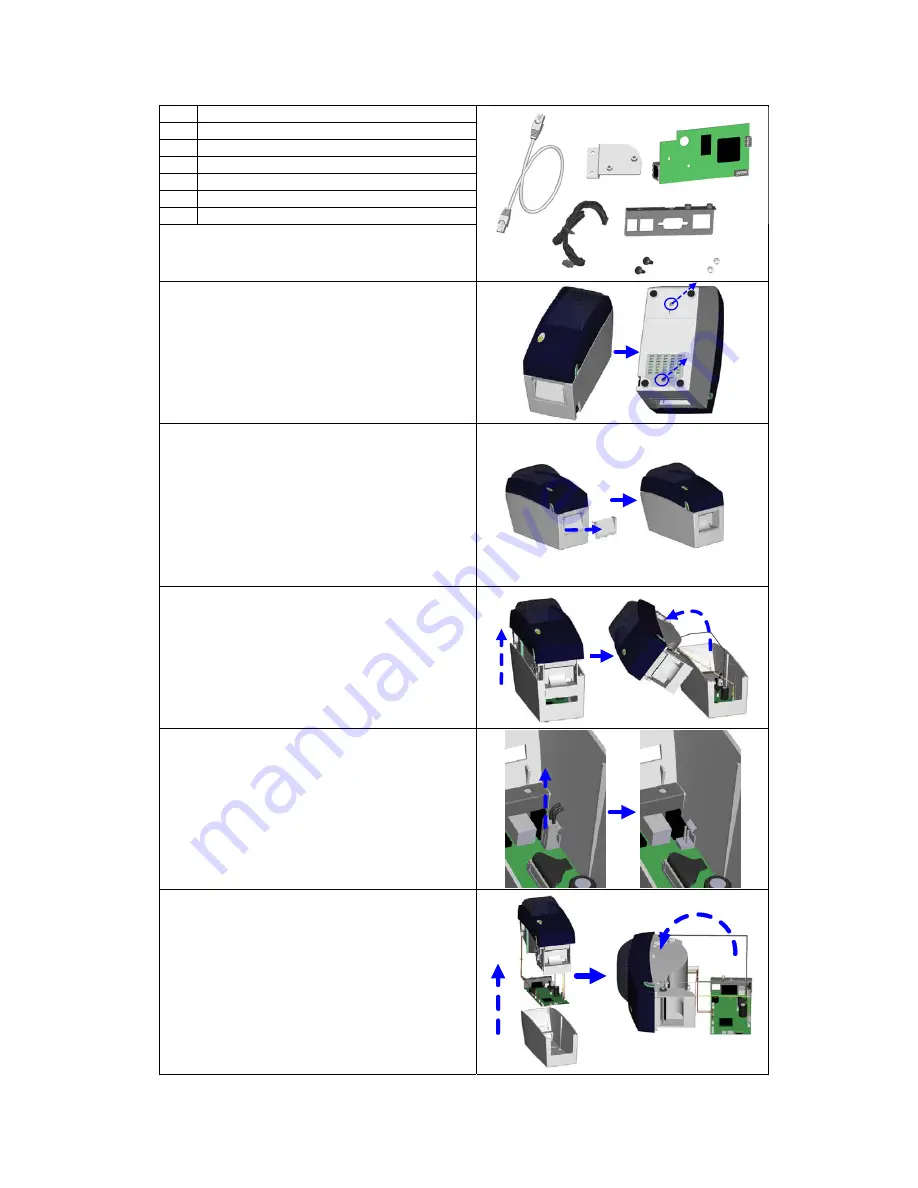
3-3. EZ-DT-2
t Module Installation
Ethernet Ca
Etherne
ble 1.8M
1
2
Module Connection Wire
3 Bracket
4 Ethernet
module
5
Ethernet Back Panel
6 Bracket
Screw*2
7 Secure
Screw*2
【
Note
】
Please make sure that anti-static precautions
are adopted during the installation.
1
2
3
5
4
6
7
1.
Make sure the power is off and the power
cable is unplugged. Place the printer onto
a smooth surface and flip the whole printer
side down.
the bottom case screws as
ated in figure.
unit up
2.
Unscrew
indic
3.
Remove the Front Cover Plate.
4.
ment and the top
Lift the middle compart
cover up.
5.
Unplug the power connector on the
mainboard.
6.
Remove the middle compartment and the
top cover together with the mainboard.
7.
ompartment and the
ainboard.
Turn over the middle c
top cover to the left side of m
EZ-DT-2/EZ-DT-4 User’s Manual
20
Summary of Contents for EZ-DT-2
Page 1: ...User s Manual EZ DT 2 EZ DT 4 P N 920 012511 03 Rev A 08 2009 ...
Page 34: ...Appendix 1 EZ DT 2 Certifications EZ DT 2 EZ DT 4 User s Manual 33 ...
Page 35: ...EZ DT 2 EZ DT 4 User s Manual 34 ...
Page 36: ...EZ DT 2 EZ DT 4 User s Manual 35 ...
Page 37: ...EZ DT 2 EZ DT 4 User s Manual 36 ...
Page 38: ...EZ DT 2 EZ DT 4 User s Manual 37 ...
Page 39: ...2 EZ DT 4 Certifications EZ DT 2 EZ DT 4 User s Manual 38 ...
Page 40: ...EZ DT 2 EZ DT 4 User s Manual 39 ...
Page 41: ...EZ DT 2 EZ DT 4 User s Manual 40 ...
Page 42: ...EZ DT 2 EZ DT 4 User s Manual 41 ...


