


Features
1. This flash unit uses internationally recognized Li-ion polymer battery which has long runtime. The
available charge-and-discharge times are over 500.
2. It is reliably safe. The inner circuit is against overcharge, overdischarge, overcurrent, and short circuit.
3. Take only 3 hours to fully charge the battery by using the included battery charger.
Cautions
Do not short circuit.
Do not expose to rain or immerse into water. This battery is not water proof.
Keep out of reach of children.
No over 24 hours’ continuous charging.
Store in dry, cool, ventilated places.
Do not put aside or into fire.
Dead batteries should be disposed according to local regulations.
Please charge the battery to approx. 60% before being placed for long time.
To extend the battery life, it is recommended to charge the battery every three months.
It is recommended to replace with a brand-new battery after over 500 charge-and-
discharge times or three-year usage of battery.
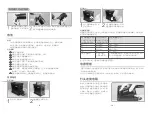
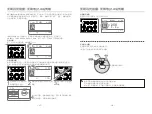
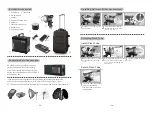
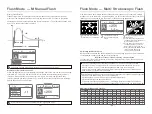
Push down the battery
2
pack until it is locked.
Put the battery into the
1
battery compartment.
When the Direction Adjusting
1
Handle is not pulled out, screw
clockwise while unscrew anti
clockwise.
The Direction Adjusting Handle's rotation angle should be
2
restrained from 0 to 240 degrees below the flash body. Please
pull out the Direction Adjusting Handle, adjust the appropriate
angle, and manipulate the step 1 before colliding with the flash
body.
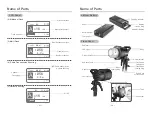
Name of Parts
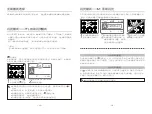
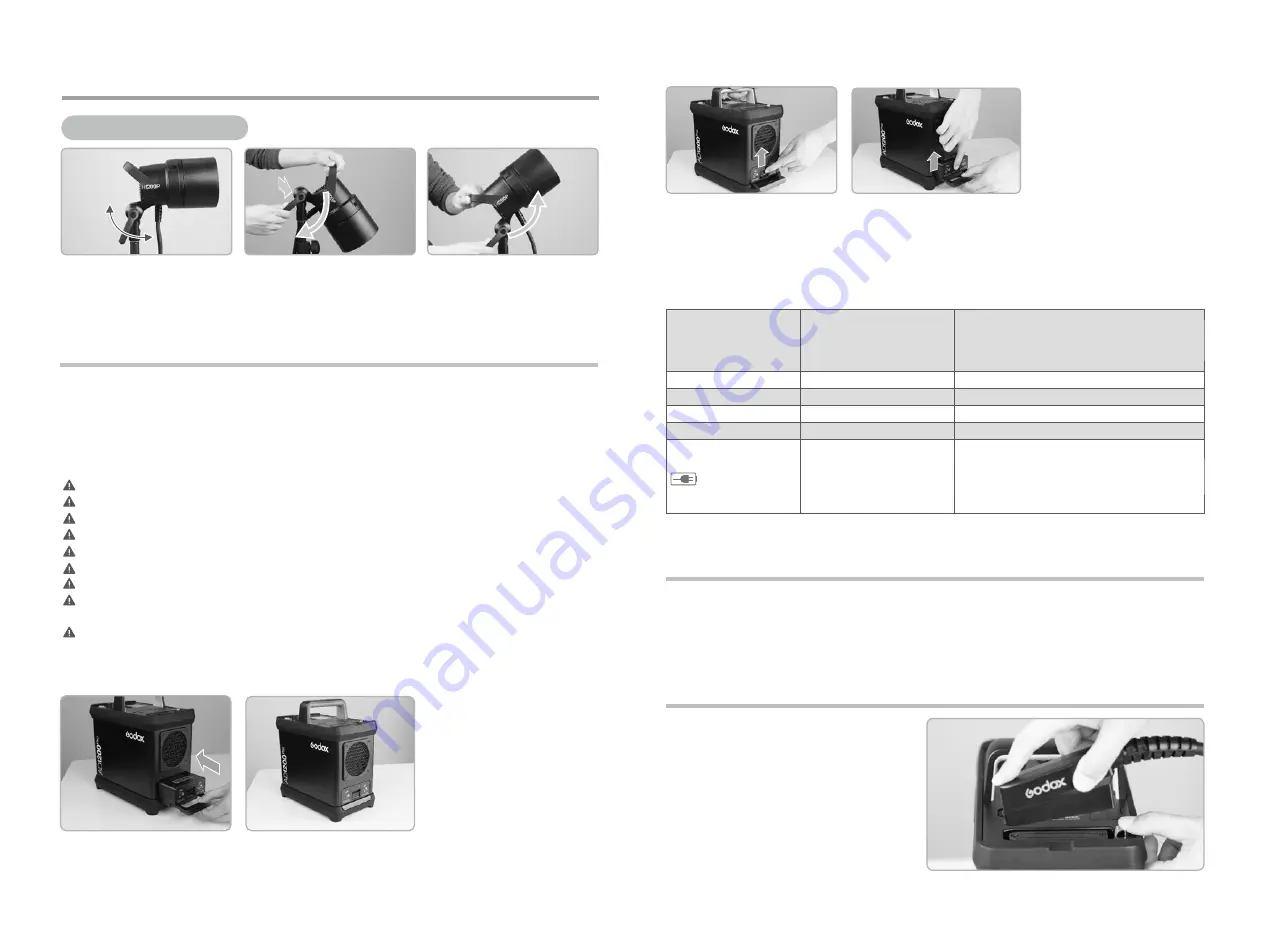
Hold upward the the
2
Battery Locking Ring,
and take the battery out.
Push up the Battery
1
Locking Ring and the
rod pop out.
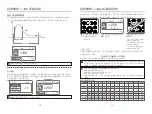
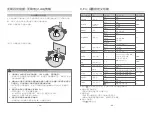
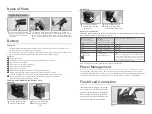
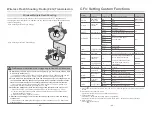
Battery Level Indication
Attach the battery pack to the flash correctly. Be aware of the battery level by check the battery
level indication on the LCD panel when using.
Insert the power cord plug of flash head
into the power socket. Please insert the
tail end of the plug into the slot firstly and
insert the other end to finish installation.
When taking the plug out, hold down the
spring and pull out the plug upwards.
Adjusting Handle
Battery
Loading and Unloading the Battery Pack
Loading
Unloading
Note: The indications are almost the same except of grids shift.
3 grids
2 grids
1 grid
Blank grid
Low battery and
charging reminder
1 red grid +3 green grids
1 red grid +2 green grids
1 red grid +1 green grid
1 red grid
2%: red light blinks
1%: the indicator is off.
75%~100%
50%~75%
25%~50%
3%~25%
Battery Level Indication
on the LCD Panel
(
Indicating battery level and
management of the whole flash
system
)
LED Battery Level Indication on
the Battery
(Indicating battery level and
management of non-loaded battery)
<2%
The battery level is going to be used out immediately.
And the flash will alarm for the 1 minute and auto power
off in 3 minutes. Note: Please recharge the battery as
soon as possible (within 10 days). Then, the battery can
be used or be placed for long period.
Meaning/Percentage of Battery Level
Power Management
Long press the Power Switch for 1 seconds to control the on/off of the flash unit. Turn off the
power pack if the flash unit will not be used for an extended period. This product has auto power
off function. The flash will auto power off in 30 to 120 min. which is set on C.Fn-STANDBY.
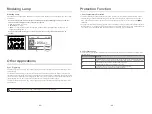
Flash Head Connection
- 35 -
- 36 -


