Deutsch |
2
6. FAQ
English
|
19
Questions
Answers
Battery
▶
Is it okay not to use them for a long time
▶
Charge the battery every 6 months, otherwise it may deteriorate in performance after 6
months.
▶
Does charging after each use affect
battery life
▶
Suggestion: When the remaining battery time is only 25% (a light on the display) or when the
battery is exhausted, it should be recharged to increase the battery life.
Usage
▶
If the tool housing is used continuously in
conventional riveting mode (D) for a certain
period of time, will the heating in the tool
housing affect normal use?
▶
As the high-speed motor causes the gear to rotate, the heat generated during the riveting
process is transferred to the outside, which does not affect the normal use of the tool.
The user is advised to wear suitable protective gloves.
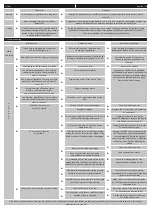
7. Troubleshooting
Malfunction
Probable cause
Correction of defects
While
charging
▶
▶
The battery is plugged into the charger
and the green light is on
▶
Battery malfunction or damage, error,
charging not possible.
▶
Stop charging immediately, remove the
battery and replace it with a new battery.
Abnormal charging temperature (battery over
-
heating) outside normal range (0°C~45°C)
▶
Red light is on while the battery is charging
▶
Immediately switch off the power,
remove the battery and check the
charger
U
S
A
G
A
G
E
▶
All displays on the function panel flash
▶
Low power alarm
▶
Remove the battery
▶
The indicator light flashes once within a
certain period of time and switches off
after 15 seconds.
▶
Motor short-circuit alarm
Please send the battery to qualified,
professional maintenance personnel for
inspection and repair. If in doubt, please
contact the authorised dealer in good
time for advice and repair.
▶
The indicator light flashes within a certain
period of time and switches off after 15
seconds.
▶
Overheating alarm of the control unit
▶
The indicator light flashes 4 times
within a certain period of time
and switches off after 15 seconds.
▶
Engine blockage alarm
▶
▶
The indicator light flashes 5 times within
a certain period of time and switches off
after 15 seconds.
▶
Switch-on error or abnormally high current
flow
▶
The blind rivet nut was
not set correctly.
▶
Thread of blind rivet nut damaged.
▶
▶
Use a new blind rivet nut.
Mandrel damaged.
Replace the mandrel (see P8 Replacing
accessories).
▶
The setting head of the blind rivet nut is not in
contact with the threaded sleeve.
▶
Length of mandrel is incorrectly
adjusted; adjust according to the length
of the blind rivet nut (see S9).
▶
Discharge the battery. Check the power
indicator panel.
▶
Charge (see S9: Battery check, for use with
P14 batteries and chargers).
▶
The mandrel cannot be
be pulled in
▶
Too high traction force or too long working
stroke, as a result of which the thread of the
blind rivet nut will be deformed or damaged.
▶
Unscrew the blind rivet nut manually with
the Allen key see 4.3) Unscrewing blind
rivet nuts manually. Adjust the traction
force or working stroke (see 3.1) Adjusting
the traction force and 3.2) Adjusting the
stroke
▶
Use a new blind rivet nut.
Blind rivet nut thread damaged
▶
▶
Use a suitable blind rivet nut.
Blind rivet nut thread not centred or
perpendicular on flange/set head
▶
The intended hole of the riveted plate is not
perpendicular to the plane, or the accuracy of
the rounding does not meet the requirements.
▶
Check the intended bore of the
workpiece and machine it after
▶
Premature termination of the riveting process
before the tool stops working completely.
▶
Wait until the tool stops working
completely 4.) Tool Operation (Important
tips before starting work)
▶
▶
The blind rivet nut is not perpendicular to the intended
hole of the workpiece during processing.
▶
Make the correct setting for operation.
4.) Tool Operation (Important tips before
starting work)
▶
Loose blind rivet nut after rivet installation
▶
The traction force is too low.
▶
Adjust the traction force correctly (see
3.1 Adjusting the traction force)
The blind rivet nut is loosened before the set
working stroke is reached.
▶
Set the working stroke correctly (see
3.2) Setting the stroke
▶
If the above method does not remedy the situation, the riveting tool must be repaired by professional personnel or the tools must be returned to the seller or
manufacturer for repair!
20
| English
8. Protection conditions & CE certification
Warranty period & maintenance protection
Our products offer lifetime after-sales service and if any manufacturing quality
problem is found in use, we provide three warranties.
The warranty period for this tool is 1 year and the start date is based on the sales
invoice.
Damage caused by normal wear and tear, overloading, improper use or by human hand
is not covered by the warranty.
For the quality problem of the tool itself, free repair or replacement within the
warranty period.
Free repair or replacement under warranty, only complete tools that have not been
opened independently will be accepted. Wear parts are not covered by the warranty.
In case of abnormal use, the manufacturers are not responsible for the quality and
does not take into account storage, accident, misuse, loss and failure due to
non-conformity of the equipment. The highest liability for damages is limited to the
value of the product itself and does not cover the relevant parts.
If you have any questions, please contact your local dealer or GOEBEL directly for
assistance immediately.
We hereby declare that this battery tool complies with the following standards and the
standard documentation when used in accordance with the operating instructions.
CE Certification
EC Compliance Statement
EN 62841-1:2015/AC:2015,
EN 60335-1:2012/A11:2014,
EN 55014-1:2006+A1:2009+A2:2011,
EN 55014-2:2015, EN 61000-3-2:2014,
EN 61000-3-3:2013
related to CE Directive(s):
2006/42/EC (Machinery)
2014/35/EU (Low Voltage)
2014/30/EU (Electromagnetic Compatibility)
www.goebelfasteners.com

