background image

2

 | Deutsch

3

 | English

Safety precautions

Use of the battery

• 

Do not charge damaged, contaminated or wet batteries.

• 

Batteries must not be thrown into water or fire at any time, and used batteries must 

not be disposed of at will.

• 

Do not charge when the ambient temperature is below 0°C or above 45°C.

Use of the charger

• 

The original battery and the manufacturer's charger must be used for charging.

• 

The battery must not be charged with a damaged, dirty or damp charger.

• 

Do not place metal objects in the charging area as a short circuit may occur.

• 

This charger must not be used by persons with disabilities, mental disabilities or 

persons without training or knowledge unless a safety officer is on site to supervise 

or instruct them in the use of the charger.

Danger

• 

Do not use the riveting tool in a damp environment or near flammable liquids and 

gases. Risk of explosion!

• 

Do not point the riveting tool at yourself, others or animals.

• 

Do not load in a damp environment, near an open fire or in an environment with       

flammable, highly combustible gases that can easily be detonated.

Warning

• 

Tools should be placed so that they do not fall down to avoid unnecessary damage 

and safety accidents.

• 

When installing the battery, make sure to fix its position. An audible "click" sound will  

indicate that the battery is in place.

• 

When servicing this riveting tool, the battery must be removed.

• 

Before charging, check that the charger and its power supply equipment are in good 

condition.

• 

Use a power supply unit that matches the charger.

• 

Plugs, power cords and chargers should be checked regularly. If a problem is found, it 

should be repaired by qualified maintenance personnel.

• 

Maintenance personnel must have professional skills; only qualified professionals 

can carry out repairs. If in doubt, please return the unit to the authorised dealer or            

manufacturer for repair.

• 

Original spare parts must be used during maintenance.

www.goebelfasteners.com

Summary of Contents for GO-RN1

Page 1: ...innovative fastener solutions GO RN1 GO RN2 GO SN1 Cordless Blind Rivet Nut Battery Tool User Manual ...

Page 2: ...n force 3 2 Adjusting the stroke 3 3 Setting the riveting mode 3 4 Riveting in fully automatic riveting mode 3 5 Riveting in conventional riveting mode 11 11 12 13 14 14 14 4 Tool Operation important tips before starting work 4 1 Instructions for presetting the blind rivet nut 4 2 Checking the set blind rivet nut 4 3 Unscrewing blind rivet nuts manually 4 4 Setting instructions for the riveting pr...

Page 3: ...to riveting blind rivet nuts and must not be used for impact or other purposes such as a hammer Do not overload the blind rivet nut tool Please use it only within the range speci fied in the function settings see page 10 12 Do not block the ventilation openings of the motor Do not insert any objects into the ventilation openings It is recommended to wear safety glasses and personal protective equi...

Page 4: ...losion Do not point the riveting tool at yourself others or animals Do not load in a damp environment near an open fire or in an environment with flammable highly combustible gases that can easily be detonated Warning Tools should be placed so that they do not fall down to avoid unnecessary damage and safety accidents When installing the battery make sure to fix its position An audible click sound...

Page 5: ...tact the dealer for purchase Repair The warranty period is 1 year from the date of sale Excluded from this are quick wear parts noted on page 8 Failure to comply with the relevant installation and commissioning instructions or failure to follow the operating procedures may void the warranty Environmental protection and resource recovery When replacing lithium batteries used in this product be sure...

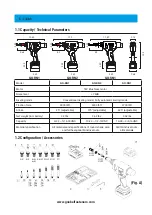
Page 6: ...ting mode Traction force 4000 lbft 6000 lbft 4700 lbft Stroke 25 adjustable 375 adjustable 625 adjustable Net weight incl battery 3 3 lbs 3 62 lbs 3 62 lbs Capacity 6 32 5 16 18UNC 10 24 1 2 13UNC 10 24 3 8 16UNC Material specification All materials and specifications of round shank semi and full hexagonal blind rivet nuts Split blind rivet nuts all materials 1 2 Configuration Accessories Fig A 11...

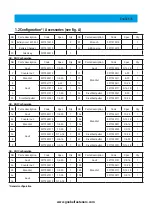
Page 7: ... 4 20 24 Rivetbolt puller 2277032971 10 24 GO RN1 Configuration General configuration NO Parts description Code Spec Qty NO Parts description Code Spec Qty 1a Anvil 2277030111 1 4 20 1 13a Mandrel 2277032611 10 24 1 2a Counter nut 2277030210 1 14a 2277032711 5 16 18 1 3a Mandrel 2277030311 1 4 20 1 15a 2277032821 3 8 16 1 6a Anvil 2277031911 10 24 1 16 2277033020 1 2 13 1 7a 2277032010 5 16 18 1 2...

Page 8: ...2 Deutsch 7 English Abb B Abb B 1 3 Part list Fig B www goebelfasteners com ...

Page 9: ...277031310 PCB Set 1 27 2277032711 Mandrel 5 16 18 1 2277032961 Rivbolt puller 8 32 1 2277032981 Rivbolt puller 1 4 20 1 2277032971 Rivbolt puller 10 24 1 GO RN1 Parts List NO Standard Code Parts description Qty NO Standard Code Parts description Qty 1a 2277030111 Anvil 1 4 20 1 20a 2277032010 Anvil 5 16 18 1 2a 2277030210 Counter Nut 1 21 2277032121 Anvil 3 8 16 1 3a 2277030311 Mandrel 1 4 20 1 22...

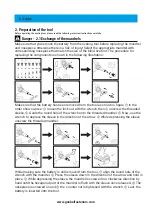
Page 10: ...ure In the order shown above loosen the lock nut with the wrench then unscrew the threaded sleeve Guide the round hole of the wrench onto the threaded mandrel Now use the wrench to depress the sleeve in the direction of the arrow While depressing the sleeve unscrew the threaded mandrel While making sure the battery is still removed from the tool align the round hole of the wrench with the mandrel ...

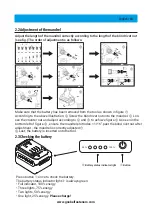
Page 11: ...rrectly according to the length of the blind rivet nut see fig The order of adjustment is as follows Make sure that the battery has been removed from the tool as shown in figure According to the above illustration Screw the blind rivet nut onto the mandrel Loo sen the counter nut and adjust according to and to achieve figure As seen in the bottom left of figure ensure the mandrel protrudes 1 16 pa...

Page 12: ...raction mode L green light on not flashing The tractive force mode L stands for low tractive force Tractive force mode H stands for high tractive force Please set the traction force according to the specifications and the strength of the blind rivet nut Before setting the traction force enquire about the technical values of the blind rivet nut and its range of application To avoid excessive stress...

Page 13: ...m on page 13 with a total stroke of 0 25 inches according to diagram Page 13 which is the maximum stroke setting when all 10 stroke setting lights are on Press the button again briefly after the achieving the full stroke length all lights on and the stroke goes back to the minimum stroke setting of 0 0083inches and the 1 stroke indicator light will be illuminated see figure labeled 1 below If ther...

Page 14: ...0 0375 1 0 0208 0 0416 0 0624 2 0 0332 0 0415 0 0498 2 0 05 0 0625 0 075 2 0 0832 0 104 0 1248 3 0 0581 0 0664 0 0747 3 0 0875 0 1 0 1125 3 0 1456 0 1664 0 1872 4 0 083 0 0913 0 0996 4 0 125 0 1375 0 15 4 0 208 0 2288 0 2496 5 0 1079 0 1162 0 1245 5 0 1625 0 175 0 1875 5 0 2704 0 2912 0 312 6 0 1328 0 1411 0 1494 6 0 2 0 2125 0 225 6 0 3328 0 3536 0 3744 7 0 1577 0 166 0 1743 7 0 2375 0 25 0 2625 ...

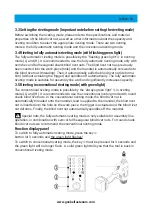
Page 15: ...mode is suitable for assembly line work and significantly increases capacity 3 5 Riveting in conventional riveting mode with green light The conventional riveting mode is possible by the always green light in riveting mode L and H It is recommended to use the conventional riveting mode with round shank blind rivet nuts In the conventional riveting mode the blind rivet nut is automatically threaded...

Page 16: ...tion performance will vary greatly Therefore pre installation sample riveting is required when the function is set before official riveting Fig 1 We recommend that you use GOEBEL brand blind rivet nuts for optimum processing 1 Screw the blind rivet nut manually by turn according to the above illustration vertically and straight onto the mandrel Press the blind rivet nut in the direction of the arr...

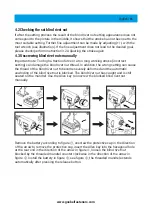
Page 17: ... the blind rivet nut thread In addition the wrong setting can cause the thread of the blind rivet nut to become severely deformed and the automatic unwinding of the blind rivet nut is blocked The blind rivet nut has caught and is still seated on the mandrel Use the Allen key to unscrew the blocked blind rivet nut manually Remove the battery according to figure unscrew the protective cap in the dir...

Page 18: ... the mandrel retracts automatically unwinding of the blind rivet nut and the riveting process is completed 4 5 Riveting in special applications The blind rivet nut is placed on the mandrel in the direction of the arrow and automatically spindled on please note the vertical alignment The blind rivet nut is inserted into the workpiece in the direction of the arrow please note the vertical alignment ...

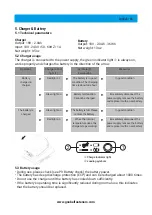
Page 19: ...ove the battery and replace it with a new battery The battery is charged Green light on The battery is full Please remove the battery In good condition Red light on When the internal temperature rises the charger stops working Immediately disconnect the power supply remove the battery and replace it with a new battery Battery Output 18V 2 0Ah 36Wh Net weight 13oz 1 2 5 3 Battery usage During use p...

Page 20: ...thin a certain period of time and switches off after 15 seconds Switch on error or abnormally high current flow The blind rivet nut was not set correctly Thread of blind rivet nut damaged Use a new blind rivet nut Mandrel damaged Replace the mandrel see P8 Replacing accessories The setting head of the blind rivet nut is not in contact with the threaded sleeve Length of mandrel is incorrectly adjus...

Page 21: ...ranty In case of abnormal use the manufacturers are not responsible for the quality and does not take into account storage accident misuse loss and failure due to non conformity of the equipment The highest liability for damages is limited to the value of the product itself and does not cover the relevant parts If you have any questions please contact your local dealer or GOEBEL directly for assis...

Page 22: ...NOTIZEN NOTES NOTES ...

Page 23: ...NOTIZEN NOTES NOTES ...

Reviews: