background image

A

LL 

M

ODELS 

#3005SS, #3008SS, 3015 

Tornado  

and  

Whirlwind  Floss  Machine


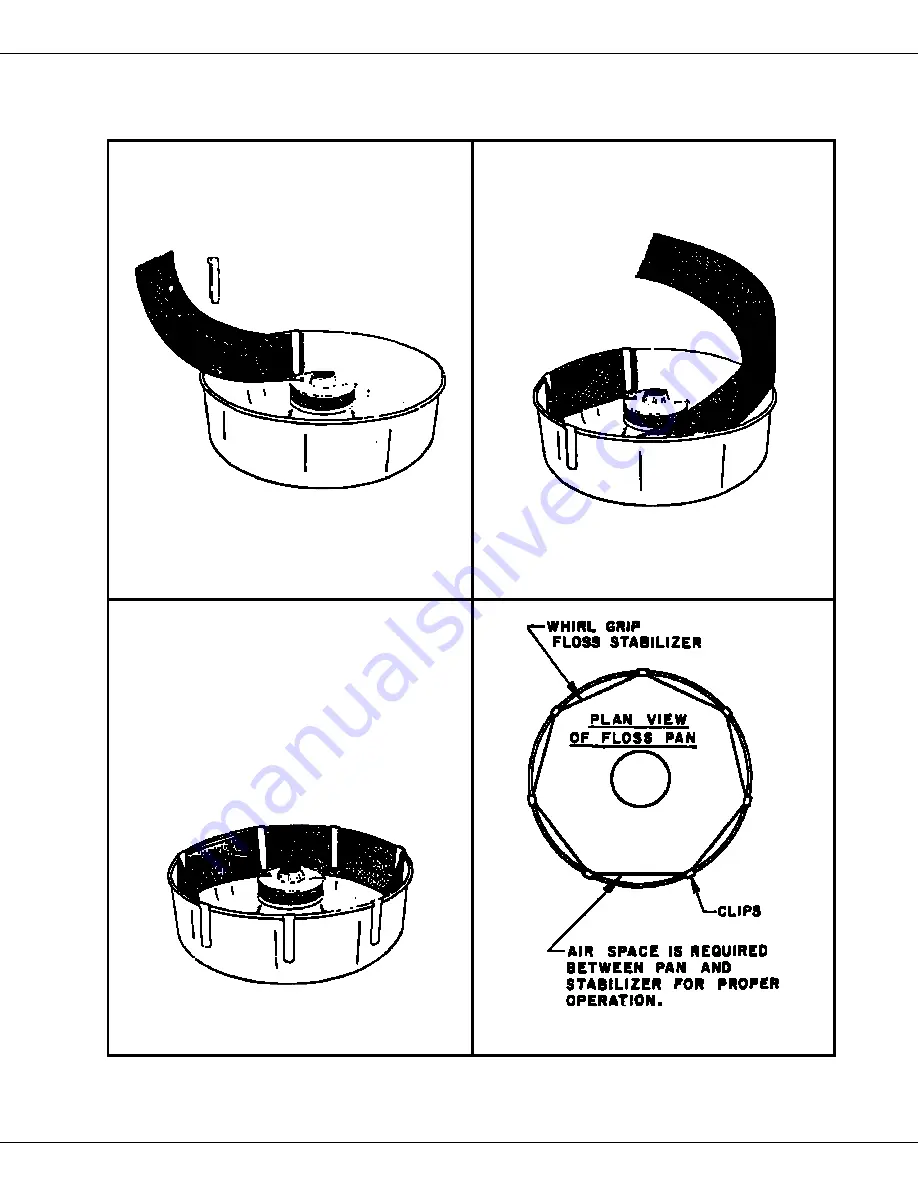
INSTALLATION OF WHIRL GRIP FLOSS STABILIZER


1


2


3


Summary of Contents for Deluxe Whirlwind

Page 1: ...Tornado and Deluxe Whirlwind Instruction Manual Part No 42117 Model No 3005SS and 3008SS Cincinnati OH 45241 4807 USA Tornado Model 3005SS Whirlwind Model 3008SS ...

Page 2: ...ons to this equipment will void the warranty and may cause a dangerous condition NEVER make alterations to this equipment Read the Installation Operating and Maintenance Instructions thoroughly before installing servicing or operating this equipment 014_051514 WARNING Floss head rotates at high speeds Operator MUST keep hands and face clear of the floss head to avoid injury Operator must wear eye ...

Page 3: ...uipment by the public when used in food service locations Only personnel trained and experienced in the equipment operation may operate this equipment Carefully read all instructions before operation 012_010914 WARNING This machine is NOT to be operated by minors 007_010914 Note Improvements are always being made to Gold Medal s equipment This information may not be the latest available for your p...

Page 4: ...king material Remove the shipping support angles which protect the suspension springs during transit Retain these for future use when you transport the machine LOCATION Place the floss machine in the Unifloss Stand or on a suitable table or bench Ventilation around the machine is important to insure long life of the components Be sure to allow a minimum of six inches around each side and no restri...

Page 5: ...lure to wire properly will void the warranty and may result in damage to the machine It is Gold Medal Products Co s recommendation that this machine be plugged directly into a wall outlet The use of extension cords is not recommended due to safety concerns and may cause sacrificed and or reduced performance Make sure cord is located to prevent a trip hazard or unit upset BEFORE YOU PLUG IN MACHINE...

Page 6: ...de a normal operating range HEAT CONTROL This is a variable transformer used to provide finer control across the pre selected range of the heat switch It increases or decreases the voltage to the spinner head raising or lower ing the heat to the head On the door panel surrounding the heat knob are red and blue graduated scales from 1 to 9 designed to correspond with the setting of the heat switch ...

Page 7: ...b of floss that is building up in the pan Usually some floss will stick to the cone Lift up the cone with the ring of floss attached and by rotating the cone wind the floss onto it Do NOT roll floss onto the cone while it is inside the pan This will just pack the floss onto the cone causing you to use more floss to fill the cone and result in less cones of floss per load of sugar For additional he...

Page 8: ... and could impart a bitter taste to the candy There is a limit as to how dark you can make cotton candy that s because it is 98 air and we cannot color the air Today 99 of the sugar manufactured is Extra Fine Granulated which does have some small particles which can slip thru the ribbons without being melted If this becomes objectionable you can seek out Medium Coarse or sanding sugars The larger ...

Page 9: ...ALL MODELS 3005SS 3008SS 3015 Tornado and Whirlwind Floss Machine 8 INSTALLATION OF WHIRL GRIP FLOSS STABILIZER 1 2 3 4 ...

Page 10: ...ss with the cone 4 Lift web of floss from the pan and roll onto the cone 5 Remember Let the machine do the work 6 7 8 FLOSS MAKING PROCEDURES Add Flossugar only while motor is off Then manually spin the head to balance This will eliminate excessive vibration of the head When adding sugar always fill about 90 full DO NOT OVERFILL Keep hands away from spinning head ...

Page 11: ...on each time 7 Read the section in this manual on Making Floss before going into full production X 15R WHIRLWIND 1 Plug in floss machine 2 Before turning on the main power and motor switch and with the spinner head stationary fill the floss head about 90 full with sugar Do Not Over Fill Whenever you add sugar to the floss head always fill the head about 90 full This is necessary to obtain a balanc...

Page 12: ...tream of air Hold it open with your free hand and stuff the floss in the bag cone and all 5 To Sell More Cotton Candy you should always rotate your colors often The easiest way is to use Flossugar in the eight exciting color flavor combinations Simply pour from the handy half gallon carton into the floss head and presto you have a new color Always change colors as the floss head runs out of sugar ...

Page 13: ...counter top cutout size and shelf location request drawing numbers B 3374 and C 3418 from Gold Medal Products Company After the top half of the Unifloss Stand is in position tilt the floss machine and position the spinner head in the center of the cutout NOTE Make sure shipping support angles are re moved as indicated in the installation section of this manual Place the spun aluminum pan over the ...

Page 14: ...quipment into the receptacle 008_051514 DANGER Improper installation adjustment alteration service or maintenance can cause property damage injury or death Any alterations to this equipment will void the warranty and may cause a dangerous condition NEVER make alterations to this equipment Read the Installation Operating and Maintenance Instructions thoroughly before installing servicing or operati...

Page 15: ...which is fractured as centrifugal force can cause it to be thrown off with consider able force Gold Medal Floss Ribbons Heat Elements are made of nickel nikrome wire with ceramic insulation at the terminal point and on the lead wires They are designed to be as reliable as the Gold Medal Floss Bands however ther are certain cau tions which must be exercised in the handling of the ribbons The most c...

Page 16: ...l the sugar dissolves Bump the band inthe palm of your hand to loosen the ribbons for removal At this point you are ready to inspect clean and or replace your bands and ribbons If the ribbon has been removed for cleaning an additional soaking in hot water should remove the rest of the carbon build up If the carbon persist in sticking to the ribbons it must be burned off by inducing electric curren...

Page 17: ...wear Rings should not be flush with the phenolic parts and or worn unevenly Inspect brushes for proper seating wear and free movement Brushes should not be allowed to wear down smaller than INSPECTION CLEANING AND MAINTENANCE 1 Unplug the machine before cleaning and servicing 2 Place motor and heat switches in off position Remove the retainer screws and brush cover Using a damp cloth and blunted i...

Page 18: ...e pits tht sanding will not remove they should be re placed The replacement of slip rings is considered more involved than normal field maintenance To be done correctly you should have machine shop facilities Head assemblies may be returned to Gold Medal to have this maintenance performed We furnish a rebuilt head assembly if you do not have the time to send in the one from your machine For open a...

Page 19: ...n order to get the assembly together again 6 Thread one slip ring stud into one slip ring allowing approximately one inch to protrude through This will be the top ring Thread the other slip ring stud through the other ring allowing it to protrude approximately two inches This will be the bottom ring Now re assemble the phenolic parts and rings on the head casting in the order that they were disass...

Page 20: ...is best to have them checked by a competent electrician or returned to Gold Medal for repair However here is a simple check you can perform to determine which component is at fault Disconnect motor lead wires and induce current directly into the motor If the motor runs you have a faulty motor switch If the motor fails to run it is the faulty part When removing wires be sure to remember which termi...

Page 21: ...ow line voltage Have an electrician check the line voltage and add new lines if there is not enough current for the requirement listed on the equipment name plate NOTE The Tornado and Deluxe Whirlwind equipment have the ability to increase the line voltage approximately 20 4 Check the ribbons One burned out or shorted ribbon will cut production in half 5 Foreign objects in the head assembly may sh...

Page 22: ...de part number part name and quantity needed 4 Please include your model number serial number and date of manufacture located on the machine nameplate data plate with your order 5 Address all parts orders to Parts Department Gold Medal Products Co 10700 Medallion Drive Cincinnati Ohio 45241 4807 Or place orders by phone or online Phone 800 543 0862 513 769 7676 Fax 800 542 1496 513 769 8500 E mail...

Page 23: ...Tornado and Whirlwind Floss Machine CABINET ASSEMBLY 23 ALL MODELS 3005SS 3008SS 3015 ...

Page 24: ...Sugar Seal Baldor Motor 20051 20051 20051 3 8 Hex Motor Mount Bolt 6 42310 42310 42310 Bottom Cover 7 42049 42049 42049 Pan Support 9 42065 42065 n a 3 16 Dia Plastic Plug 10 42022 42022 48027 Heat Control Knob 11 42042 42042 42042 8 32 Door Mount Screw 12 47155 47155 47155 High Rubber Feet 13 43148 43148 43148 Stainless Steel Door Assembly 14 n a 47364 47364 15 Amp Circuit Breaker PARTS NOT SHOWN...

Page 25: ...Tornado and Whirlwind Floss Machine X 15R WHIRLWIND ASSEMBLY 4 8 14 15 16 17 25 ALL MODELS 3005SS 3008SS 3015 ...

Page 26: ... 6 20052 Brush Tension Spring Screw 7 42035 Brush Pad 8 48017 Brush Holder Insulator 9 42034 Motor Mount Casting 10 47200 Finger Guard 48018 Exhaust Blower 120V 47199 Blower Plug and Cord 11 43012 Stainless Steel Case Assembly 12 47026 Strain Relief SR 9P 2 47603 Lead In Cord 120V 13 42006 Terminal Block 14 43141 Motor Switch 15 48033 Heat Range Tap Switch 48028 Tap Switch Bar Knob 16 48010 Voltme...

Page 27: ...Tornado AND Whirlwind Floss Machine 3005SS TORNADO 3008SS DELUXE WHIRLWIND 2 12 13 14 15 17 18 27 ALLMODEIS 3005SS 3008SS ...

Page 28: ...ension Spring Screw 7 42035 42035 Brush Pad 8 48017 48017 Brush Holder Insulator 9 42034 42034 Motor Mount Casting 10 47200 47200 Finger Gaurd 48018 48018 Exhaust Blower 120V 47199 47199 Blower Plug and Cord 11 43019 n a Blue Case Assembly n a 42001 Red Case Assembly 43012 43012 Stainless Steel Case Assembly 12 42069 42069 Transformer Support Bracket 13 47603 47603 Lead In Cord 120V 47026 47026 St...

Page 29: ...Tornado and Whirlwind Floss Machine WHIRLWIND FLOSS HEAD ASSEMBLY 29 ALL MoDELS 3005SS 3008SS 3015 ...

Page 30: ...Stud Insulator Phenolic 1 15 42029 Stud Insulator Phenolic 13 32 16 42030 Stud Insulator Phenolic 5 8 17 42028 Insulator Sleeve 18 42305 Terminal Assembly 19 42308 Stud Insulator Phenolic 20 42303 Terminal Guard Phenolic 21 42311 Set Screw 1 4 20 22 48041 Acorn Nut 1 4 20 Nylon 23 42301 Hex Nut 10 32 Brass 24 42215 Washer 10 External Tooth COMPONENT PARTS NOT SHOWN ON DRAWING 74143 Hex Nut 10 32 Z...

Page 31: ...Tornado and Whirlwind Floss Machine TORNADO FLOSS HEAD ASSEMBLY 31 ALL MODELS 3005 3008AND 3015 ...

Page 32: ...Phenolic 15 42025 Top Phenolic Washer 16 42026 Center Phenolic Washer 17 20054 Bottom Phenolic Washer 18 42215 Washer 10 External Tooth 19 74143 Hex Nut 10 32 20 42032 Head Stud Brass 3 LG 21 42028 Insulator Sleeve 22 42029 Stud Insulator Phenolic 23 20020 Slip Ring 24 42030 Stud Insulator Phenolic 25 43015 Head Casting 26 42308 Stud Insulator Phenolic 27 42214 7 Double Floss Band 28 Terminal Jump...

Page 33: ...Tornado and Whirlwind Floss Machine Wiring Diagram Model 3005SS 33 ALL MODELS 3005 3008AND 3015 ...

Page 34: ...Tornado and Whirlwind Floss Machine Wiring Diagram Model 3008SS 34 ALL MODELS 3005SS 3008SS 3015 ...

Page 35: ...E IMPLIED WARRANTY OF MERCHANTABILITY THERE ARE NO WARRANTIES WHICH EXTEND BEYOND THE DESCRIPTION ON THE FACE HEREOF In no event shall Gold Medal Products Co be liable for special incidental or consequential damages No claim under this warranty will be honored if the equipment covered has been misused neglected damaged in transit or has been tampered with or changed in any way No claim under this ...

Reviews: