background image


The Breeze


Model No. 3030-00-000 


Page 8 


gmpopcorn.com

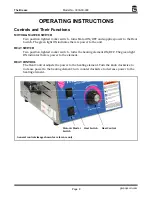
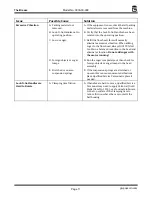
OPERATING INSTRUCTIONS 

Controls and Their Functions 
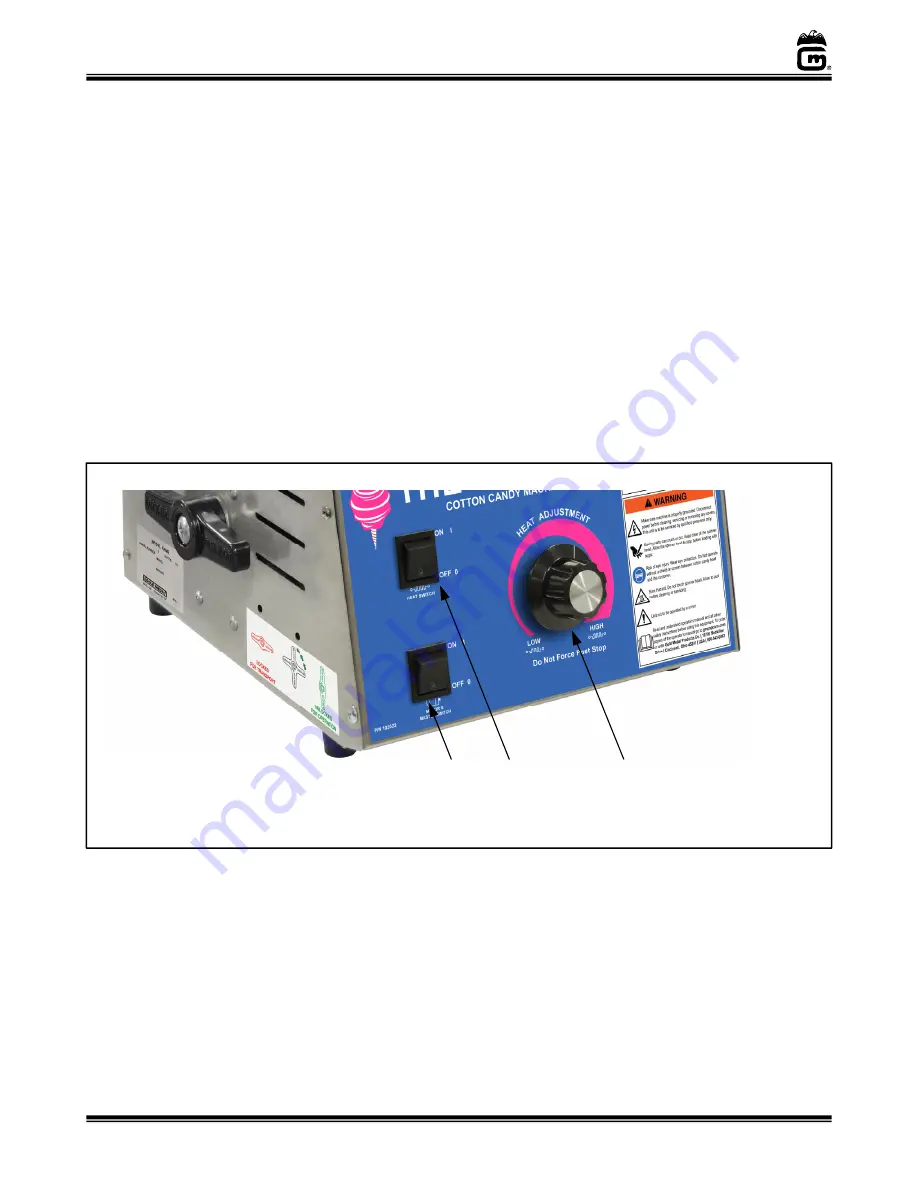
MOTOR


&


MASTER


SWITCH


Two position, lighted rocker switch - turns Motor ON/OFF and supplies power to the Heat 

Switch. The green light ON indicates there is power to the unit. 

HEAT


SWITCH


Two position, lighted rocker switch - turns the heating element ON/OFF. The green light 

ON indicates there is power to the element. 

HEAT


CONTROL


The Heat Control adjusts the power to the heating element. Turn the knob clockwise to 
increase power to the heating element; turn counterclockwise to decrease power to the 

heating element. 


Motor


&


Master


Switch


Heat


Switch


Heat


Control


General


controls


image


shown


for


reference


only.


Summary of Contents for The Breeze 3030-00-000

Page 1: ... 2018 Gold Medal Products Co Part No 110012 Instruction Manual 10700 Medallion Drive Cincinnati Ohio 45241 4807 USA The Breeze Model No 3030 00 000 ...

Page 2: ...angerous condition This appliance is not intended to be operated by means of an external timer or separate remote control system NEVER make alterations to this equipment Read the Installation Operating and Maintenance Instructions thoroughly before installing servicing or operating this equipment 014_020416 WARNING Floss head rotates at high speeds Operator MUST keep hands and face clear of the fl...

Page 3: ...ood service locations Only personnel trained and experienced in the equipment operation may operate this equipment Carefully read all instructions before operation 012_010914 WARNING This machine is NOT to be operated by minors 007_010914 Note Improvements are always being made to Gold Medal s equipment This information may not be the latest available for your purposes It is critical that you call...

Page 4: ...on of this machine since it is beyond our control reference warranty in back of manual Manual Read and understand the operator s manual and all other safety instructions before using this equipment To order copies of the operator s manual go to gmpopcorn com or write to Gold Medal Products Co 10700 Medallion Drive Cincinnati OH 45241 USA 1 800 543 0862 Model Description 3030 00 000 The Breeze cott...

Page 5: ... 2 Lock N Go handles are used for transport Rotate both handles to a vertical UNLOCKED position for use This allows the bell housing to float freely on the springs during operation DO NOT operate with handles in the transport position Step 3 Place floss pan on unit Step 5 Install Floss Stabilizer see instructions on next page Unit should be cleaned prior to use reference Care and Cleaning section ...

Page 6: ... N 77470 Clips are designed to provide air space between screening and floss pan Step 1 Place Whirl Clips over rim of pan with hooks facing inside Step 2 Hang Stabilizer on top up facing hook Screening should be about flush with top of pan Step 3 Gently pull screening down and attach to bottom down facing hook Step 4 Repeat for all clips keeping equal spacing around pan number of clips varies by m...

Page 7: ...t Failure to wire properly will void the warranty and may result in damage to the machine It is Gold Medal Products Co s recommendation that this machine be plugged directly into a wall outlet The use of extension cords is not recommended due to safety concerns and may cause sacrificed and or reduced performance Make sure cord is located to prevent a trip hazard or unit upset Before You Plug In Ma...

Page 8: ... is power to the unit HEAT SWITCH Two position lighted rocker switch turns the heating element ON OFF The green light ON indicates there is power to the element HEAT CONTROL The Heat Control adjusts the power to the heating element Turn the knob clockwise to increase power to the heating element turn counterclockwise to decrease power to the heating element Motor Master Switch Heat Switch Heat Con...

Page 9: ...T USE EXCESS COLOR Too much color will ruin the element on your machine and could create a bitter taste to the candy There is a limit as to how dark you can make cotton candy That s because cotton candy is 98 air and we cannot color the air Sugar Considerations Today 99 of the sugar manufactured is extra fine granulated which does have some small particles which can slip thru the ribbons without b...

Page 10: ...out 30 seconds When unit starts making floss reduce the heat setting Turn the Heat Control counter clockwise to eliminate smoking If the unit is operated at the startup setting it will carbonize the element CAUTION Never operate the equipment for a prolonged period of time with the HEAT CONTROL in a position that causes the sugar to smoke This will result in excessive carbonization of the heat ele...

Page 11: ... thru 8 shown below If the floss fails to stick to the cone pass the cone near the spinner head to pick up a starter of melted sugar Lift the cone out of the pan and wrap the floss with a figure eight movement of the hand This leaves giant pockets and makes the final product appear larger Make sure room humidity is not too high or product will be heavy 1 Grip cone as shown 2 Break into web of flos...

Page 12: ...loss collects low on the stabilizer twist the front leading edge of the leather floaters down You get more lift and the floss will collect higher Form leather floaters as shown below This creates a lifting action to float the floss higher on the wall of the floss pan Leather Floater Leading Edge of Leather Floaters seen twisted down Rotation ...

Page 13: ...clean appliance with a water jet Always unplug the equipment before cleaning or servicing 025_111616 WARNING Burn Hazard DO NOT touch spinner head Allow to cool before cleaning or servicing Avoid contact with molten sugar 006_092414 Good sanitation practice demands that all food preparation equipment be cleaned regularly only use non toxic food grade cleaners A clean looking well kept machine is o...

Page 14: ... nut lock nut and terminal guard 5 Remove the retaining screws which fasten the element lead wires to the terminals use a 1 4 9 5mm nut driver then remove the band and element See next page for reconnecting element leads 6 If there is excessive sugar build up run hot water over band and element until the sugar dissolves be careful to keep element leads dry When the sugar has been removed allow the...

Page 15: ... NOT OVERTIGHTEN SCREWS Initially snug down each screw evenly be careful not to over apply pressure on any single point Once snug tighten all screws evenly to secure spinner cap to floss head Band is marked to show correct orientation Floss Band Orientation Terminal Assemblies INCORRECT DO NOT connect both element leads to the same terminal assembly CORRECT Connect ONE element lead to EACH termina...

Page 16: ...h current for the requirement listed on the equipment nameplate The use of extension cords is not recommended due to safety concerns and may cause sacrificed and or reduced performance If the use of an extension cord cannot be avoided then be sure it is no longer than 10 to 12 ft and is at least 14 AWG wire D Foreign objects in the spinner head D Foreign objects in the head assembly can short out ...

Page 17: ...tain a balanced condition in the head and eliminate vibration Do not add sugar with the motor running D Foreign objects or sugar lumps D Run the sugar completely out then check for foreign objects or sugar lumps in the head assembly E Stretched or uneven suspension springs E If the suspension springs are stretched or uneven this can cause unwanted vibrations Have Qualified Service Personnel replac...

Page 18: ...ation adjustment alteration service or maintenance can cause property damage injury or death Any alterations to this equipment will void the warranty and may cause a dangerous condition This appliance is not intended to be operated by means of an external timer or separate remote control system NEVER make alterations to this equipment Read the Installation Operating and Maintenance Instructions th...

Page 19: ...his unit 3 When ordering please include part number part name and quantity needed 4 Please include your model number serial number and date of manufacture located on the machine nameplate data plate with your order 5 Address all parts orders to Parts Department Gold Medal Products Co 10700 Medallion Drive Cincinnati Ohio 45241 4807 Or place orders by phone or online Phone 800 543 0862 513 769 7676...

Page 20: ...r and Lock N Go Handle Assembly CAUTION If supply cord is damaged it must be replaced by Gold Medal Products Co its service agent or similarly qualified persons in order to avoid a hazard 26 27 28 29 30 31 24 23 25 22 13 14 11 12 19 21 20 18 17 15 16 3 7 2 5 1 6 4 9 10 8 ...

Page 21: ...ON OVERLAY 102022 9 SWITCH LIGHTED ROCKER GR 42798 10 KNOB HEAT CONTROL 42556 11 10 24 X 1 2 PH TRUSS M S 42826 12 HEX NUT 10 24 ESLOK 74691 13 RUBBER FEET 3 4IN HIGH 4 required 47155 14 HANDLE UNLOCK DECAL 102253 15 LOCK N GO HANDLE NEW CAB 56563 16 5 16 18 X 1 2 PH TR M S 12183 17 WASHER SS 5 ID X 1 10 OD 48428 18 CLAMPING SHAFT LOCK N GO 56565 19 CLAMPING CAM 42460 20 5 16 FLAT WASHER ZINC PLT ...

Page 22: ...2 gmpopcorn com 5 Spinner Head Model No 42283T Parts Breakdown 4 3 1 15 2 9 12 13 14 2 8 6 5 Spinner Head Bottom Spinner Head Complete Model 42283T 9 10 Floss Head Band Interior View 7 11 18 19 Uses two Set Screws 21 22 23 24 16 17 7 25 20 ...

Page 23: ...8715 10 8 32 LOCKNUT REVERSIBLE 48767 11 8 32 X 1 4 HX HD WHIZ LOCK 42045 12 8 INTERNAL TOOTH L W 410SS 12132 13 COUNTER WEIGHT 55006 14 188ID FLATWASHER 77052 15 SPINNER HEAD BOTTOM Complete assembly includes 2 element lead screws Terminal Guard Nylon Nut Lock Nut and items listed below 42284 16 UPPER SPINNER HEAD 42437 17 1 4 20 X 2 3 4 SET SCREW 42413 18 HEX NUT 10 32 BRASS 42301 19 10 INTERNAL...

Page 24: ...1 HEX NUT 10 24 ESLOK 74691 2 188ID FLATWASHER 77052 3 MOTOR MTG PLATE 42119 4 MOTOR FLOSS MACHINE 48649 5 6 32 X 1 2 PH PAN HD M S 47516 6 6 32 GRIP NUT ZINC PLATED 47517 7 BRUSH HOLDER ASSEMBLY includes Brushes Caps and Holders 42382W 8 DUAL BRUSH HOLDER W LEADS 42436W 9 CARBON BRUSH 55007 10 CAP BRUSH HOLDER 42138 9 10 8 7 4 3 1 2 5 6 ...

Page 25: ...or Parts Breakdown 11 12 13 14 When reassembling the unit Be sure the Bell Housing is located UNDER the Clamping Brackets as shown here Be sure to keep wiring clear of the locking mechanism 3 2 1 8 9 10 4 7 6 4 5 3024 00 000 General image shown for parts reference only ...

Page 26: ...ZINC PLATED 47517 8 TERMINAL BLOCK 2 POS 55620 9 8 32 X 3 4 PHIL PAN MS SS 39007 10 HEX NUT 8 32 STAINLESS 89129 11 ACORN NUT 1 4 20 49068 12 SPRING SUSPENSION MEDIUM 42524 13 SCREW 1 4 20X3 8 PN HD PH 42360 14 10 24 TINNERMAM FASTENER 42221 Floss Pan and Whirlgrip Stabilizer Item Part Description Part Number 3030 00 000 1 FLOSS PAN 0 080 ALUM 42040 2 WHIRLGRIP STABILIZER Includes Floss Stabilizer...

Page 27: ...The Breeze Model No 3030 00 000 Page 27 gmpopcorn com Wiring Diagram Model No 3030 00 000 ...

Page 28: ...NCLUDING THE IMPLIED WARRANTY OF MERCHANTABILITY THERE ARE NO WARRANTIES WHICH EXTEND BEYOND THE DESCRIPTION ON THE FACE HEREOF In no event shall Gold Medal Products Co be liable for special incidental or consequential damages No claim under this warranty will be honored if the equipment covered has been misused neglected damaged in transit or has been tampered with or changed in any way No claim ...

Reviews: