background image

Do  not  perform  any  servicing  on  the  Patio  Heater  yourself.  This  includes  internal 
adjustment  of  the  regulator  and  gas  valves.  Servicing  can  only  be  carried  out  by 
authorised technicians. Your Patio Heater should be serviced annually by a certified 
gas service agent. 

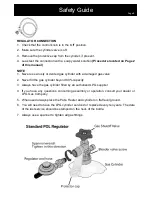
The  pressure  regulator  and  hose  assembly  supplied  with  the  Patio  Heater  must  be 
used.  Replacement  pressure  regulator  and  hose  assembly  must  be  those  specified 
by  the  manufacturer.  Replacement  parts  may  be  obtained  from the  manufacturer  or 
your local Patio Heater retail specialist. 

Storage of this Patio Heater indoors is permissible only if the cylinder is disconnected 
and removed from the Patio Heater.  

The  Patio  Heater  is  for  portable  outdoor  use  and  is  not  intended  for  permanent 
installation or installation in vehicles or boats.  

Maintenance 

Page 20 

Summary of Contents for GGOH100

Page 1: ...Operating Instructions Outdoor Patio Heater Model GGOH100 GGOH200...

Page 2: ...atio Heater that you Purge the gas line prior to attempting to ignite the Patio Heater o Do not dispose of packaging until completely satisfied with assembly of your Patio Heater Please refer to your...

Page 3: ...rotating the knob to the open position Using a brush or spray bottle apply the soap solution to the gas line and each join in the gas line including The gas connection at the inlet of the Patio Heate...

Page 4: ...ial on the LPG Cylinder SLOWLY to the on position o Press the control knob in allowing gas to come up the line and bleed it pressing control knob in for not more than 1 2 minutes or until you smell ga...

Page 5: ...fire explosion or severe personal injury including death LPG gas is heavier than air and will collect in low areas proper ventilation is extremely important Keep the ventilation opening of the LPG cy...

Page 6: ...ore than two walls Refer to Figure 2 and Figure 3 Within a partial enclosure that includes an overhead cover and more than two walls the following shall apply At least 25 of the total wall area is com...

Page 7: ...e must remain free of kinks and sharp bends Never puncture or put stress on the hose or fittings Hose connection is located at the lower front area on the right side wall of the main body of the Patio...

Page 8: ...not smoke or use a naked flame near the Patio Heater or gas cylinder while disconnecting the gas line between the Patio Heater and gas cylinder 4 Remove the gas cylinder from the enclosure before dis...

Page 9: ...ed gas valve 2 Never fill the gas cylinder beyond 80 capacity 3 Always have the gas cylinder filled by an authorized LPG supplier 4 If you have any questions concerning assembly or operation consult y...

Page 10: ...use The use of unauthorised parts will void your Warranty and can create an unsafe environment and conditions of use Never disconnect any gas fittings while the Patio Heater is in use In the event th...

Page 11: ...Parts Diagram Page 10...

Page 12: ...1 Put the 3x Support Posts part 9 in position on the Base part 10 Use 3x M8 x16mm bolts to join the Support Posts and Base Step 2 Put the Post part 7 onto the top of the 3x Support Posts part 9 Use 6x...

Page 13: ...bottom Put the Tank Housing part 8 through the Post part 7 Ensure the regulator does not fall back inside the Post Page 12 Step 4 Secure the reflector support bolts on the flame screen cap with 4x 60m...

Page 14: ...conduct a leak test Procedure located on Page 2 of this manual Fix the burner base to the post by 4x M6 x10mm bolts Page 13 Step 6 Check whether the connection of vertical post and burner are assembl...

Page 15: ...Page 14 Step 8 Secure the Reflector pieces one by one with M5 bolts and nuts Step 9 Once all four Reflector pieces are together install a M6 bolt and nut with 2x washers in the centre Step 10 Put the...

Page 16: ...ner Reflector support bolts Fit washers into each support bolt and tighten each by M8 castle nut Page 15 Step 12 Attach the Wheels by lining up holes in Wheel Bracket with corresponding holes in base...

Page 17: ...unit Take the hose that came with the Patio Heater check that it has a rubber seal on the regulator end of the hose and connect this end to the gas cylinder ensuring that the hose is not twisted You w...

Page 18: ...y again Close the gas cylinder valve after each use Never use the Patio Heater in strong winds Never lay the gas cylinder down always keep upright Never allow the flexible gas supply hose or any elect...

Page 19: ...disperse before trying again If satisfactory operation cannot be achieved consult your retailer before proceeding Note Failure to follow the lighting procedures correctly can lead to a hazardous cond...

Page 20: ...onds Then press in knob control and turn to the OFF position If your Patio Heater is connected to piped LPG you can simply turn the burner controls off It s okay to leave the cylinder connected to you...

Page 21: ...pplied with the Patio Heater must be used Replacement pressure regulator and hose assembly must be those specified by the manufacturer Replacement parts may be obtained from the manufacturer or your l...

Page 22: ...a covered location If you are storing it in a closed room eg shed or garage you should keep the cylinder away from any other cylinders or any cars boats motorcycles or any other petrol engines If you...

Page 23: ...tting and discoloration does not become worse and more visible resulting in permanent damage to your Patio Heater it should be cleaned and removed straight away This is best done with a stainless stee...

Page 24: ...Troubleshooting Page 23...

Page 25: ...ld be filled out at the time of purchase It is in your interest to make sure this is done If the product is to be replaced cannot be repaired then that replacement will be of the same or similar produ...

Page 26: ...707 NSMC Auckland New Zealand Monday Friday 8am 5pm Phone 0800 232 633 Website www goldair co nz TECHNICAL SPECIFICATION Model No GGOH100 GGOH200 Gas Type LPG Injector Size 1 9mm for Main Total Gas Co...

Reviews: